The Official F-15 Strike Eagle Handbook
by Richard Sheffield
Defensive Maneuvers
This section offers you several defensive options you can use to turn the tables in those tight spots. Don't be afraid to use the pause feature of F-15 Strike Eagle to review your options if you find yourself in trouble.
Attempt various escape techniques, and try to find one or two you feel most comfortable with. Practice and perfect those maneuvers for the best results.
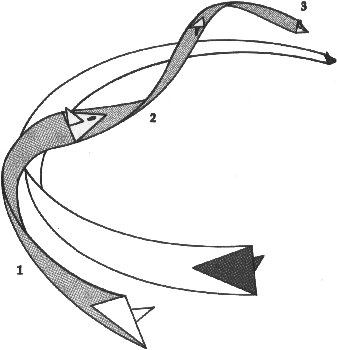
High-G Barrel Roll
Situation: An enemy aircraft is close behind, closing for a gun attack.
Maneuver:
• Break hard into the attack (1).
• Perform a Barrel Roll in the opposite direction. This could bleed off some speed and make the attacker overshoot (2).
• Roll in behind the target for a gun or short-range missile shot (3).
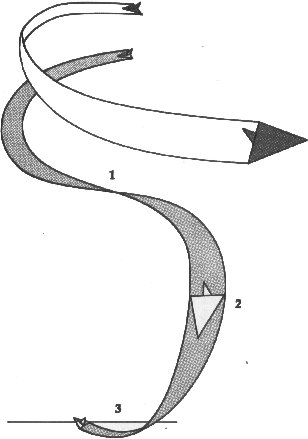
Disengagement
Situation: You're in a low-speed, hard-turning fight and can't gain an advantage after several turns. Sometimes the best maneuver is to disengage and reposition to attack again under better conditions.
Maneuver:
• Roll inverted (1).
• Pull back on the stick to start a steep dive (2).
• Keep the stick pulled back until you pull out right-side up but heading in the opposite direction (3).
Timing has a lot to do with the success of your disengagement attempt. If possible, make your move in one direction when the bogey is headed in the other.
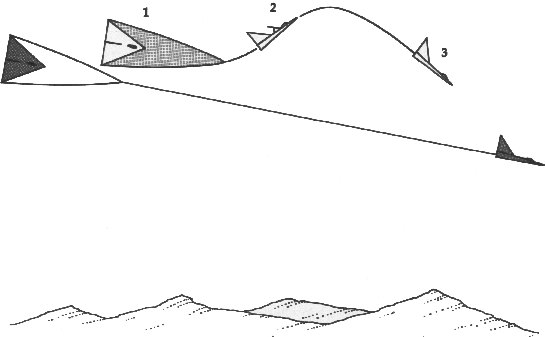
Speedbrake Reversal
Situation: An attacker is closing fast from behind.
Maneuver:
• Level out your wings (1).
• Cut your engines, pull up hard, and extend your speedbrake (2).
• As soon as the attacker appears on your screen (overshoots), retract the speedbrake and be prepared to turn hard to follow, or take a missile shot and disengage.
You must be quick to react on this one; the bogey won't like being out in front of you and will turn hard very quickly. You'll only have a good shot for a split second.
CAUTION |
Using a speedbrake reversal with less than 400 knots of airspeed won't leave you much speed for maneuvering. Use this with caution when flying at low speed. |
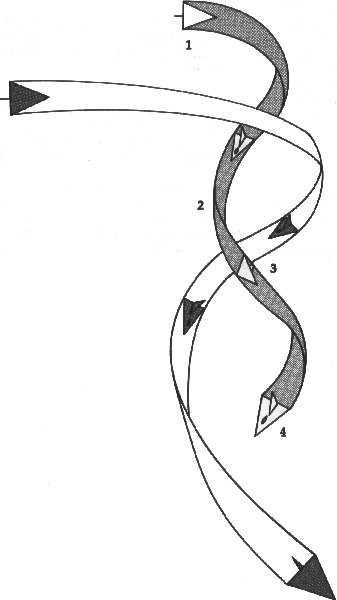
Defensive Spiral Dive
Situation: An enemy aircraft has closed to within firing distance behind you. You have at least 15,000 feet of altitude, and you want to (a) disrupt the enemy's aiming process, (b) escape, and (c) if possible, reverse the situation.
Maneuver:
• Roll to an inverted position (1).
• Pull back on the stick to start the dive (2).
• Determine the position of the attacker (3).
• Begin rolling toward the attacker. In other words, if he's to your left, push the stick to the left (4).
• As your speed builds, cut power to idle and extend your airbrake.
• If the attacker follows you down, he may overshoot at this point and allow you to take a shot.
Vertical Spiral
Situation: You're being out-turned by an enemy aircraft. Your opponent is pulling around behind you. The Vertical Spiral lets you take advantage of the excellent design of your aircraft—the F-15 can climb while it's in a hard turn.
Maneuver:
• Pull the nose up to a 30-degree climb (1).
• Roll into the attack and light your afterburners. Hold this climbing turn until you've gained 5,000-10,000 feet or so in altitude. Most air-to-air missiles fired at you will be from behind during this maneuver and can be defeated with a properly timed flare (2).
• Cut your afterburners. Locate the enemy and take a missile shot (3). Depending upon the quality of the enemy aircraft, he may or may not be able to follow you up. Also your F-15 may have a higher ceiling (max altitude) than some of the older enemy aircraft, allowing you to gain an advantage even if they try to follow you up.

Climb and turn at the same time; then locate the target and fire or dive.
Table of Contents
Previous Section: ACM Checkride 2
Next Section: ACM Checkride 3