The Official F-19 Stealth Fighter Handbook
by Richard Sheffield
Gun Accuracy
The accuracy required to destroy a target increases as you move up in difficulty levels. In other words, it's much easier to successfully strafe a target when playing against Green troops than it is playing against Veteran or Elite level troops.
At the Green troops level, all you have to do is get close to the target and it will be destroyed. At Elite level, you really have to hit the bullseye.
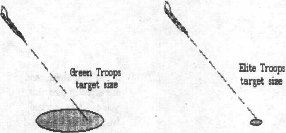
“As you increase the difficulty level, the size of a strafing target decreases forcing you to be more accurate.
Targets for Strafing
Your cannon is effective against most ground targets. Only very hard targets such as bunkers, or very large targets such as runways, buildings, and bridges, cannot be destroyed with your cannon.
Depots are especially good strafing targets, as they're often located away from other targets and they don't shoot back. Oil tanks also go up in a hurry under a gun attack.
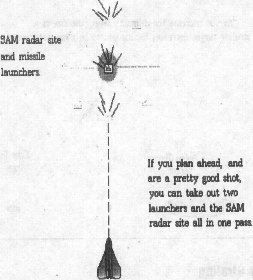
Although it may be dangerous, SAM sites can make good gun targets. If you approach from the correct angle, you can destroy two missile launchers as well as the radar in one pass. Once over the site you're pretty safe, as the SAM launchers cannot shoot straight up.
Weapons Selection
Choosing the right weapon for the right job is very important if you're to have a successful mission. Most targets can be destroyed by a number of different weapons; you should choose the one that can be delivered with the least deviation from a good stealth profile.
The AGM-65D Maverick is by far the most versatile weapon in your inventory. You should choose these whenever possible. They can be delivered from 500 feet and have the best “standoff” capability. They're extremely accurate from 16 km and reasonably accurate from 36 km.
This “standoff” ability allows you to pop up, launch the weapon, turn away from the target, and regain a good stealth profile all before the weapon hits the target and alerts the enemy to your presence. Unless you have a particular target in mind, such as a runway or sub pen (military jargon for a sub base), always fill any unused bay with Mavericks whenever they're available.
We all hate to see it, but sooner or later a mission will come up with no Mavericks available. Laser guided bombs are the next best thing. Toss bombing is easy, and the laser guidance system makes them as accurate as the Maverick. The downside is you'll have to get much closer to your target to drop them.
Some targets require a specific ordnance. Use Durandals to destroy runways. CBU-72 FAE bombs should be used against sub pens. Most other targets are vulnerable to several kinds of weapons. Again, don't forget about your cannon.
Plan Your Attack
The time to make your battle plan is during the briefing portion of the game. Here you have all of the intelligence information you'll need. Once in the air, it's too late. Sure, things will happen in the heat of battle that may disrupt even the best plans, but it's much better to have a plan and change it than to have no plan at all.
Just because the waypoints are set a certain way doesn't mean this is the best path to take. Sometimes it might be safer to pass the secondary target and attack the primary target first. Even though the secondary target might be closer, if you hit it first the area could be full of MiGs by the time you get to the primary target. You can always hit a secondary target like this one on the way home.
You should look at the radar coverage and pick the safest path. Sometimes this might take you out of your way. This is often the case when flying in the North Cape area. Targets along the coast can best be approached by flying way out to sea, out of radar coverage, and then zipping straight in to attack the targets. You can head back home via the same route. And if you come up short of fuel, you can always put down on the USS Kennedy, which is usually in a convenient position.
Good planning leads to more points. A good case in point is how you plan your entry and egress. When heading into enemy territory, the longer you can go unnoticed, the better. This might mean flying right past a fat target or letting a MiG pass right through your gunsights. Anytime you attack a target, the enemy is alerted and a herd of aircraft will be vectored in your direction. Also, try to stay away from enemy air bases.
Reaction time for enemy aircraft is largely based on your distance from the nearest base. Make them use up a lot of fuel and time if they come after you. You want the enemy to be totally unaware of your presence until that prized primary or secondary target goes up in flames. Also, plan to pick up extra targets on the way home. Those missile boats you avoided on the way in can be hit on the way out if you plan ahead. These boats are great for strafing practice.
Use Standoff When Attacking Multiple Targets
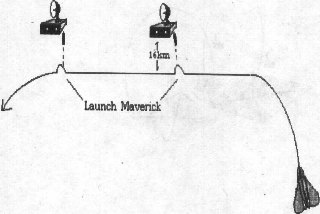
If you're going to use Mavericks to attack two targets that are close together, pick an approach path that will maximize your standoff capability on both targets. If you attack them in a straight line, you'll have to fly right over the first target to get to the second. And since enemy aircraft will start heading for the first target as soon as it's hit, it may get rather crowded. You're better off to fly parallel to the targets at a good standoff range and make quick turns toward the targets to lock and fire your weapon.
On the other hand, if you're going to drop a bomb on one target and use a Maverick on the other, it would be better to approach them in line. Use your standoff advantage on the second target. In this case you should align the targets so the one to be bombed is first in line. This way, you can drop your bomb on the first target and fire the Maverick at the second target at the same time. Then you're free to turn away and leave the area before the bad guys show up.
Go Around Instead of Over Hills
Although it might take you out of your way, going around hills and mountains is much safer for two reasons. First, some of the mountains are several thousand feet high. As you come over the crest you make an excellent radar target. By the time you can get back down to a safe level, you'll probably have several SAMs after you.
The second reason is that as you come around a mountain, you can deal with one target at a time. If you go over the crest of the hill, all of the targets on the other side will appear at the same time, much faster than you can deal with them. But as you swing around the base of the hill, the targets will come into your field of view one at a time.
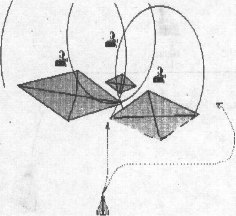
If you fly straight over these hills, you will be righted by all three radar sites. If you go around, you can deal with them one at a time
Photo Reconn Missions
Although these photo reconnaissance missions are probably not on the top of anyone's list of favorites, they're a very real simulation of how a Stealth Fighter would actually be used. In fact, since the aircraft has been in operation for the past five years, I think it safe to assume this type of mission has already taken place.
Using the camera isn't that difficult, but there are a few things you need to keep in mind. Once the camera is selected, the tracking camera that produces the lower right-hand screen is locked into a fixed position so it can act as the viewer for the reconn camera in the bay. You need to approach the target low—200 feet is good. When you're about 4 km away, open the bay doors and get ready to shoot. Even though you're given the small box on the HUD to aim with, it's more important to make sure the target appears on the lower right-hand screen. Use this screen as your aiming guide. Snap the picture when the target is on this screen, and you should get a good shot. Also, don't be afraid to try a number of shots as you approach the target; I've never run out of film on a photo run.
A nice steady run is the key here. If you detect a SAM launch or have MiG problems, use your decoys or ECM until you finish the run. You just can't fight and shoot photos at the same time. But do take the necessary precautions to make sure you survive. Remember, a photo mission isn't successful unless you land safely to deliver the film; bailing out just won't cut it.
Check Both Map Displays Often
Sometimes in the heat of battle, especially if you get hit, your onboard computer may get a little scrambled and mess up your waypoint settings. If you blindly follow the NAV cursor on the HUD without occasionally checking your location on the map, you may be heading in a totally wrong direction. For this reason it's important to frequently check the Satellite Map as well as the Tactical Display. Always double check both displays after you take a hit.
If your waypoints do get scrambled, your primary and secondary targets show up on the Satellite Map as flashing dots. You can find them easily by flying in their general direction and locating them with the TrackCam.
Table of Contents
Previous Section: Strafing Ground Targets
Next Section: A Few Defensive Suggestions