Microsoft Flight Simulator Handbook
by Jonathan M. Stern
Normal Takeoff
Takeoffs are relatively easy maneuvers to perform—if you started at the beginning of this book, you made at least one takeoff with little effort and virtually no skill required. Nonetheless, takeoffs can be hazardous and have led to many accidents in real life.
As stated earlier, takeoffs should, if practical, be made into the wind. This procedure reduces both the ground speed and distance necessary to achieve flight, thereby minimizing wear and tear on the wheels and reducing the risk of an accident. You must select an appropriate runway, and then taxi the airplane to the departure runway.
Before actually taxiing onto the runway—and assuming that this is the first takeoff you have made during the flight—you should perform a pre-takeoff check. Appendix D contains a Before Take-off checklist, which you should use for the pre-takeoff check.
Set the parking brake by holding down Ctrl and pressing the period key. Ensure that the flight controls do not bind by moving the controls in all possible directions. This can best be accomplished using the different cockpit viewing directions. To select a viewing direction, hold down Shift and press a keypad key to select the appropriate viewing direction. The viewing directions are listed in Table 3.1.
For example, to check the left aileron, select the left view. Then turn the control yoke counter-clockwise (press the Keypad 4 key) and ensure that the left aileron goes up and the right aileron goes down (see Figure 3.1).
| TABLE 3.1 Available Viewing Directions | ||
| Keypad Key | Viewing Direction | Preflight Purpose |
| 1 | Rear Left | |
| 2 | Rear | Check elevator and rudder |
| 3 | Rear Right | |
| 4 | Left | Check left flap and aileron |
| 6 | Right | Check right flap and aileron |
| 7 | Front Left | |
| 8 | Front | |
| 9 | Front Right |
You can remember this by thinking that a raised thumb of a hand gripping the control yoke points at the aileron that should be raised. Likewise, check that the rudder moves left when left rudder pedal pressure is applied and right when right rudder pedal pressure is applied. The trailing edge of the elevator should move up when the yoke is pulled aft (Keypad 2) and down when the yoke is moved forward (Keypad 8).
The checking and setting of flight instruments in a real airplane involves adjusting the attitude indicator, setting the altimeter to the current altimeter setting, and setting the heading indicator to the heading displayed on the magnetic compass. With Flight Simulator, press D to reset the heading indicator and A to set the altimeter to the current barometric setting.
Set the fuel-air mixture to full rich. We have the simulation set up, however, so that the mixture control is non-functional. Later, when mixture control is used, it can be adjusted by dragging the red-handled lever with the mouse or by using any of the keystrokes listed in Table 3.2.
| TABLE 3.2 Mixture Control Keystrokes | ||
| Control | F Keys On Top | F Keys On Side |
| Mixture Enrich | Ctrl+Shift+Keypad 9 | Ctrl+Shift+Keypad 9 |
| Mixture Lean | Ctrl+Shift+Keypad 3 | Ctrl+Shift+Keypad 3 |
| Mixture Idle Cutoff | Ctrl+Shift+F1 | Ctrl+Shift+F10 |
| Mixture Full Rich | Ctrl+Shift+F4 | Ctrl+Shifr+F2 |
You can check fuel quantity with the fuel quantity gauges on the upper-right of the instrument panel. When Flight Simulator is operated in VGA or EGA display modes, several instruments are on a second panel, which you can access with the Tab key. These instruments include the fuel quantity indicators, the oil temperature and pressure gauges, the ignition switch, the carburetor heat selector, propeller and mixture controls, and the manifold pressure gauge.
The necessary fuel depends on your planned flight, but takeoff normally should not be perfomed if the indicated quantities are below one quarter tank. Set the fuel selector valve, controlled within the Sim/Engine and Fuel menu, to All.
Elevator trim, which can be selected from the Sim/Realism menu, should not be selected with Flight Simulator. Unless you have flight controls equipped with a pressure-feedback device (and I have not yet seen any), the use of elevator trim with Flight Simulator is extremely unrealistic.
Many joysticks and control yokes have calibration wheels that you can use for coarse elevator trim without selecting this feature in the software. In the real airplane, the trim wheel is used to trim away control pressures so that the pilot's hands can be removed from the controls without causing a flight path deviation. Without a pressure-feedback device, trim cannot be used for this purpose. With a control yoke or joystick, however, trim can be adjusted to allow hands-free flying.
Rudder and aileron trim are not available in the Flight Simulator program, but may be utilized as part of an add-on control yoke, joystick, or panel.
To check for normal engine operation, perform an engine run-up:
- Increase the RPM to 1,700 by advancing the throttle.
- Set the magnetos to left, back to both, to right, and back to both, ensuring that the RPM do not drop more than 175 RPM when selected to a single magneto. Be sure also that the left and right magnetos provide RPM within 50 of one another.
- Use the mouse or the H key to activate carburetor heat. A slight drop of RPM should result if the carburetor heat is working. Then turn the carburetor heat off for takeoff. Were the propeller control activated, you would cycle the propeller control to high pitch/low RPM and back to ensure operation.
- Be sure that all of the engine instruments are in the green ranges, which reflect normal operation.
- Reduce the throttle to 800 RPM. Set the strobe lights, radios, and avionics as desired. Ensure that the autopilot is off.
- Set the wing flaps for takeoff (usually fully retracted) and release the parking brake (press period).
- Select the Trainer situation from the Options/Situation menu and practice the Before Takeoff Check.
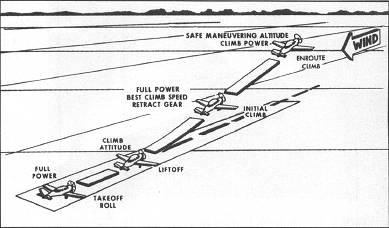
The takeoff involves three steps: takeoff roll, lift-off, and initial climb. Look down the runway to ensure that the path is clear and that no other aircraft are landing on the same or intersecting runways. I have delayed or aborted takeoffs when faced with other aircraft, teens on bicycles, or even a cow crossing the runway.
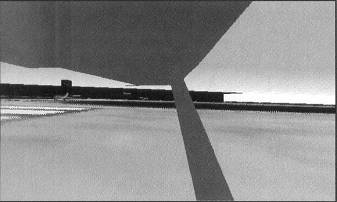
If the coast is clear, smoothly advance the throttle until it is fully open. After applying full power, check the engine instruments again to ensure that they continue to indicate normal operation (see Figure 3.2).
Because you have programmed out the left-turning tendencies, you do not experience the pull to the left during the takeoff roll, which in a real airplane, requires right rudder pressure. Nonetheless, be careful to remain aligned with the runway and on or near the runway centerline. Should the airplane deviate to either side of the centerline, slight rudder pedal pressure must be applied in the direction of the centerline (because you are auto-coordinated, you can use the aileron control for rudder).
The takeoff roll involves a transition from taxiing to flying. At the beginning of the takeoff roll, the airplane steers with nose wheel steering and functions by having its weight on the wheels.
After takeoff, the ailerons, rudder, and elevator control the airplane. Somewhere during the takeoff roll, both systems play a role. For example, at 35 knots, both the nose wheel steering and the rudder play a role in steering the airplane. As the airflow over the control surfaces increases, smaller amounts of control movement are required to affect the path of the airplane.
As the airspeed passes through 50 knots, apply gradual aft pressure on the control yoke to lift the nose wheel slightly off the runway. This process is referred to as rotation, and the speed at which it is initiated is called rotation speed. In strong, gusty winds, increase the rotation speed by one half of the gust factor to allow an added margin of safety. The main wheels quickly follow the nose wheel. It is necessary to carefully control the airplane's attitude so that the airplane does not settle back onto the runway or, conversely, so that it does not stall.
Allow the airplane to accelerate to VY, the best rate of climb speed, which is approximately 85 knots indicated airspeed. Aileron control must be used to keep the wings level during the initial climb. Aircraft pitch must be adjusted to maintain the desired climb speed. With power fixed at full, speed adjustments are made with slight changes in aircraft pitch.
Upon reaching an altitude of 500 feet above any obstacles, accelerate the airplane to the enroute normal climb speed of 90 to 100 knots.
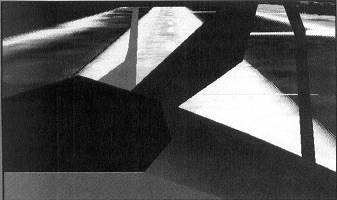
If a crosswind is present after takeoff, it will be necessary to make a wind correction. Turn the nose of the aircraft into the wind just enough to maintain a path aligned with the departure runway. A look to the rear gives a good indication of whether proper alignment is being maintained (see Figure 3.3).
After passing through an altitude 300 feet below the pattern altitude, make a medium banked turn to the left to fly out of the pattern 45° off the upwind track (on a heading of approximately 315 °).
Practice a normal takeoff from Runway 36 at Meigs Field. In reality, the Runway 36 traffic pattern at Meigs Field is flown with right (non-standard) turns to avoid the downtown skyscrapers. For additional instruction and practice on takeoffs, select "Lesson 8—Takeoff Roll" from the Options/Flight Instruction menu (Basic Category).
Table of Contents
Previous Section: Takeoffs and Climbs
Next Section: Crosswind Takeoff