Flying on Instruments with Flight Simulator
by Jonathan M. Stern
Chapter 8
Variations
This last chapter offers variations on the approaches you've already learned and practiced. After you've mastered these approaches, you'll be well prepared to delve into the many instrument approach procedures which await you in Appendix B.
Night ILS Approach
Begin this section with the following settings to Flight Simulator:
|
You're on the ground at Martha's Vineyard Airport in Massachusetts. It's almost midnight, and the clouds are just 207 feet above the ground. You're about to take off, fly the ILS RWY 24 IAP, and land. Turn to page 173, Appendix B, and study the IAP chart.
Taxi your airplane out to the end of runway 6 and set up your avionics for the flight. Tune your NAV-1 radio to the localizer frequency (108.7), your NAV-2 radio to the Martha's Vineyard VOR (108.2), and your COM radio to the control tower (121.4). Set your NAV-1 OBS to the inbound course of 236°. After you've looked carefully at the IAP chart, start your takeoff roll.
 As you lift off from runway 6, track outbound along the localizer while climbing to 1500 feet. You should be flying at a heading of 56°. When you enter the clouds, the windshield turns pitch-black. It's just you and the instruments this time.
Remember that the localizer needle has reverse sensing while you're outbound.
There's no procedure turn on this IAP. When you see a boldface racetrack-like pattern on the planview—as you do here—it means that you use the holding pattern for your course reversal instead of a procedure turn.
It's really quite easy. When the DME reads 5.0, turn right 30° to an 86° heading, and fly that heading for one minute. Then turn left at standard rate to the inbound course heading of 236° and re-intercept the localizer course inbound.
As you approach the 5.0 DME mark, the glideslope needle will begin to descend from the top of the localizer display. As the glideslope needle approaches center, reduce the throttle and begin your descent along the glideslope. Just before you get to the decision height (DH), which is 263 feet, you should break out of the clouds and see the runway lights. If you land safely, you've just completed your first overwater instrument approach at night with the weather near minimums. Congratulations!
Figure 8-1. At Decision Height at Night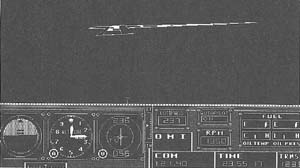
Just before you reach the decision height of 263 feet, you should break out of the clouds and see the runway lights in front of you.
VOR/DME Approaches
Begin this section with the following settings to Flight Simulator:
|
You're on the ground at Southbridge Municipal Airport, which is between Hartford, Connecticut and Boston, Massachusetts.
Take off to the north and track direct to Gardner VOR (110.6) at 4000 feet. When you arrive at Gardner, you're cleared for the VOR/DME RWY 15R IAP to Boston/General Edward Lawrence Logan International.
There are only two significant differences between this approach and others that you've already flown. First, there are three stepdown fixes along the approach in addition to the final approach fix. Look at the profile view of the VOR/DME RWY 15R IAP chart on page 122 of Appendix B. At the 15, 10.5, and 8 DME fixes, you can descend to lower published altitudes of 3000, 2300, and 1400 feet, respectively. At 5 DME, you descend to the minimum descent altitude (780 feet).
Second, the missed approach point is at the 1.4 DME fix instead of at the VOR (again, look at the chart's profile section).
Enjoy the approach, and don't land in the sea.
Figure 8-2. Too High for a Normal Landing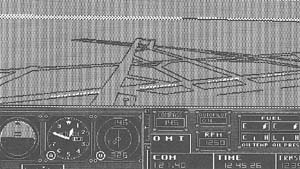
This airplane is obviously too high for a normal landing. Its pilot should execute the missed approach procedure and then try again.
Circling Approaches
Begin this section with the following settings to Flight Simulator:
|
Circling approaches were discussed briefly in Chapter 5. A circling approach is made when the executed IAP serves a runway other than the landing runway. Because such a procedure involves maneuvering from the final approach course to another runway, the minima for a circling approach are usually higher than those for a straight-in approach.
Approaches that don't meet specified criteria for runway alignment are designed as circling approaches only and are designated by the type of approach (VOR or NDB, for example) and a single letter (such as B). Each such approach to an airport is given a different letter, beginning with A and moving up the alphabet.
When you execute a circling approach, you may not depart from the published approach procedure until you have the runway in sight and are in a position from which a normal landing can be made.
You should maneuver the airplane as close as possible to the airport. If, during the circling procedure, you lose sight of the airport, you must immediately execute the missed approach procedure. Because you have maneuvered off of the approach course, executing the missed approach procedure may require a left turn when a right is called for, or vice versa.
In this scenario, you're on the ground at Ocean-side Municipal Airport in Southern California. After setting up your avionics for the published departure procedure (see Appendix A) and the VOR-A IAP to Carlsbad/McClellan-Palomar Airport (see Appendix B), take off and follow the published departure procedure.
Continue your climb to 3000 feet. When you cross the Oceanside VOR, turn left to 270°, and hold that heading for one minute. Then turn left at standard rate and re-intercept the 270° radial inbound (on a 90° course). When you cross the VOR, track the 120° radial outbound while descending to 1300 feet.
At the 7 DME fix, you can continue your descent to the circling minimum, 860 feet. As you descend through 900 feet, you should break out of the clouds and have the airport in sight. Choose the runway that you'll land on; then maneuver as close to the airport as possible to land on that runway.
Figure 8-3. At Circling Minimums—Airport in Sight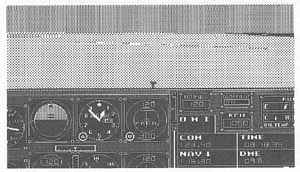
These instruments show an airplane at the circling minimums for Oceanside. The airport is barely visible in the distance (it may be more easily seen in your version of Flight Simulator).
DME Ares
Begin this section with the following settings to Flight Simulator:
|
Some IAPs use a curved path instead of a straight course to lead into the final approach. One example of this can be found at the Danville Airport in Danville, Illinois.
That's where your airplane is sitting right now. If you look at the VOR/DME RWY 3 IAP chart to Danville (page 151 in Appendix B), you'll see that there are three IAFs. One is SOREZ intersection. The other two are at the ends of the 16 DME arc. If you begin the IAP from SOREZ, you must execute the procedure turn. If you begin on either end of the arc, however, you don't execute a procedure turn.
Take off from runway 3 and fly the runway heading until you intercept the Danville 085° radial. Climb and maintain 2300 feet. The clouds will be above you during the approach.
Track the 085° radial outbound. When you get to approximately 15.5 DME, turn right to 185°. Because you continue to travel eastward as you turn, you need the one-half-mile lead. By turning 100° to the right, you should stay within one mile of the arc.
Rotate the OBS all the way around until the needle centers with a TO indication. Keep the needle centered so that you can keep track of which radial you're on—turn the airplane every time you've traveled 10° to keep the airplane's heading 100° to the right of the radial you're passing. Remember that the radial you're passing is the reciprocal of the OBS setting when you have a TO indication. The reciprocal is the number on the bottom of the Omni-Bearing Indicator. In other words, your heading should be 100 greater than the radial shown on the bottom of the OBI—if the radial reads 195, for instance, then your heading should be 295°.
If the DME reading is greater than 16, make a correction to the right to get back on the arc. If the DME readout is less than 16, make a correction to the left.
As you approach the inbound course of 16°, time your turn so that you roll out on the inbound heading as the needle centers with the OBS set to 016°. When you're established on the inbound course, you're authorized to descend to 2200 feet. At SOREZ (DME 11), you can descend to 1300 feet. At 8.5 DME, you may descend to the MDA. The missed approach point is the Danville 6.3 DME.
ILS Approaches After Glideslope Fails
Begin this section with the following settings to Flight Simulator:
|
Occasionally, the glideslope transmitter on the ground isn't working, or the glideslope receiver in the aircraft fails. In such a situation, a localizer approach may be made in lieu of a full ILS IAP.
To simulate this situation, you have a choice. Either use your NAV-2 radio—which has no glideslope receiver—for the localizer, or use the NAV-1 radio and pretend that the glide-slope is inoperative.
You're sitting on the ground at Snohomish County Airport in Everett, Washington. Study the ILS RWY 16 IAP to Everett. When you're ready, take off from runway 34 and track the localizer outbound while climbing to 3000 feet.
Track outbound past the outer marker and execute the procedure turn. When you're established on the inbound course, maintain 3000 feet until you cross the outer marker. Note the time that you cross the outer marker.
The missed approach point is determined by elapsed time on a localizer-only approach. The time-distance table at the bottom right of the IAP chart provides the times it will take to fly from the outer marker to the missed approach point at various groundspeeds. If your groundspeed is 90 knots, for example, it will take you 5 minutes and 12 seconds.
After crossing the outer marker, descend to 980 feet, the minimum descent altitude (not DH, since there's no glideslope) for localizer-only approaches (S-LOC 16 in the minima section of the chart stands for straight-in localizer approach to runway 16).
Maintain 980 feet until you have the runway in sight and are in a position from which a normal landing can be made, or until your approach time runs out. Time should run out at about the same time you pass over the middle marker.
Figure 8-4. Failed Glideslope Receiver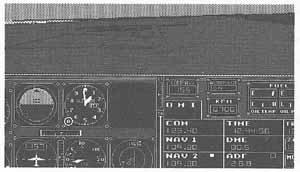
You're at minimum descent altitude (MDA), but your glideslope receiver isn't working.
Radar Vectors to the Final Approach Course
Begin this section with the following settings to Flight Simulator:
|
Some IAPs require an air traffic controller to provide radar vectors (or headings) to the final approach course. One example of this is the VOR RWY 31L to New York/John F. Kennedy International Airport.
Notice the RADAR REQUIRED note in the planview. There are no IAFs, because the only way to execute the approach is to receive radar vectors to the final approach course.
Unfortunately, Flight Simulator doesn't provide air traffic control services (other than the information provided on ATIS or on control tower frequencies). Fortunately, there is a way that you can play the role of a radar air traffic controller.
After you take off from Republic Airport, you can use the overhead, or map view, to view your airplane relative to the airport at which you're landing. Try assigning yourself headings that will place you on the final approach course outside the final approach fix. Ideally, your intercept heading should be within 30° of the final approach course.
To get yourself started, take off from Republic and intercept the 220° radial from Deer Park. Follow the radial with the map view selected until you can see the runway layout at Kennedy Airport. Begin giving yourself radar vectors.
Good luck in your new career as an air traffic controller!
Figure 8-5. Vectoring Yourself
This map (or overhead) view shows an airplane on a heading to join the final approach course into Kennedy.
Table of Contents | Previous Section | Next Section