Jet Fighter School II
More Training for Computer Fighter Pilots
by Richard G. Sheffield
Chapter 12
Tips and Hints for Playing Jet Combat Simulator by Epyx
Jet Combat Simulator was one of the first games of this type (its copyright date is 1985), yet it has a number of good qualities that can provide a continuing challenge. The landing and takeoff sequences are very good. They are difficult to master, as they should be in an accurate simulation. The screen is rapidly updated, which provides for smooth flying and accurate maneuvers.
While the combat mode offers only guns (no missiles), the close-in knife-fight action can be very exciting. Beware of the higher skill levels: The enemy can pull some fancy tricks that might make you think the computer is cheating by not following the laws of physics.
Landing Practice
Takeoffs and landings are taken for granted in many games. In Jet Combat Simulator, they require practice to master. Before you go out hunting for MiGs, be sure you can get your bird back down on the ground safely. Take some time to go to the Practice Landing section of the game and learn the procedure. Once you can safely land and takeoff three times in a row you're ready to move on to combat.
When you master the following procedure for taking off and landing, you won't have to worry about getting killed while landing. This will allow you to concentrate on other aspects of the game.
Landings. To practice landing, select the first item on the game menu: Landing Practice. Once this is selected, the cockpit screen will appear and you will be properly lined up for a landing. To land safely, follow these steps:
- Immediately add power until the indicator is a little more than halfway across the scale. Extend your flaps all the way.
- Pitch down to start losing altitude.
- Level off at 300 feet. As the landing ball on the LSI passes through the center of the scale, start a gentle decline at a pitch rate of approximately - 10. If you descend below 50 feet before you reach the beginning of the runway, level off and then descend again when you reach the beginning of the strip.
- When you touch down (there is no noise; watch for the altitude to go to zero) immediately cut the power to 0 and hold the brake key down until the plane comes to a stop. A menu should come up.
- Select C for continue. The cockpit screen will now appear; you are on the runway where you stopped after your landing. You won't have enough runway in front of you to take off again. You'll have to taxi around to face the other direction.
- To control your direction while taxiing on the ground, use the Z and X rudder-control keys. The runway isn't wide enough for you to turn around from your position in the middle. You'll first have to taxi to the edge. You will need some speed. Apply three keystrokes of throttle. Keep your speed down. When the speed level reaches 10, use the brake to slow it down occasionally. Hold down the Z key to point the aircraft toward the edge of the runway. Once you are close to the edge, hold down the X key until the plane is turned around. Line up the end of the runway on the center of the screen. The center isn't marked, but it's directly above the C in the word PITCH on the instrument panel. If you've made a good landing on the first part of the strip you'll want to taxi past the last set of dotted lines on the runway before making your turn; this will give you enough room to take off.
- Once you have turned around, apply full power. When you reach 130 knots, pull back hard on the stick. The altitude indicator will tell you when you are airborne. Once up, immediately hit the U key several times to raise the landing gear. If you don't get the landing gear up quickly, you will crash.
- Climb to 4000 feet and maintain your heading until you are 25 miles from the base. Note the mile indicator in the lower right-hand corner of the radar screen.
- Once you are 25 miles away, make a 15-degree banked turn to the right until the diamond on the radar is even with the tail of the aircraft symbol. Now make a 23-degree banked turn in the other direction until your heading is 0 degrees. You should now be roughly in line with the runway; adjust your heading to point towards the flashing diamond.
- Cut your throttle to just below the first major increment (approximately one-third power). Keep the nose up and reduce your speed. As the speed drops below 472 knots, start to extend your flaps. Each increment of extension of your flaps will cause the speed to drop. When the speed drops, more flap can be added. Once the flaps are fully extended, immediately increase power to past halfway on the scale to avoid a stall. Now lower your landing gear.
- Pitch down to -40 on the VSI and level off at 500 feet.
- When the ILS activates, fly towards the ball but maintain your altitude. Remember that the ball doesn't point to the runway but directs you to a line that extends from the end of the runway. You have to fly down that line in order to land properly. Flying towards the ball may, on occasion, cause you to turn so much that the runway is off of the screen. If this happens, be prepared to turn hard back towards the runway when the ball starts to move towards the center. If you don't anticipate this move you may end up chasing the ball back in the other direction.
- Descend as you did before and level out at 100 feet, then down to 50. Watch your speed. If you drop below 130 knots, add a little power so you'll have enough speed to maneuver without the threat of a stall.
- Touch down as before and stop.
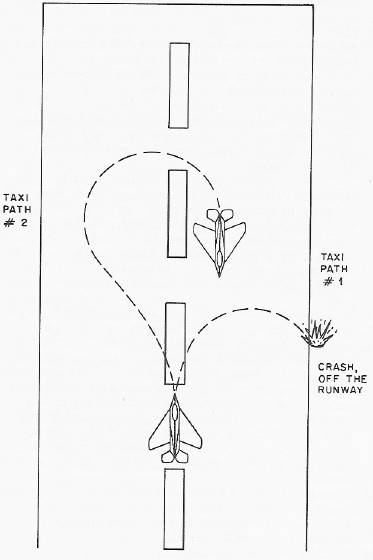
Figure 12-1. Runway Taxi Procedure
If you follow Path #1 (trying to turn around from the center of the runway), you'll run out of room and crash off the strip. However, if you follow Path #2 (taxiing to the side before turning around), you will have enough room to turn around for another takeoff.
Combat: The Bounce Attack
Since the earliest air combat of World War I, pilots have favored the bounce attack. The bounce attack is a maneuver in which you attack your opponent's tail from above. The name of this game could have been Watch Your Six! because most successful attacks are made from the rear.
The best way to attack your opponent is to take advantage of one of the game parameters. The result of this parameter is that if you and the enemy are separated by more than 5000 feet, he can't see you.
Here is the bounce attack, step by step:
- Once your enemy is located, head straight for him and climb to 5000 feet above his altitude. The flight computer will give you the enemy altitude.
- As you approach the enemy, reduce your speed to about half of the scale or lower.
- When the bogey passes under you, turn and take a position behind and above him.
- Make your bounce attack: Dive to gain speed and catch up with the bogey. When you begin to see the shape of the enemy aircraft, reduce your speed to avoid passing him. The worst thing you could do in this game is overshoot your opponent, thereby giving him the advantage. It's better to approach too slowly and let him pull away than to approach too fast and overshoot.
- Wait until you are at close range to start firing. Your opponent will fly a zigzag course so don't over correct. If he is to one side, wait a second and he will likely reverse course and head back into your sights.
- If you get too close to the enemy and you see the plane start to bank hard, you must react quickly. First, reduce your throttle to 1/3 of the scale or less; this will allow you to turn at your maximum rate. Second, turn hard with the bogey. If you can reduce your speed and turn hard enough, you'll be able to maintain your position behind the bogey; he may pull away a little, but you can always increase power to catch up.
Figure 12-2. When a Close Enemy Banks Hard, Reach Quickly to Avoid Overshooting
Shortcut
Often, after a long dogfight, you'll find yourself at the edge of the map. When the next bogey comes up, he may be all the way across the map. If you try to fly to him at top speed, you'll waste a lot of fuel and he will probably bomb a base before you get there. To get around this, fly off the map in the opposite direction from where you want to appear on the other side. For instance, if you fly off the top, you will reappear on the bottom. If you fly off of the right side, you'll pop up on the left side. Using this shortcut can save enormous amounts of time and fuel.
Table of Contents | Previous Section | Next Section