Jet Fighter School II
More Training for Computer Fighter Pilots
by Richard G. Sheffield
Chapter 9
Tips and Hints for Playing Stealth Fighter by MicroProse
A new game from MicroProse is like a new Ludlum novel: always eagerly awaited and always received with enthusiasm. Stealth Fighter is no exception. Shortly after the project was announced, questions about the release date became common on the MicroProse phone lines. Players were not disappointed. The graphics and game play are excellent and Gunship pilots will recognize the popular promotion and decoration system. With some practice and a little help from the following hints you just might win that Congressional Medal of Honor.
The Big Hint
If you only remember one hint from this chapter, remember this one: Maintaining a low stealth profile is very important for a number of reasons. It improves your Stealth Rating and your score, and it reduces the chances of your being spotted by enemy radar. The best way to keep a low profile is to fly low and slow. Flight below 500 feet, where your profile is the lowest, however, can be very difficult. Constant altitude adjustments are necessary to keep from hitting the ground or popping up to 1000 feet.
Flight below 500 feet can be difficult, that is, unless you know the trick: There is a combination of airspeed and pitch that will allow you to fly hands-off at altitudes below 500 feet. This point will be different for each weapon's load and fuel level, but it is generally in the area of nine degrees of pitch and 250-275 knots.
The best way to find this combination is to fly at 900 feet and then set the pitch to nine degrees; this is indicated in the lower portion of the HUD (Heads-Up Display). Now decrease the throttle. Watch the Vertical Velocity Indicator bar gauge; when it indicates a slight descent, you're almost there. Now let the plane descend to below 500 feet. This should be a very slow descent; if not, increase your throttle by one notch. Once below 500 feet, you should have only one blue light showing on your EMV (Electro-Magnetic Visibility) bar. Increase throttle by one notch. This should stop your descent and leave you in level flight at 400 feet or so. Now if you want to change altitude you can increase or reduce throttle. If you can't fly steadily at this point and you reach a situation where one notch more of throttle causes the plane to rise while one notch less causes it to sink, adjust the pitch one notch up or down and repeat your throttle adjustment. This process becomes second nature with a little practice.
Once you master the technique of finding this smooth-flying slot, you'll be able to greatly increase your stealth percentage by flying consistently below 500 feet. Remember that you burn fuel faster at this altitude, so it may not be right for all missions. Also, be careful when flying in this manner near mountains as the erratic winds near them will move you out of the slot and cause you to rise or sink. If you sink to 300 feet, there won't be a lot of air under you.
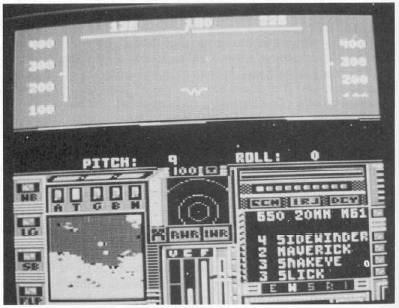
Figure 9-1. Flying "In The Groove" at 300 Feet
Radar Ranges
There is a drawing on page 42 of the manual that shows how to draw circles around all enemy positions to see the range of the radar at each installation. This would help you thread the needle, allowing you to wend your path just outside of radar range, thus minimizing your exposure. It isn't very clear how to do that, however.
Turn to page 64 in the manual. You'll see a SAM chart and under the heading Max Range for Search there is a number in parentheses. This number shows the radar range in numbers of blocks on the maps provided. If you knew that a SAM location had SA-2 missiles, you could go to the chart and find that the range was three. You could then use a compass to measure three blocks and draw a circle around the SAM site indicating the range of the radar. If you do this for all the radar installations in the area, you will be able to visualize the best route through them.
HARMS and Harpoons
Both HARM (High Speed Anti-Radiation Missile) and Harpoon missiles are excellent for accomplishing a specific mission: blasting radar and ships. The problem with these missiles is that you're limited to one missile in each weapons bay.
To earn a high score, you'll need to hit extra ground targets, but carrying one missile in each bay limits that ability. A good solution is to carry the multipurpose Maverick missile. The Maverick has a better range than the HARM and is just as effective. It does have a shorter range than the Harpoon, but you can safely get within Maverick range of most ships with little problem. The main benefit of the Maverick is that you can carry two missiles in each bay. This will allow you an extra missile for those important extra ground targets.
Weapons Are Internal
Remember that all the weapons carried by the F-19 are carried internally. When you activate these weapons and open the bay doors you increase drag and reduce lift. Get into the habit of increasing the throttle just before you activate your weapons. Doing so will prevent finding out the hard way that you are losing altitude.
This applies to dogfighting as well as to air-to-ground situations. If you're trying to out-turn a MiG, you're better off closing the bay doors until you're close to firing position. By doing so you will increase the turning performance of your aircraft and reduce the chances of stalling. You can use the air-to-air tracking mode to keep track of the enemy while keeping the doors shut; use the Switch Tracking Mode key to activate it.
Panic Shots
The enemy will often take shots with SAMs and AAMs (Air-to-Air Missiles) that don't have a chance of hitting you; they just try to trick you into using your ECM (Electronic CounterMeasures) systems and giving away your location. When you are entering or leaving an area with a good stealth profile, go to the 12-mile radar screen if shot at. Many times the missile won't even come within 12 miles of you, and if it does, its lock may be too weak to hit you. Wait until the last second before using ECM and use jammers only briefly. This will minimize your exposure.
Runway Landings
A common problem for beginning players is lining up the jet for runway landings. Most give up too soon. They come in low on fuel and have trouble getting properly lined up. When they give up and try to go around again, they run out of fuel.
You don't have to start your landing at the very end of the runway. The runways are very long and wide so you can be way out of line as you go over the start of the strip and still have time to straighten up and land on the last third of the runway. You'll be flying very slowly, so you have more time than you think. You'll be surprised at how fast the air-craft stops rolling after touchdown once you cut the engines and put on the brakes.
In fact, I don't recommend trying to land at the beginning of the strip; it's very hard to judge when you're over the runway and it's easy to land too short, thereby ruining an otherwise good mission. Give yourself plenty of room and set your plane down gently. You have plenty of time.
Enemy AWACS
Enemy AWACS (Airborne Warning And Control System) planes can cause a lot of problems in the North Cape and Central Europe scenarios. They can see you but you can't see them. If you've been spotted but you can't see anything on your radar, you've probably been seen by an AWACS. There isn't much you can do about AWACS except try to fly under their coverage.
Two-Player System
In the heat of battle, everything seems to happen at once. An extra pair of eyes and hands can be a big help. Many players have commented that they consistently score higher when they play with another experienced player at the keyboard. The following is one way to divide the responsibilities.
Pilot Responsibilities- Fly the aircraft
- Set the course
- Fire the weapons
- Give the orders
- Change the radar display scale
- Activate the ECM and decoys
- Activate and select weapons
- Keep an eye on the altitude during bomb runs and dogfights
- Check all systems for damage after an enemy hit ID and switch targets
- Change map displays
Since the copilot is not involved with flying the plane, he or she can be given more duties to keep occupied.
Extra Fuel
Fuel is a critical item. You have to get to the target, destroy it, destroy extra ground or air targets, and return home. You'll rarely find this possible on the minimum amount listed as you arm your plane. If a mission has a minimum fuel amount of 9,900 pounds, you should think seriously about leaving some weapons behind and taking more fuel instead. Even then you will have to be frugal: The extra tanks don't carry very much. Be conservative with your throttle and altitude.
You can activate the fuel as soon as you take off. Doing so has the odd effect of increasing your speed and thus your range. The fuel is still there to use but you are no longer burdened by the extra weight. If you think you'll have to glide most of the way home from your mission, you might want to wait before using the extra fuel. Go ahead and let the aircraft run out of fuel (make sure that any extra weapons are dropped) and start your glide. Now activate the extra fuel, but don't start your engines yet. When you are close to the base, you can restart the engines and use the extra fuel for your landing maneuvers.
Gliding
If you don't turn or maneuver, you should be able to glide indefinitely under certain circumstances. It glides best when the weapons bays are empty. By pitching the nose up to around nine degrees you will be just above stall speed, and you should be able to get the Vertical Velocity Indicator to level out. This maneuver won't work if you have a lot of fuel left, due to the added weight.
Fuel Efficiency
The aircraft fuel consumption rate goes down as you increase in altitude, up to 32,000 feet. This is shown in an increase in airspeed for a particular throttle setting. The effect of this increase in airspeed is an increase in range.
Additional Ground Targets
Additional ground targets are essential for high scores. You'll receive the same score for any ground target.
If you have light weapons, SAM radar sites are excellent targets. Destroying this site with missiles or by strafing will disable all of the launchers. It's often a good idea to take out the SAM radar first, before attacking the major objective.
If you have heavy weapons, take out a runway. Enemy planes will scramble from the closest runway. If the nearest runway is destroyed, they will have to come from the next closest base, which may be very distant. This should make your flight home a lot easier.
Enemy Fighters
Each type of enemy plane is programmed with different capabilities, as is each type of air-to-air missile. The airplane and missile attributes don't have as large an effect on the dogfighting capability as the quality of the enemy pilot. Green pilots will generally fly cautiously, keeping their planes flat and attempting few acrobatics. Average pilots will be somewhat more aggressive. Veteran pilots will use a variety of vertical maneuvers you won't be able to duplicate. Engaging a veteran enemy pilot in a close-in dogfight isn't advised. Even the folks at MicroProse have a hard time with them. You would be better off dealing with them at long range and then using stealth to escape.
The good news about enemy fighters is that they can use only missiles against you. They are not programmed for cannon attacks.
Also, it is to your advantage that enemy fighters are vectored to your last known position. They aren't vectored on an intercept course with your heading. They can be fooled if you let yourself be seen a distance from your target area. Once you are seen, the fighters will head for your current position. If you're not there when they arrive, and you haven't been sighted elsewhere, they will hang around for a few minutes and then go home. If you can get a low stealth profile, you can fly on toward your target without problems from enemy fighters.
Strafing Attacks
One way to increase your scores is to master the art of strafing targets. You carry all that cannon ammunition, so you might as well learn to use it. You must be below 500 feet for a successful attack, and your range is only 2.5 miles. Flying very slowly is the key. The manual recommends using the speed brake, but it's easier to use your flaps to increase lift and decrease stall speed. Line the target up and dip the nose slightly as you fire. Keep an eye on your altitude; making smoking holes in the ground won't win any medals.
Most targets will take several strafing hits to destroy. Some (runways, for instance) are almost impossible to destroy with your gun. Oil tanks are easily destroyed by gunfire.
Organize your Weapons Bay
If you take the time to organize your weapons before you take off, you can save precious seconds in the heat of battle. Some people like to put all air-to-air missiles in the top two bays and air-to-ground weapons in the bottom bays. Organize the way you like, but keep things the same so you'll know where they are at all times. You don't have time to pull up the weapons inventory in the middle of a dogfight.
Scoring System
As with all MicroProse games, the scoring system for Stealth Fighter is complicated. MicroProse tried to take into account all of the various options.
First you have a score based on the values of all the targets destroyed. That number is then multiplied by a factor. This factor value is based on
- Region
- Tension
- Mission
- Range
- Enemy quality
- Realism
- Landing
Depending upon these items, the factor value may be larger or smaller than 1, thereby increasing or decreasing your basic score. If all options are at their hardest levels, your basic score can be increased by a factor of 9.
The following describes all items that go into making to the factor value. In order of importance they are
- Region
- Tension, enemy quality, and realism
- Range
- Mission type
Landing safely at a base will keep your score the same. Bailing out over the deep ocean costs you a few points, bailing out over friendly territory costs more, and bailing out over enemy territory (including coastal waters), will cost you heavily.
Let's examine each of the categories.
Region. Western Europe provides the most points. The North Cape provides only slightly less. These are followed by the Persian Gulf, Libya, and training.
Tension. In order of importance from highest tension to lowest, the levels of tension are Conventional War, Limited War, and Cold War.
Enemy Quality. The enemy may be a Veteran flier, a Regular, or Green (inexperienced).
Realism. The quality of realism will be either Realistic Flight, Easy Flight, or No Crash.
Range. The range is based on the Fuel Distance Estimate provided at the beginning of the mission. The range falls into one of four categories: 11,500 or more; 9,000 to 11,499; 7,000 to 8,999; and 6,999 or less.
Mission Type. There are also four levels of mission types: Ground Target; Aircraft Target; Air-to-Air Practice; Bombing Practice.
Promotions
Promotions are based on three things: number of missions flown; total score; and average score per mission. The average score prevents bad players from being promoted simply by flying a large number of missions.
To give some idea of the promotion process, MicroProse provided the information in Table 9-1. The numbers may not be exact. This table is only intended to provide an overall view.
Table 9-1. Factors Affecting Promotions
Rank               Number of Missions     Total Score     Average Score
First Lieutenant          2                  400             150
Captain                   5                 1500             200
Major                    10                 3300             230
Lieutenant Colonel       20                 7250             260
Full Colonel             40                16000             280
Brigadier General        99                22000             220
As you can see, it's important to keep your average score up. Don't record low-scoring missions. Also note that you must meet all of the criteria to be promoted. If you fly enough missions and achieve the required total score but your average is below par, you won't be promoted until you bring your average up.
Medals
Winning a medal is based solely on your performance on a particular mission; no other items are taken into account. Your score for that mission is the determining factor.
The values shown for earning medals may not be exact. They only approximate the points you must score.
The one-mission score values are shown in Table 9-2.
Table 9-2. One-Mission Score Values
Medal                          Score
Congressional Medal of Honor   1800
Distinguished Flying Cross     1300
Silver Star                     850
Bronze Star                     500
Airman's Medal                  250
To win a second medal of any type, you must score a little more than twice the original total. You'll win your first Silver Star before you win a second Bronze Star, and so on. To win your Third of any medal type requires more than three times the original total and so on. This keeps you from racking up 20 or 30 Airman's Medals without improving your flying.
IBM Version
By the time this book is published, MicroProse will have released the IBM version of Stealth Fighter. They have made use of the extra memory to improve the game so much that they felt a different title was warranted. Therefore, the title of the IBM version will be F-19 Stealth Fighter.
The cockpit is redesigned in several ways. The Stealth Profile indicator will be changed to let you know how close enemy radar is to locating you, and a Tracking Camera will be included. Once locked onto a target, this camera will provide a continuous view even if the target is behind you. This will be a big help in dogfights with other aircraft. The view from this camera will also show close-up shots of your missiles hitting the target, the smoking aircraft or ground target, and the enemy pilot's parachute.
Table of Contents | Previous Section | Next Section