Learning to Fly with Flight Simulator
by John Rafferty
CHAPTER 4
IFR: Going the Profesional Way
FLIGHT 17
Shooting the ILS
Filmore (Private) to Van Nuys
There's no aviation procedure more exhilarating and satisfying than a properly-executed instrument approach; you had a brief taste of how it feels when you landed at Kennedy back on Flight 6, so you know what I mean.
But now you're in for a treat, because starting with this flight you'll learn all the different types of approach procedures. In the process, you'll learn to use the official approach charts, and then, whenever you plan a simulator flight on your own, you can select the appropriate plate from Chapter 5, using that authentic approach when you arrive at your destination airport. Professional pilots use these instrument approaches all the time, even in clear weather.
So let's get started. You'll begin with the ILS approach to Runway 16 Right at Van Nuys.
Briefing
The ILS. ILS stands for Instrument Landing System, an electronic system that permits a very precise instrument approach to a specified runway, even when the ceiling and visibility are extremely low. ILSs are usually only available at larger airports, and only for certain runways; where an ILS is available, commercial airline flights will almost always use that approach, regardless of the weather.
How It Works. Essentially, an ILS is like a three-dimensional electronic highway in the sky. Think of it as a giant funnel: You enter the mouth of the funnel, and, if you stay within it's bounds, you'll be guided right down to the runway threshold. In the process, there are two things to be concerned with—the localizer and the glide slope.
The Localizer. The localizer is just a special kind of VOR. It has only a single radial, which is lined up perfectly with the runway.
You tune in the localizer on NAV-1, in exactly the same way you that you tune in any other VOR, and the vertical needle on NAV-1 responds to the localizer just as it does to a conventional VOR—when the NAV-1 needle is centered, you know you're lined up perfectly with that runway whether you can see the ground or not.
The Glide Slope. When you tune NAV-1 to the localizer frequency for a given ILS, you automatically get the glide slope as well. The glide slope controls the other needle on NAV-1—the horizontal one, which we haven't discussed before now.
The glide slope is something like a localizer that's been turned on its side. While the localizer needle lines you up with the runway in a left-to-right sense, the glide slope needle lines you up vertically, in the up-and-down sense. If the glide slope needle is centered across the window, you're on a proper glide path to the runway threshold.
Flying the Needles. Once you're “in the funnel,” all you have to do is keep both NAV-1 needles centered, like cross hairs, and you'll be guided right to the runway threshold.
You center the localizer needle with shallow right or left turns, just as you do when tracking a VOR radial, and you center the glide slope needle by temporarily increasing or decreasing engine power, just as you normally do to control your rate of descent. However, though the concept is simple enough, it takes a gentle but decisive touch to do it well.
Preview
Departure. You'll depart from a private field about 10 miles west of the Filmore VOR, as shown by Figure 4–1. This field is a field in the literal sense, and it's not shown on any chart; using it will save you the time of flying a long distance to get to the ILS funnel, so that you can concentrate on just the approach itself.
Study Figure 4–1 carefully as you preview the flight before departure; the figure is actually a simplified version of the official approach plate, which you'll find under Van Nuys in Chapter 5.
On departure, you'll climb directly toward the Filmore VOR; then will track outbound on R-050 as you continue your climb to 4300 feet.
NAV-1 will be set to Fillmore as you track R-050 outbound, and NAV-2 will be set to the Van Nuys VOR, so that you can monitor your position along that course.
Setting Up For the Approach. When you reach the Van Nuys 310° radial, slow down and set up for the approach. Always be set up for the approach before you begin to intercept the localizer.
Switching the NAV Frequencies. When you set the airplane up for the approach, NAV-1 will be tuned to Fillmore (for tracking the 050° radial outbound), and NAV-2 will be set to Van Nuys (for monitoring your position). You now need NAV-1 for the localizer, however, so after setting up for the approach, switch frequencies, changing NAV-1 from Fillmore to the localizer, and changing NAV-2 to Fillmore R-066° (for Yales Intersection).
Intercepting the Localizer. As soon as the NAV-1 needle begins to move, start a shallow right turn to intercept the localizer on heading 160°. While turning, you monitor the progress of the needle as it moves toward center, and try to time the turn so that you roll out on 160° with the needle perfectly centered.
If the needle is off-center after you roll out on heading 160°, use shallow banks and small interception angles—try about 2°—to get it centered.
Preparing to Descend. As you proceed inbound on heading 160°, with the NAV-1 (localizer) needle centered and your altitude still at 4300 feet, monitor NAV-2. When the NAV-2 needle centers, you're at Yales Intersection, so it's almost—but not quite—time to begin your descent.
The Outer Marker. About 2 minutes after Yales, you'll pass over the outer marker beacon, which is called Kadie in this case. You'll hear a beep, and the marker light on the upper right side of the panel will flash. At that point, throttle back to begin your descent.
Glide Slope. As you begin to descend, you'll monitor the horizontal glide slope needle. If the needle is above center, it means you're below the glide slope. Add power until the needle centers; then resume a descent of about 500fpm to 600fpm—whichever rate of descent keeps the needle centered. If the needle is below center, you're too high. Ease back on the power until the needle is centered again.
Localizer. While monitoring the glide slope, also watch the localizer needle. Make very gentle turns of about 2° to keep it centered.
Landing. When you're 0.4 miles from the runway threshold, you'll hear the code signal from the middle marker beacon. At that point either you can make out the runway or you can't. If you see the runway, land visually in the usual way.
If you can't see the runway at that point because of a low ceiling or poor visibility, pull up; add full power; lower the flaps; and execute the missed approach procedure that's given on the approach plate. Then Air Traffic Control will issue further instructions.
Set-Up for Fillmore:
|
From the Right-Hand Seat
Departure. You're about 10 miles DME to the west of the Fill-more VOR, and you're just about on the 050° radial. Take off; fly to the VOR; and proceed outbound on R-050 as you climb to 4300 feet.
Setting Up for the Approach. When the NAV-2 needle centers, you're on R-310 from Van Nuys. Throttle back and set up in the usual way. You have maybe 4 minutes or so before it's time to start your right turn to intercept the localizer.
NAV-2. When set up for the approach, switch NAV-2 to Fillmore (112.50, as presently set on NAV-1), and toggle the bearing to 066° degrees, for Yales Intersection.
NAV-1. Now switch NAV-1 to the localizer (111.30).
There's only one localizer radial, so you don't really have to set the NAV-1 bearing at all, but it's good practice to set it to the localizer heading anyway (160° in this case), as a reminder during the approach.
Intercepting the Localizer. When the NAV-1 needle begins to move, start a shallow right turn to 160°. Watch the progress of the needle, and try to time the turn so you roll out on 160° with the needle centered.
Yales Intersection. NAV-2 is set to Fillmore R-066. When the NAV-2 needle centers, you're at Yales, and you have just about 2 minutes or so to Kadie, the outer marker.
Outer Marker. When the marker light comes on and you hear a beep, throttle back to begin your descent. Get the glide slope needle centered, and keep it there.
Flying the Needles. Use gentle turns (2° intercept angles) to keep the localizer needle centered; use gentle power adjustments to keep the glide slope needle centered. When an adjustment to either the heading or descent is needed, be decisive and consistent.
Middle Marker. At the signal from the middle marker beacon (or when you have the runway centerline stripe clearly in view), transfer your attention from the needles and land visually in the usual manner.
Figure 4-1. Approach Procedure, Van Nuys, ILS RWY 16 R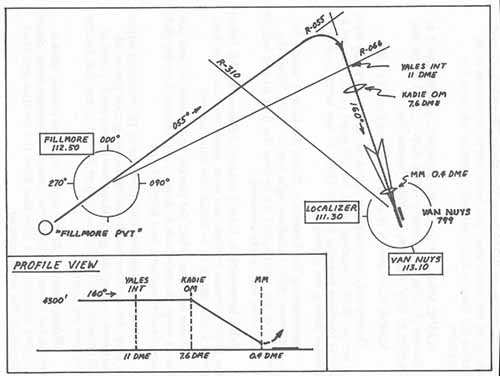
Not for use in navigation.
Table of Contents | Previous Section | Next Section