IFR Flights of 13MIKE
by Fred J. Calfior and Douglas W. Miller
IFR Flights
of
"13MIKE?
for versions 4.0 and 5.0
A Microsoft®
Flight Simulator®
Action Book
by
Professor Fred J. Calfior
and
Professor Douglas W. Miller
Book Two - Level B
Covering the
Chicago, Los Angeles, San Francisco, Seattle, and New York areas
IFR Flights of "13MIKE"™
© 1994 by CalMil Publishing. All rights reserved.
Printed in the U.S.A.
No part of this publication may be reproduced, stored in a retrieval system, or transmitted, in any form or by any means, electronic, mechanical, photocopying, recording, or otherwise, without the prior written permission of the publisher. For information, contact CalMil Publishing, 2224 Katahn Drive, Prescott, AZ 86301-3976.
First edition, 1994.
International Standard Book Number: 0-9639052-1-X.
Library of Congress Catalog Card Number: 94-94166.
This book is sold as is, without warranty of any kind, either expressed or implied, respecting the contents of this book, including but not limited to implied warranties for the book's quality, performance, merchantability, or fitness for any particular purpose. Neither CalMil Publishing nor its dealers or distributors shall be liable to the purchaser or any other person or entity with respect to any liability, loss, or damage caused or alleged to be caused directly or indirectly by this book.
Microsoft is a registered trademark of Microsoft Corporation.
Flight Simulator is a trademark of Bruce Artwick.
13 MIKE and Airienteering are trademarks of CalMil Publishing.
| About the Authors |

Professor Fred J. Calfior
Fred Calfior is a 1975 graduate from the United States Naval Academy, with a degree in Aerospace Engineering. He has instructed in both the T2C Buckeye (a twin engine jet) and the TA4J Skyhawk (a single engine jet). Upon joining the Embry-Riddle Aeronautical University faculty, Professor Calfior acquired his Masters in Aeronautical Science. He has been involved in all levels of flight instruction, as well as academic instruction, in the areas of Aerodynamics, Flight Performance, and VFR/IFR Navigation.
Professor Douglas W. Miller
Douglas Miller is a Professor at Embry-Riddle Aeronautical University where he teaches Aerodynamics and Electronic Flight Control Systems. Professor Miller has an extensive background in aircraft system design and simulation development. As a consultant to the aerospace industry, he has been responsible for the development of a variety of multi-user simulation systems, including a virtual reality simulation used for vehicle design and analysis. Professor Miller has extensive instrument and weather flying experience. Most of this experience was obtained while flying his Mooney for business purposes. Currently Professor Miller is involved in the research and development of a virtual reality flight simulator for teaching and flight technique analysis.
Other Flights of "13MIKE"
BOOK ONE
Flights of "13MIKE" - LEVEL A
"Competitive", "Challenging", "Fun", "Exciting", "Thrilling", and "Nerve Racking" are words that have been used to describe flying these scenarios. Non-pilots, student pilots, and commercial pilots are all hooked on the challenge and adventure of 13MIKE. You do not have to be a pilot to enjoy the thrill and adventure of flying through the LA Class B Airspace Corridor. Professor Calfior is seated at your right for the entire flight. Drawing on years of flight training has enabled Professors Miller and Calfior to bring you the most authentic and realistic selection of flight scenarios that you have ever encountered. You feel like you are actually in the cockpit, with Professor Calfior giving you friendly advice in his humorous fashion.
BOOK THREE (Coming Winter 1995)
AirienteeringTM with "13MIKE" - LEVEL A
What would it be like to do a little orienteering with an airplane? Well, jump into old 13MIKE, get out the map, and let's hit the sky. We need to find all the marks and get back to our home field as fast as we can. The clock is ticking and it looks like a storm is brewing. How good are you at map reading and flying at the same time? Come fly with 13MIKE and find out.
Order form in back of book
| Preface |
After flying "13MIKE" around for the hundredth time, Professor Calfior and I, Professor Miller, decided we wanted more challenges, more thrills, and MORE white knuckle flying! So we started this next set of adventures for our fun loving 13MIKE flyers, TFR Flights of "13MIKE". This collection of foul weather and wind cross countries give 13MIKE a run for its money. We have included eight dynamos of power packed scenarios for your yukky weather flying pleasure. The procedures are as realistic as we can make them, from the FULL weather brief down to the Ground Control clearance to taxi to the destination terminal. All enroute charts, airport diagrams, departure information, and approach plates are authentic in every detail.
NOTE: The charts and plates are intended for use with this book only, in flying the scenarios utilizing Microsoft's Flight Simulator program. Please do not try to use these navigational charts for actual flight purposes. Reason - they are no longer current.
By drawing on our experience and background in teaching flying and aviation concepts, we have been able to bring to you a very authentic and realistic set of cross country flights.
This is the second book of a vast series of upcoming action books for the Microsoft Flight Simulator program. The books have been designed to be flown in sequence, even though it is not required. The action books come in two levels. Level A is primarily visual flight (VFR), keeping the non-pilot and student pilot well challenged but within reach of everyone's flying ability. Level B, on the other hand, is a book geared to anyone who has completed the first book or is an experienced pilot. This book deals with cloud overcast, shifting winds, and developing weather instrument flights, sometimes right down to a missed approach (go to another place!) condition. It will challenge you and feel so realistic that your body will sway with your airplane motion!
This action book has eight flight scenarios covering five geographic areas. You do not need to fly the scenarios in sequence, though it is advisable to do so. The areas are:
San Diego/Los Angeles, California
1. San Diego to Los Angeles
2. Oceanside to Van Nuys
San Francisco, California
1. San Francisco to South Lake Tahoe
2. Watsonville to Oakland
Chicago, Illinois
1. Kankakee to Champaign
New York City, New York
1. Islip to Westchester County
2. Block Island to Marthas Vineyard
Seattle, Washington
1. Port Angeles to Seattle-Tacoma
You will notice that there are scoring points throughout the flight scenarios. They are weighted according to their degree of importance in the IFR flying arena. The purpose of the scoring is so you may have a target of proficiency to shoot for. We'll tell you, based upon your score, what category of pilot you REALLY, REALLY are! The answers for each scenario are provided in the back of the book, so that you can tell how close your skills are to whatever goals you've set for yourself.
IFR Flights of "13MIKE" - Book Two - Level B has been prepared and written so that it challenges the non-pilot, student pilot, instrument pilot, and commercial pilot. It is assumed the student is familiar and versatile with Microsoft Flight Simulator Versions 4.0 or 5.0. This is not a teaching aid on how to fly the simulator - we assume that you have already practiced using the Microsoft Flight Simulator's own manual and guide. So whether you have version 4.0 or 5.0. this companion provides you with a custom program geared for your needs no matter what version you own.
The airplane in which you will be practicing is a Cessna 182 RG, a retractable gear airplane. We recommend that you use the map display very sporadically - more for curiosity sake than anything else. The areas are default areas which come automatically with your original Microsoft program. You won't have to build any scenery, locations or navaids unless you want to do so for your own personal thrill. We also recommend that you follow all the steps in each scenario so you can build a habit pattern of awareness in procedural techniques, especially in the preflight area. If you do skip a step, you won't fall out of the sky and die in simulation, but you will fail to utilize this action book to its full benefit!
You may fly each one of these flight scenarios using your keyboard, mouse, or joystick. There is no specific preference. The transfer of learning will be attained by the application and practice of the standardized procedures which are a foundational part of each and every flight scenario. These procedures are practiced and accepted worldwide. We recognize that there will be differences of opinion based upon Fixed Base Operator (FBO) or flight school methods of instruction. For example, the magneto checks which we have you do are performed with "LEFT" first then with "RIGHT", so that at the end of the final magneto check one click will bring it back to "BOTH". If the "LEFT" magneto was checked last, then one click would rest on the "RIGHT" magneto, and a pilot could then quite inadvertently take off with only one magneto in operation!
So, start up your computers! CESSNA 13MIKE is ready to fly with you to the exciting and challenging IFR world in a totally hands on, you're in control, plan ahead style of airplane navigation! Happy flying!!!!!
******************************************************************************
As you progress through this companion, we would enjoy hearing about your triumphs, thrills, and any other comments you may wish to share with us. We are always eager to hear from our fellow flyers. All comments are appreciated. Please send them to CalMil Publishing, 2224 Katahn Drive, Prescott AZ, 86301.
Professor Douglas W. Miller
Professor Fred John Calfior
| Table of Contents |
|
ABOUT THE AUTHORS | |
OTHER FLIGHTS OF "13MIKE" |
|
|
PREFACE | |
|
PREFLIGHT | |
|
About This Action Book | |
|
Flying The Scenarios | |
|
The Instrument Environment and You | |
|
Flight Scenario One (Islip to Westchester County) | |
|
Flight Scenario Two (San Diego to Los Angeles) | |
|
Flight Scenario Three (Kankakee to Champaign) | |
|
Flight Scenario Four (San Francisco to South Lake Tahoe) | |
|
Flight Scenario Five (Port Angeles to Seattle-Tacoma) | |
|
Flight Scenario Six (Oceanside to Van Nuys) | |
|
Flight Scenario Seven (Watsonville to Oakland) | |
Flight Scenario Eight (Block Island to Marthas Vineyard) |
|
ANSWERS | |
|
APPENDIX A (Flight Plan Form and Worksheet) | |
|
Flight Plan Form | |
|
Flight Plan Worksheet | |
|
APPENDIX B (Low Altitude Enroute Charts) | |
|
B1 - New York (L-28) | |
|
B2 - San Diego/Los Angeles (L-3) | |
|
B3 - Chicago (L-23) | |
|
B4 - San Francisco (L-2) | |
|
B5 - Seattle (L-l) | |
|
B6 - New York (L-25) | |
|
APPENDIX C (Airport Diagrams and Approach Plates) | |
|
C1 - Scenario 1 (Islip to Westchester County) | |
|
C2 - Scenario 2 (San Diego to Los Angeles) | |
|
C3 - Scenario 3 (Kankakee to Champaign) | |
|
C4 - Scenario 4 (San Francisco to South Lake Tahoe) | |
|
C5 - Scenario 5 (Port Angeles to Seattle-Tacoma) | |
|
C6 - Scenario 6 (Oceanside to Van Nuys) | |
|
C7 - Scenario 7 (Watsonville to Oakland) | |
|
C8 - Scenario 8 (Block Island to Marthas Vineyard) | |
|
NOTES | |
|
ORDER FORM |
| PreFlight |
ABOUT THIS ACTION BOOK
The flight scenarios in this action book have been written with the assumption that you are familiar with the operation and control of Microsoft Flight Simulator 4.0 or 5.0.
Hi! My name is Professor Miller. Professor Calfior and I will be helping you fly "N9413M", referred to as "13MIKE" (pronounced "ONE THREE MIKE"), through the scenarios in this action book. It is to your advantage to read the Microsoft Flight Handbook and understand all the keyboard controls for operating the instruments, engine, and flap controls on the Cessna 182 RG instrument panel before starting. An excellent way to acquire this knowledge is by going through Microsoft's "Flight School".
The following Flight School sections are recommended: 1) "Ground School", 2) "Basic Flight Training", 3) "Advanced Flight Training", and 4) "Navigation Course". It is best to complete all lessons in each of these sections. Flying the scenarios in this action book without the Flight School experience is possible. We try to provide as much help as we can in areas where you may run into problems. You can also refer to the Microsoft Flight Handbook for help. We highly recommend that you have a good understanding of how the following instruments work: 1) VOR and OBI, 2) DME, and 3) VSI.
Flight Simulator version 5.0 comments
The latest version of Microsoft Flight Simulator is something to behold. The scenery is fantastic, and the instruments and controls are very realistic. There are a few differences between versions 4.0 and 5.0. We have used a bold square bracket "[ ]" to indicate any 5.0 version specific command or answer. If you are flying version 5.0, please use the numbers in the square brackets.
Make sure that your propeller is set to "fixed pitch". Airspeed indicator to "indicated". Aircraft position will need to be set using Latitude and Longitude settings. 5.0 also displays NAV 1 and NAV 2 DME simultaneously. When you come across a command that tells you to switch to NAV 2 DME, just revert your attention to your second DME display.
Due to the slant range consideration given in version 5.0, the minimum DME for station passage over a VOR will be different from that of version 4.0, and is also noted in brackets.
The power settings are directly linked to the airspeed indicator. In other words, as your airspeed increases, your RPM will increase, and vice versa. You will have to closely watch your RPM settings as your airspeed changes, in order to maintain the commanded RPM setting.
When setting up winds and clouds, each level must be created in sequence to mimic the version 4.0 levels.
FLYING THE SCENARIOS
The "Competitive", "Challenging", "Fun", "Exciting", "Thrilling", and "Nerve Racking" experiences of 13MIKE are back! Along with "White Knuckle" and "Yukky" weather! All levels of flyers have agreed that these scenarios are, by far, the most challenging series of intensely packed instrument flights they have ever encountered. From the zero-zero takeoff to the instrument landing approach with a two hundred foot ceiling, and everything in between, Professors Calfior and Miller keep you busy and on the edge of your seat from startup to shutdown. All procedures are authentic, from the flight plan and weather brief, to the low altitude enroute charts and instrument approach plates.
The flight scenarios we created in this action book are the results of our many years of actual flying and flight instructor experiences. We hope you will benefit from the great effort we expended to assure the authenticity of each and every scenario, and the realism that we ingrained into each flight.
As you progress through the flights, you will get a sense of repetitiveness from scenario to scenario. Because of the authentic nature of each flight, it was necessary to step through the repetitive procedures that are an inherent part of every real flight. Flight instructors spend hours upon hours trying to get the student to be able to repeat these procedures in their sleep. Welcome to the real world of instrument flying!
Okay, here is an overview of the setup procedures, COM dialog, questions format, simulator flying techniques, and general hints.
SETUP
Aircraft - It is important to select the Cessna 182 RG aircraft. All performance and position parameters are based on the 182 RG. If another aircraft is used, your answers will not match the answers in the back of the book.
Winds - The winds are set by levels. The wind changes speed and direction as your altitude changes. Double check the level settings and make sure that the wind speeds and directions indicated in the SETUP section of the scenario match your settings, as well as the turbulence levels. Your distance, timing, and position answers will be off if the winds are not set correctly.
Clouds - The clouds are set by levels. Thunderstorms are also found in this section. Make sure you have the proper level settings, which become especially important when shooting an instrument approach to your destination airport.
Position - When the simulator starts, you are placed at a default airport and runway. Do not be concerned about this. The SETUP section of the scenario takes you through a repositioning series of steps. Just follow the instructions and you will be repositioned at the correct airport for the departure part of the scenario. The aircraft positioning sequence has four parts, "NORTH", "EAST", "ALTITUDE", and "HEADING". Be sure that all parts have been set correctly. You do not need to set the "Control Tower" position. Caution, your position will be different at each airport. You will need to read the TAXI section to determine how to get to the runup area for the departure end of the runway in the scenario.
COM SETTINGS and DIALOG
This action book is based on realistic flight procedures which include weather briefs and radio communications. Unfortunately, the radio dialog of the Microsoft Flight Simulator is limited, therefore we have inserted full radio communications dialog within the scenarios where they would normally occur. This dialog will appear after you have changed COM frequencies, and a transmission on your part or a broadcast message would normally take place. At times, you will tune in an ATIS frequency and see a message run across your outside view screen. Microsoft Flight Simulator has ATIS broadcast messages at selected airports only. To make the scenarios as realistic as possible, we have included ATIS messages in the action book for all airports that are used. These ATIS messages will not necessarily match those that Microsoft displays. You only need to be concerned with those in the book.
Some of the frequencies listed in the Microsoft Flight Simulator are different from those you'll notice in the IFR low altitude enroute charts and instrument approach plates. Please use the frequencies listed in the scenarios. Also, you will notice that all radials given in the book are even numbered, which differ from some of the instrument approach plates and Victor airway tracks. This is due to Microsoft Flight Simulator version 4.0's two degree gradation for the OBS.
QUESTIONS and ANSWERS
One of the objectives in flying the scenarios is to obtain the highest score possible by performing the listed procedures as precisely as you can. At different times during the execution of the scenario, you will be asked to "pause" the simulator. Write down specific flight parameters or answer certain questions pertaining to the flight (all questions are indicated with a double "**"). After you have written the information down, you will be asked to continue the simulation. Each question has a certain point value assigned to it. Some questions are more important than others, and therefore have a higher point value. At the end of the flight, you add up the points to find out what kind of pilot you are. You will need to study the questions you missed so you can do better the next time you fly that scenario.
THE PATH TO THE PERFECT SCORE
Obviously, you are interested in gaining the maximum number of points for each flight scenario. The level of flight difficulty increases as you get deeper into the book. For the most part, it will take you at least three to five attempts before you can nail each flight scenario with a maximum score! The harder flights may even require more than five flights! So don't feel discouraged at a low score for your first flight. That's what makes these series of flight scenarios so dynamically alive and heart pounding! You keep trying to better your previous attempt, being ready for a required quick reaction that you may have missed before, or keeping your VOR needle centered so you can accurately meet a checkpoint.
We recommend the following five steps when you're ready to fly:
1. READ THE ENTIRE SCENARIO FROM START TO FINISH WITH CHARTS IN FRONT OF YOU. THE FLIGHT CANNOT BE UNDERSTOOD UNLESS YOU WALK IT THROUGH.
2. ENJOY BEING IN THE AIR DURING YOUR FIRST FLIGHT. TRY TO STAY A PAGE AHEAD SO YOU CAN ANTICIPATE WHAT IS COMING UP. GO FROM DEPARTURE TO DESTINATION FOLLOWING EACH SERIES OF NOTES AND TASKS METHODICALLY.
3. THE SECOND FLIGHT, YOU KNOW WHAT TO EXPECT. STABILIZE YOUR FLYING BY BEING SHARPLY ON ALTITUDE - PROPER POWER SETTINGS - RECOMMENDED OR PREVIOUSLY DISCOVERED DESCENT RATES, ETC. SEARCH TO SPECIFICALLY BETTER THE AREAS WHICH YOU MISSED THE FIRST TIME.
4. THE THIRD FLIGHT, SKIP PROFESSOR CALFIOR'S NOTES (YOU'VE BEEN THROUGH THEM TWICE NOW!) AND CONTINUE WITH THE RADIO CALLS. HUNT FOR THOSE ELUSIVE CORRECT NUMBERS, BUT KEEP THE FLOW NONSTOP FOR THE ENTIRE FLIGHT RIGHT TO THE LANDING.
5. THE FOURTH FLIGHT AND ANY ADDITIONAL FLIGHTS, PAY SHARP ATTENTION TO ALL THE NUMBERED NOTES. THESE FLIGHTS WILL BE QUITE DYNAMIC BECAUSE YOU WON'T BE NEEDING TO READ AHEAD TO PREPARE FOR THE NEXT STEP! YOU'VE GOT THE SCENARIO PRACTICALLY MEMORIZED. WHEN YOUR TIMING IS ON, AND YOU KNOW THE ROAD, IT BECOMES ONE THRILLING MANEUVER AFTER ANOTHER.
HINTS and SIMULATOR TECHNIQUES
The following is a list of flying techniques that will help in performing the scenarios with more accuracy and precision, thereby increasing your score:
a) You may need to adjust your power setting from the one stated in the scenario. This is due to deviations from the correct approach speed and altitude.
b) Watch your VSI (vertical speed) on approach. Try to maintain a constant vertical speed.
c) Watch your heading. The winds will make your airplane fly a different ground track than your heading would indicate. You may need to set in a crab to compensate.
d) Watch overbanking and over controlling. It is easy to over control the simulator. After putting in a roll control, you will need to put in an opposite control to stop the roll. Do not overdo it. The airplane will oscillate back and forth if you do. Gentle on the controls.
The following hints will help you in flying the scenarios in the beginning. After you become more proficient, try to fly without the aid of these hints.
a) For finding the airport and taxiing around the airport, use the "Num Lock" key.
b) To determine orientation to the airport and other landmarks, use the "Scroll Lock" along with key pad numbers 1 through 9 (except 5) to change your view of the outside to the different windows of the aircraft.
c) To provide more stability to the aircraft and minimize the aircraft's tendency to wander, you may want to fly with the autopilot "wing leveler" on.
d) To help maintain your orientation, follow your flight on the IFR low altitude enroute charts in Appendix B.
e) You should fly the scenarios more than once, trying to improve your performance, accuracy, and score each time. Remember timing is important.
f) You may want to save your approach or landing configuration so you can practice these sections without having to fly the entire scenario again.
g) For the best scanning technique, use a round pattern around the six-pack of instruments. These are the airspeed indicator, attitude indicator, altimeter, VSI, heading indicator, and turn and bank indicator. Other scanning methods are the "L", "T", or "X". Don't disregard your other instruments, but these six are the meat of basic attitude instrument flying.
THE INSTRUMENT ENVIRONMENT AND YOU
The following section consists of some helpful instructional aids, methods, and knowledge of how to operate in an instrument environment, so as to allow you to accomplish the basic instrument procedures given throughout your flight scenarios. It will help you acquire a high flight score.
PREFLIGHT
Notice to Airmen System:
Called NOTAMs, there are three categories possible.
1. NOT AM (D) which is distant
2. NOT AM (L) which is local
3. Flight Data Center (FDC) NOTAM
A representative sample of information found in NOTAMs are:
i. airport equipment outages
ii. runway or taxiway closures
iii. change in instrument approach procedures
iv. temporary flight restrictions
v. construction or movement on runways
Flight Plan for IFR Flights:
IFR flight plans need to be filed at the least, thirty minutes before planned departure, so that the controlling agency has plenty of time to prepare your brief.
When using Victor airways, designate each and every one in the Route of Flight block of your Flight Plan Form. If there are several VORs in a line along a similar Victor airway, just the first and last needs to be identified as endpoints of that Victor airway. When going direct from one fix to another, not using a Victor airway, each checkpoint must be designated.
Special equipment codes used for Block 3 of your Flight Plan Form are as follows:
1. /X - no transponder
2. /T- transponder, no altitude encoding
3. /U - transponder, altitude encoding
4. /D - DME, no transponder
5. /B- DME, transponder, no alt encoding
6. /A - DME, transponder, altitude encoding
7. /M- TACAN, no transponder
8. /N - TACAN, transponder, no altitude encoding
9. /P - TACAN, transponder, alt encoding
10. /C - RNAV, transponder, no altitude encoding
11. /R - RNAV, transponder, alt encoding
12. /W - RNAV, no transponder
13. /G - Flight Management System
13 MIKE is slash A equipped, even though the transponder on the instrument panel does not have an ALT indicator.
DEPARTURE
Departure Control:
If taking off from a controlled airport, (one which has a tower) do not switch to a Departure Control frequency until advised to do so. If taking off from an uncontrolled airport, you may switch to the Departure Control frequency once airborne and at your discretion.
In a flight plan clearance, both the departure frequency and the transponder code will be given. Pilots are advised to not activate their transponders until just prior to the takeoff roll. This is so that radar does not have to pick up any unnecessary clutter.
Standard Instrument Departures (SIDs);
You cannot accept a SID unless you have, as a minimum, a textual description of it with you, and that you can meet the required performance parameters necessary to execute that SID. By flying a SID, and following its track, you are ensured of obstacle clearance straight through to the minimum enroute altitude. You may enter a SID at any portion of that SID, as long as you are cleared for it. In other words, it does not always have to be flown from its designated start point all the way through to its end point.
ENROUTE
Low Altitude Enroute Charts:
Some altitudes of interest when analyzing a low altitude enroute chart are:
1. Minimum enroute altitude (MEA) - this is the minimum IFR altitude under normal circumstances, where navigational signal coverage is constant from the VOR at one end of the airway to the VOR at the other end of the airway. There are three methods of determining when to switch from the navigational facility behind you to the one in front of you on the airway, (called changeover points or COP)
A) when it is symbolized by a three line right angled symbol
B) when a course change occurs at an intersection to bring you to the navaid in front of you
C) with no symbol given, or course change present, the changeover point will occur at the halfway point along the Victor airway
2. Minimum obstruction clearance altitude (MOCA) - this is the minimum emergency IFR altitude which guarantees navigational signal coverage only within twenty two nautical miles of a facility. It does ensure one thousand feet obstacle clearance in non-mountainous, and two thousand feet obstacle clearance in mountainous areas.
3. Minimum crossing altitude (MCA) - this is an altitude designated to cross a specific fix at or above. What will follow is a higher MEA than the one you just came from.
4. Minimum reception altitude (MRA) - this is the altitude at a certain fix which you must be at or above in order to be guaranteed a way to identify that fix via an off airway navigational facility. Most of the time, that will be a VOR.
VOR Tracking on a Radial:
When you have intercepted your desired course, the CDI needle should be centered with either a "TO" or a "FROM" indication. If there were no winds to blow you off course, that needle would stay centered. But that generally does not happen, so something called tracking and bracketing is done.
Whenever you notice you're drifting off course, (that is, the CDI needle is moving from its center position), make a twenty degree correction in the direction that the needle is moving. Hold that twenty degree correction until you see that the needle is back to its centered position.
Now take ten degrees out of your heading correction, and watch that needle. If it remains centered, your ten degree crab angle is the correction you need to hold that desired radial. But if the needle starts moving now in the opposite direction, the ten degrees is too much of a correction. So turn to the heading which parallels your radial and drift back to a centered needle.
When the needle centers, make a five degree correction in the original direction and that should keep your needle centered.
If the first twenty degrees of heading change does not force your CDI needle to head back towards the center, then put in another twenty degrees in the same direction. You're obviously in a strong crosswind. When the needle finally centers, take out twenty of those degrees and see how your needle reacts.
Reading the VOR CDI:
The VOR OBI has a needle which moves to the left or right of center, depending on whether you are left or right of your intended radial. There are four visible dots to the right and left with a small circle between them. The circle is covering the first dot which would be to the left and right of the center of the circle. Therefore, when the needle, called the CDI, is over the left edge of the circle, it is one dot to the left of center. Each dot represents two degrees of radial.
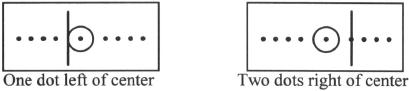
When you are flying these scenarios, and a command tells you to turn to a specific heading when your NAV 1 or 2 CDI is two dots RIGHT of center, you must count the circle's edge as dot one.
Holding Patterns:
Holding at some designated position will be necessary whenever you are given a clearance to a fix other than your destination, and a further clearance has not been received at the time of your arrival at the fix.
There are three methods of entering a holding pattern:
1. Direct - where you turn directly to the outbound leg of the holding pattern
2. Teardrop - where you turn to the far corner of the outbound leg by way of a thirty degree intercept
3. Parallel - where you turn to parallel the inbound leg
Most holding patterns are designed from one minute inbound legs, and the outbound leg is adjusted accordingly based on winds. A rule of thumb is that whatever wind correction angle you need to track properly on the inbound leg, double that correction for the outbound leg.
If an expect further clearance time (EFC) has been received, you must plan your holding pattern so as to be at the holding fix on the inbound leg at that time, and then continue your flight to the destination.
ARRIVAL
Standard Terminal Arrival Routes (STARs):
This is a programmed track which brings you to your destination. As in a SID, you cannot accept a clearance with a STAR in it unless you have at least a textual description of it. Also, a STAR can be entered at any portion of that STAR, if cleared for it.
Instrument Approach Procedure Charts (IAPs):
An instrument approach procedure chart is made up of five sections when using the NOS charts.
1. Planview - this gives a bird's eye view of the approach from above, and is found in the upper panel.
2. Profile view - this gives an edgewise view of the approach, depicting altitudes to descend to at various portions of the instrument approach.
3. Minimums section - this gives the landing minimums by way of visibility, and the lowest altitude you can descend to or arrive at, without having the field in sight. It can change when approach lights are inoperable, or when another altimeter source other than the destination's must be used. Also when not landing straight in - but having to circle to land.
4. Geographic view - this displays the airport itself and the orientation of the final approach course to the runway. It shows the runway lights that are available.
5. Timing and Remarks section - this is necessary when the only way to know when you've arrived at the missed approach point (MAP) is by timing from the final approach fix (FAF) to the missed approach point, based on your ground speed. Pertinent notes are often present.
Visual approach:
ATC (Air Traffic Center) may opt to assign you a visual approach to the airport. This is to relieve their workload and allow more airplanes to land in a shorter period of time, than if instrument approaches are executed.
You must remain VFR and have either the airport in sight, or the traffic which precedes you in sight.