Flights of 13MIKE
by Fred J. Calfior and Douglas W. Miller
GENERAL FLIGHT TECHNIQUES
and
RULES OF THUMB
The following section consists of some helpful instructional aids, techniques, hints, and rules of thumb which will allow you to accomplish the basic flight maneuvers given throughout your flight scenarios. It will help you acquire a high flight score.
Takeoff:
The takeoff can be separated into three segments.
1) The takeoff roll 2) The liftoff 3) The initial climb
a) The takeoff roll is simply an acceleration of the airplane to its rotation speed with full power. It is important to maintain the centerline of the runway. As the speed increases to rotation speed, gradually increase back elevator pressure in order to get the weight of the aircraft off the wheels.
b) The rotation speed for the Cessna 182 RG is 50 knots. The aircraft will then continue to accelerate to 70 knots. It will then lift off the ground since there is now enough air over the wing to generate the necessary lift.
c) In the takeoff roll, winds will not always be right down the runway. These crosswinds can make it slightly more difficult to maintain that runway centerline. Proper procedure calls for full ailerons into the wind at the start of the takeoff roll. As the ground speed accelerates, the ailerons are slowly taken out until at rotation speed, they are centered.
d) Once airborne, you need to maintain a specific climb speed. 80 knots is the climb speed generally utilized in these flight scenarios. Since the airplane wants to accelerate very rapidly, you must set about a 10° nose up attitude on your attitude indicator.
e) With liftoff, the nose wants to rise higher than it needs to. That's why a slight nose down pressure may be necessary in order to stabilize a 10° nose up attitude.
f) Let your nose control the airspeed here, since full power is a constant until 1,000 feet above the ground. If your airspeed is greater than 80 knots, raise the nose to bring the airspeed back to 80. If your airspeed is not yet at 80 knots, lower the nose so that you can reach it.
g) Once airborne with a crosswind being prevalent, a "crab" into the wind will be needed to maintain the runway centerline on climbout. Check behind you to verify that you're aligned with the runway, and then use an offset heading into the wind to keep that track as desired.
h) As a general rule of thumb, when you are 500 feet above the ground, then you may retract your flaps to the full up position. (We are assuming that you have taken off with a 10 degree flap down position). When the flaps come up, there is less drag on the airplane and it wants to accelerate. At the same time, the nose wants to drop, which aggravates the stabilized climb speed you have. Therefore, with flaps coming up, consciously raise your nose attitude a bit to keep a hold of your 80 knot climbout.
i) Another rule of thumb is: once you know that you can no longer land straight ahead on the runway, get your landing gear up. The retraction of the landing gear will affect the drag on your airplane. It will require a slight pitch up to maintain your climb speed.
Departure Procedures:
a) A downwind departure is one where you takeoff and maintain runway heading until 300 feet below traffic pattern altitude. You then fly the rectangular pattern around the field until you arrive at midfield, then exit the area with a 45 degree turn away from the field while continuing the climb.
b) A straight out departure is as it sounds. You simply climb on course, maintaining your alignment with the runway and depart the area.
c) The Tower or Departure Control would communicate to you any other type of departure. Unless otherwise directed, you would fly the runway heading until at least reaching traffic pattern altitude. At which time, you can perform a 90 degree, 45 degree, or a radial intercept departure. This will prevent you from accidentally flying into another airplane which has entered the traffic pattern from below.
Leveling off at an altitude from a climb:
a) If you wait until you're right at the altitude before pushing your nose over, then you will shoot right past it and get yelled at by Professor Calfior! A general rule of thumb is to lead your altitude by 10 percent of your rate of climb. But for simplicity's sake, always start to push your nose over gently at 100 feet prior to your desired cruise or level off altitude.
b) Now there's a trick to this leveling off. You are at climb airspeed, and as you lower your nose to slow down your climb rate, your airspeed will increase. As your airspeed increases, your nose wants to go back up! So while the airspeed is steadily increasing, until it stabilizes, you will need to scoot the nose down a little bit and a little bit and a little bit, in order to hold on to that target altitude. Notice this whenever you level off.
Controlling the Airplane:
When maneuvering the airplane, a recommended control sequence to follow in visual flight is:
a) Visualize the desired new flight path and airspeed.
b) Select the attitude and the power required to achieve the desired performance by moving the controls, and then verifying that the airplane has achieved the estimated attitude.
c) Hold the attitude, allowing the airplane to settle down into its new performance.
d) Make small adjustments to attitude and power until the actual performance equals the desired performance.
e) Trim. Heavy loads can be trimmed off earlier in the sequence to assist in control, if desired. But remember that the function of trim is to relieve control loads on the pilot, and not to change aircraft attitude.
Turns:
a) One thing you will notice immediately is that whenever you start a turn, the airplane will want to descend. This is because some of the vertical lift is now heading in the horizontal direction, so you need to give the required vertical lift a boost of energy! As you smoothly commence your turn, bring your nose up a thought! (That's how little you'll need at a standard rate turn)
b) Another gee-whiz feature about this simulator is that once you are established in your turn, the airplane has a tendency to want to slip deeper into the turn. So watch for that, because you want your airplane wing, on the turn indicator, to be pegged right on the "L" or "R" indicator. As it tries to deepen further, tap that wing in the opposite direction just a mite! Don't over control the plane in a rock and roll move throughout the turn!
c) When it comes to rolling out of a turn to a predetermined heading, the first few scenarios will help you by telling you what heading to begin your rollout on. On the average, it's anywhere from 7 to 12 degrees short of your heading mark. Later on, it's expected that you will acquire an eye for your roll rate and start the rollout on your own as to arrive right on your desired heading.
d) Now think about Part (a) up above. It's logical that as you start to roll your wings to the level position, all that extra nose up movement you've put in will want to make your airplane climb! So as you start that rollout, smoothly push your nose down a little in order to hold that altitude.
VOR Tracking on a radial:
Now we're getting into the instrument training side of VFR flying.
a) When you have intercepted your desired course, the CDI needle should be centered with either a "TO" or a "FROM" indication. If there were no winds to blow you off course, that needle would stay centered. But that generally does not happen, so something called tracking and bracketing is done.
b) Whenever you notice you're drifting off course, (that is, the CDI needle is moving from its center position), make a 20 degree correction in the direction that the needle is moving. Hold that 20 degree correction until you see that the needle is back to its centered position.
c) Now take 10 degrees out of your heading correction, and watch that needle. If it remains centered, your 10 degree crab angle is the correction you need to hold that desired radial. But if the needle starts moving now in the opposite direction, the 10 degrees is too much of a correction. So turn to the heading which parallels your radial and drift back to a centered needle.
d) When the needle centers, make a 5 degree correction in the original direction and that should keep your needle centered.
e) If the first 20 degrees of heading change does not force your CDI needle to head back towards the center, then put in another 20 degrees in the same direction. You're obviously in a strong crosswind. When the needle finally centers, take out 20 of those degrees and see how your needle reacts.
Reading the VOR CDI:
The VOR OBI has a needle which moves to the left or right of center, depending on whether you are left or right of your intended radial. There are four visible dots to the right and left with a small circle between them. The circle is covering the first dot which would be to the left and right of the center of the circle. Therefore, when the needle, called the CDI, is over the left edge of the circle, it is one dot to the left of center.

When you are flying these scenarios, and a command tells you to turn to a specific heading when your NAV 1 or 2 CDI is two dots RIGHT of center, you must count the circle's edge as dot one.
Descents:
a) When beginning a descent, you will be reducing the power to a certain predesignated RPM setting. What is important to note is that more than a 1,000 feet per minute rate of descent is considered excessive. As a generalization, 400 to 700 feet per minute is a good average descent rate. The aircraft is well in control, and that is the primary safety consideration. When you start working in instrument meteorological conditions, instrument approaches are always geared to the 400 to 700 feet per minute descent rate. So it's a good habit pattern to build for controllability and safety.
b) If coming in for an approach to your destination, the level off from the descent may be such that you will keep your power setting at its reduced level, to help slow down for traffic pattern operations. If you are still in the en route portion of your flight, it would be wise to lead the level off by 10 to 20 percent of your rate of descent (depending on your descent rate) and to smoothly increase your power back to its cruise setting.
c) Always pay attention to your VSI (Vertical Speed Indicator) while in a descent. This is especially true when in the landing pattern, since a 400 feet per minute descent will quite accurately put you in the most ideal final approach position from the downwind leg. It's easy to lose that VSI from your scan and when you do remember to look, it's at 1500 feet per minute and the runway is looking quite flat up ahead! Make the VSI a constant reference of scan throughout any descent.
Traffic Pattern Entries:
a) The 45 degree entry to a right or left downwind is considered standard.
b) You could be directed to fly overhead the field and descend down into a right or left downwind, depending on your heading.
c) A straight in to a landing is possible where a long extended final approach accommodates the flow of arriving airplanes.
d) It's possible to be vectored to an immediate base leg at an extended distance.
e) Let us repeat once again the importance of realizing that, without any specific instructions from the tower or at an uncontrolled field, the standard traffic pattern is left hand, and a 45 degree entry will be what's expected. Other airplanes that are in the pattern will be expecting arrivals to come in via the 45 degree entry. If you desire to enter differently, make sure that you communicate your position and anticipated approach method, so that others can look for you and exercise collision avoidance procedures by scanning for you where you say you are.
Traffic Pattern Operations:
a) The scenarios in this companion utilize a variety of landing approaches. This was done to provide you with a multitude of landing experiences. But one thing to remember always: if an airport is uncontrolled, the basic landing pattern is left turns and the basic entry is a 45 degree entry. In the diagram which accompanies this section, for another varied view, we have shown you a RIGHT 45 degree entry.
b) To help you be directionally accurate, a right hand pattern is one where your turns are made to the right. Right to base leg - right to final. A left hand pattern is one where your turns are made to the left. Left to base leg - left to final.
c) When arriving via the 45 degree entry, be at your Traffic Pattern Altitude (which is usually 800 to 1000 feet above airport elevation) by at least two miles outside of the field. This is so that you can scan for aircraft that are already in the pattern at your horizon level eye view.
d) When there is a control tower on the field, NEVER go within five statute miles of the field unless you have called the Tower, and let them know you are coming in. That five statute mile radius area is called an Airport Traffic Area (ATA), and you never go in unannounced. By the way, if you are more than 3,000 feet above the airport elevation, then you are not in the Airport Traffic Area, so to fly overhead unannounced is okay!
e) When do you put your gear down? As a standard rule of thumb, your best bet will be whenever you are abeam midfield on your downwind leg. At this point, you should also take some of your power off so that you can slow down to an airspeed (90 knots) which will allow you to bring your flaps down to 10 degrees, or the first notch.
f) You are on the downwind leg when you are flying parallel to the runway you want to land on, about 1 mile wide of it, and 180 degrees in the opposite direction from your intended direction of landing. It's called downwind because it's where the wind is heading DOWN to!
g) When you are opposite your point of intended landing on the downwind, your airspeed should be low enough to permit you to lower your flaps. Take some more power off, and begin a descent at about a 400 feet per minute rate of descent. Stay on your downwind track until the approach end of the runway you want to land on is at your 5 o'clock position (RIGHT DOWNWIND) or 7 o'clock position (LEFT DOWNWIND).
h) When the runway threshold is at those o'clock positions, you should have descended approximately 200 to 300 feet below traffic pattern altitude. Begin your turn to the base leg, which brings you to the centerline of the extended runway, with you being 90 degrees from your final approach course. You will be approximately one mile from the threshold of the runway.
i) At about the 2 o'clock (RIGHT PATTERN) or 10 o'clock (LEFT PATTERN) orientation to the runway threshold, begin your turn to the final approach. At the completion of that turn, you should have descended approximately 400 to 500 feet below traffic pattern altitude.
j) Flaps are extended to the second notch (20 degrees) and third notch (30 degrees) at various points to help you acquire the best all around descent angle to the runway, and to configure the airplane so that the final approach is solidly stabilized.
k) From final inbound to touchdown, each scenario has a wealth of notes to help make the landing a totally inspired success. We do not agree with the saying "A safe landing is one you can walk away from!"
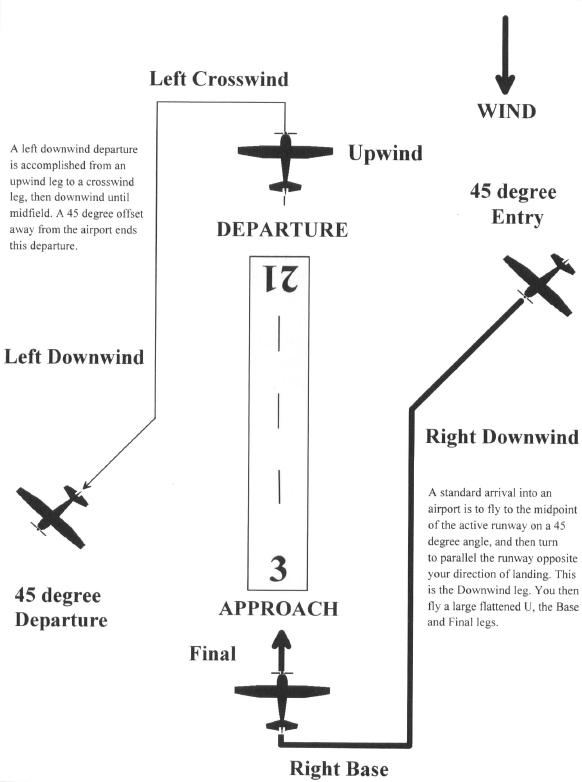
Table of Contents
Previous Section: Flying the Scenarios
Next Section: Flight Scenario One: Riverside to La Verne