Cross Country
by Alfred Poor
Chicago
Flight 1
To Buy a
Burger
Meigs Field in Chicago is the most famous airport in all of flight simulation because it is the place where Microsoft Flight Simulator has put users by default, going all the way back to the Apple ][ days.
It is only fitting that the first flight in this book begin at Meigs, using the familiar starting point. Your destination is Morris Municipal in Morris, Illinois, about 45 nm (nautical miles) away. We’ll keep this flight fairly simple—or at least as simple as general aviation flying can be in a crowded urban airspace. The flight should take just over a half an hour to complete.
Why would you want to go to Morris? In real-world flying, the $100 hamburger is a pilot’s favorite treat. ($5 for the burger, $95 for the plane rental, fuel, etc.) Morris Municipal happens to have a great airport restaurant right on the field, named Runway 47. (It gets its name from Highway 47 which runs next to the airport.) Come for lunch, and you can enjoy homemade soups and pies along with your burger. (There’s a breakfast buffet on the weekends.) And it’s a convenient distance from Meigs.
Planning out a Route
Though the straight line distance is only 45 nm from Meigs, you can’t fly that route in the real world. The FAA has regulations governing airspace use, and the sectional marks a variety of airspace restrictions that you would have to deal with in the real world, so we’ll follow the regs here as well.
There’s the O’Hare Class B airspace (formerly a TCA, or Terminal Control Area) where you need to get Air Traffic Control permission to enter. Midway has a Class C airspace (formerly an ARSA, or Airport Radar Service Area) where you also need to establish radio contact before entering. Combined, the two effectively block your travel to the southwest from Meigs. If you go too far down the south shore of Lake Michigan, however, you run into the Gary Regional Class D airspace (formerly an ATA, or Airport Traffic Area) which also requires radio contact before entering.
(Meigs Field has a control tower which you have to contact in order to depart from the field, but it only operates from 6:00 am to 10:00 pm. You can either make the required calls and assume that you’ve been cleared to take off, or you can plan a dawn patrol flight that gets you off the ground before the tower opens for business.)
We’ll chart a route that takes you down the shore to a point where you can clear the Midway airspace, but before you encounter the Gary airspace, all the while staying below the floor of the O’Hare airspace. To find your way, you’ll use a combination of radio navigation (using a VOR) and old-fashioned pilotage. For this trip, IFR stands for “I Follow Roads.”
The first step in planning out a trip like this is to draw out the route on a sectional. From this, you can determine the magnetic headings for each leg. You can also identify convenient checkpoints that you can spot along your route. Airports and large roads are the most reliable landmarks in FS5.1, though you will often find lakes and rivers that you can use.
|
One problem with pilotage is that you may see more than one landmark that could be your checkpoint. You can increase your chances of a correct identification by knowing your current position. To do this, you need to know the distance from one checkpoint to the next, as well as your planned cruising speed, so you can estimate how long it will take to get from one checkpoint to another.
A Look at the Log
I’ve already prepared a flight log for you that you can use for your flight. The Fixes column lists the departure and destination points, as well as turning points and visual checkpoints along the route. The Route columns list the magnetic course for the leg, and the cumulative distance (in nautical miles) between points in the log.
The Estimated columns include the Ground Speed and Total Time entries. Since we’re planning this flight for calm wind conditions, the ground speed will equal the airspeed, so there’s only one entry in that column. (You can dial in some wind to make the navigation a bit trickier if you want, but I recommend that you just use the default weather settings for this first flight.) I have also assumed that you’re not in any particular hurry to get your burger today, so I’ve planned on a fairly sedate 130 knot speed for the Cessna 182.
You can use an E6 circular slide rule—a whiz wheel in flying lingo—or your favorite spreadsheet program to figure out the estimated cumulative elapsed times for each point in the log. I’ve already done the math for you. I’ve also factored in three minutes at the start for your take-off roll, climb-out, and turn. At a 500 foot per minute climb, you should be nearly at the right altitude for the first leg, and ready to level out and trim for your cruise speed of 130 knots.
The Actual column is for you to use. Use a stopwatch or the clock on the airplane’s panel to keep track of the elapsed time, and enter the time at each point of the trip. You’ll know when you should be coming up on the next checkpoint or turn, which helps you stay “ahead of the airplane” by anticipating the next step before its time comes. Keep in mind that the estimated times are based on when you pass the point in question; you’ll have to look to the side or down (press the Slash key on the numeric keypad, followed by 4 for left, 6 for right, or 5 for straight down) to get an accurate timing. If you pass close to your checkpoint, either pan your side view downward (Shift+Enter) or use the Map window to see when you pass it.
You can also use the flight log to “keep score” on your flight, by seeing how closely your actual times come to the predicted numbers. If you can arrive in the pattern at Morris within two minutes of the predicted time, you are doing well. (Firewalling the throttle to make up time or executing 1-mile S-turns to lose time are cheating!)
How High to Fly?
There’s one detail that is not shown on the log: the altitude for the flight. In the real world, there are lots of factors that govern a choice of altitude.
First, you have the FARs (Federal Aviation Regulations) which have rules for VFR flights. From 3,000 feet above ground level and below 18,000 feet above sea level, and on a magnetic course of 0 to 179 degrees (heading east of north or south), you should travel at odd thousands of feet plus 500 feet above sea level: 3,500, 5,500, 7,500 feet and so forth. On a magnetic course west of north or south, fly even thousands plus 500: 4,500, 6,500, 8,500 feet and so on. Since this is based on dividing the compass rose into two halves, it is frequently referred to as the “hemispheric rule.”
Note that we have emphasized the word course in the rule. This is because you may be flying a different heading due to wind corrections. So pick your altitude based on your planned ground track, not where you point the nose of your plane.
For most efficient fuel burn (assuming a properly leaned engine), you want to travel as high as you can. On the other hand, you don’t want to waste all that fuel gaining altitude just so you can finish with a brick-like descent at the other end.
|
And finally, there are the airspace restrictions to consider. The Chicago sectional indicates that the outer ring of the O’Hare Class B airspace has a floor of 3,600 feet (as shown by the “100/36” notation.) The Midway Class C airspace has an outer region with a floor of 1,900 feet, and extends all the way up to the Class B airspace (as indicated by the “T/19” notation.) And the Gary Class D airspace extends up to 3,100 feet (the “[31]” notation.)
Put all these together, and we’ll settle on an altitude of 3,500 feet for the first leg of the flight (which takes you to the edge of the Class B airspace), then a climb to 4,500 feet for the remainder of the flight. Be extremely careful not to overshoot the altitude on the first leg, however, because an incursion in the Class B airspace frequently is followed by a visit by the FAA. (You could also complete the entire flight at 3,000 feet and be okay, but it’s easier to see your checkpoints from higher altitudes, and the extra distance between you and the ground gives you more time to find a safe place to set down in the unlikely event that your engine should quit.)
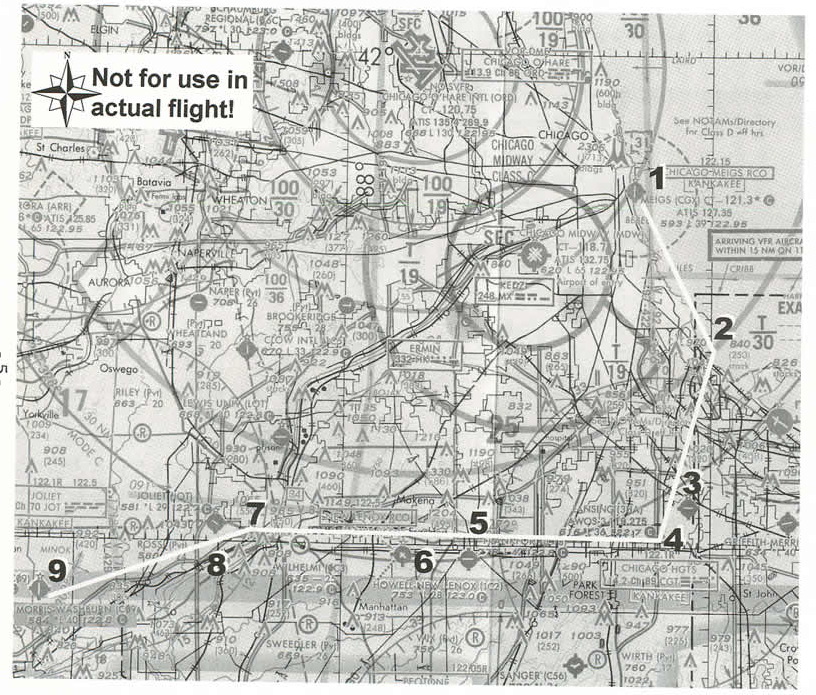
Checking the Checkpoints
Take a moment to look at the sectional and find the checkpoints we have picked for the route. There’s no good visual reference for the turn at the end of the first leg, so you’ll have to rely on VOR navigation to find that turn. You will pick up and follow the 190 radial of the Chicago Heights VOR (CGT, frequency 114.2); this leg takes you close to Lansing airport, which should pass on your left. Chicago Heights VOR is a key approach point for both O’Hare and Midway jet traffic, so keep your landing lights on for visibility and your head on a swivel watching for traffic.
When you reach the Chicago Heights VOR, you turn west toward Joliet. This route follows US Route 30, but in the real world it can be difficult to see the road, and it’s not there at all in FS5.1. So use the airports on the route as checkpoints, which should pass by just to the south of your route, on your left. First you’ll come to Frankfort (with US Route 45 running north and south about a mile beyond it.) Next comes New Lennox.
Next, you’ll come upon the city of Joliet. Avoid flying too far north of the town, because the guards at the state prison there don’t like it when small planes fly too close. Before you reach Joliet airport (which should be on your right,) turn and follow Interstate 80, which will be the second highway that heads southwest out of Joliet. Your heading will be about 245 or 250 degrees magnetic, depending on where you make your turn.
Since you’ll need to lose a bit more than 3,000 feet at this point to get down to Morris’s pattern altitude of 1,388 feet, now would be a good time to start a controlled descent of about 500 feet per minute, since you should be about six minutes from the airport at this point.
When you arrive at Morris, you can plan on entering the pattern with a 45-degree entry on a left downwind for Runway 18, and take it on in for a landing.
Preparing to Fly
Now that you’ve reviewed your flight plan, you’re ready to make the flight. Before you take off from Meigs, however, there are a few steps to add to your preflight checklist.
First, you’ll want to set your NAV 1 radio for the Chicago Heights VOR. It’s easier to do this on the ground before you blast off, so set the frequency to 114.2, and set the OBS to 190 degrees. As you fly down the lake shore from Meigs, the OBS needle will slowly move to the center of the dial. When it reaches the center, turn to a magnetic heading of 190 degrees, and keep the needle centered (don’t forget to also start your climb to 4,500 feet!) and you will fly straight to the Chicago Heights VOR.
You can also use your other navigation radio to help provide a backup for your pilotage in finding the Morris airport. The field is located along the 210 degree radial of the Joliet VOR (JOT.) By setting your NAV 2 radio to the Joliet frequency—112.3—and the OBS to 210, the needle will center when you cross that radial. Think of this as an invisible fence in the sky; if you cross it, you’ve gone too far. If the field isn’t under you at that point, you can fly toward the Joliet VOR (heading 30 degrees) or away from it (heading 210 degrees) to find the field. This backup may come in handy, since there are a number of highways coming out of Joliet, and it can be easy to follow the wrong one.
Take Off
Now you’re all set to take off from Meigs on your cross country adventure. Remember that the Meigs traffic pattern calls for right-hand turns for Runway 36 (keeps the noisy planes over the lake, instead of over the downtown buildings.)
If you want to vary the flight, change the time of day to dawn, and enjoy the rosy sky at sunrise. Or take off at dusk, and try your hand at the challenge of nighttime pilotage and landings at small fields in the dark.
No matter what time you fly, however, remember to keep a close watch on altitude and airspeed, and time your progress past each checkpoint. By the time you reach Morris, you’re sure to have worked up an appetite for that $100 burger that is waiting for you.
< Situation file: XC-CH1
Table of Contents
Previous Section: Section A: Chicago
Next Section: NORDO to Gibson City — Morris to Gibson City