Cross Country
by Alfred Poor
Chicago
Flight 3
Cheapskate
GPS
New technology touches our lives in dozens of ways every day, from faster computers to cellular phones. Global Positioning System (GPS) satellite navigation has revolutionized the art of finding your way from one place to another, for everyone from hikers and boaters to pilots. But in the real world of general aviation, yesterday’s technology still rules—the average pilot flies an airplane that is at least 20 years old, and is outfitted with navigation equipment of similar vintage.
The same is true for FS5.1 pilots; the Cessna 182RG comes equipped with a pair of VOR receivers (one of which can be swapped for an ADF—automatic direction finder—for use with NDB—non-directional beacons). A real-world pilot can spend $1,000 and get a handheld GPS receiver complete with a moving map display, but you don’t have that option for FS5.1 (at least, not yet).
With this flight, you’ll learn a handy navigation technique that will let you fly direct to your destination under most conditions, even without a GPS.
VOR Direct
FS5.1 pilots (as well as most real world single-engine aircraft pilots) must rely on VOR beacons as their guideposts in the sky. And a typical flight route goes from one to another to another until you reach your destination.
This routing is fine as long as your VOR targets are more or less in a straight line from your departure to your destination, but this is rarely the case. Instead, you may have to fly a considerable distance out of your way to reach the nearest VOR, and then go out of your way again to reach the next one. If your route zig-zags across the straight-line path between your departure and destination, you can waste a lot of time and avgas in the process.
Safety is another issue. Flying directly over a VOR does make navigation easy, since you always know exactly where to turn and what heading to use. The problem is that other pilots are using the exact same strategy, so as you get closer to the VOR, the chances of your path converging with another aircraft’s increases. Two planes trying to occupy the same airspace at the same moment generally does not result in a desirable outcome.
There is a way that you can simply launch directly from your departure point and head straight to your destination, just as you could with a GPS device. In fact, if you have a VOR with DME (Distance Measuring Equipment) readout—as the FS5.1 Cessna panel does—and you spend a little extra effort planning your route, you can fly direct using just VOR beacons.
I learned this technique from “The Proficient Pilot”, by Barry Schiff, which is a book that I strongly recommend for all pilots who want to become more skilled and knowledgeable.
|
Gibson City to Joliet
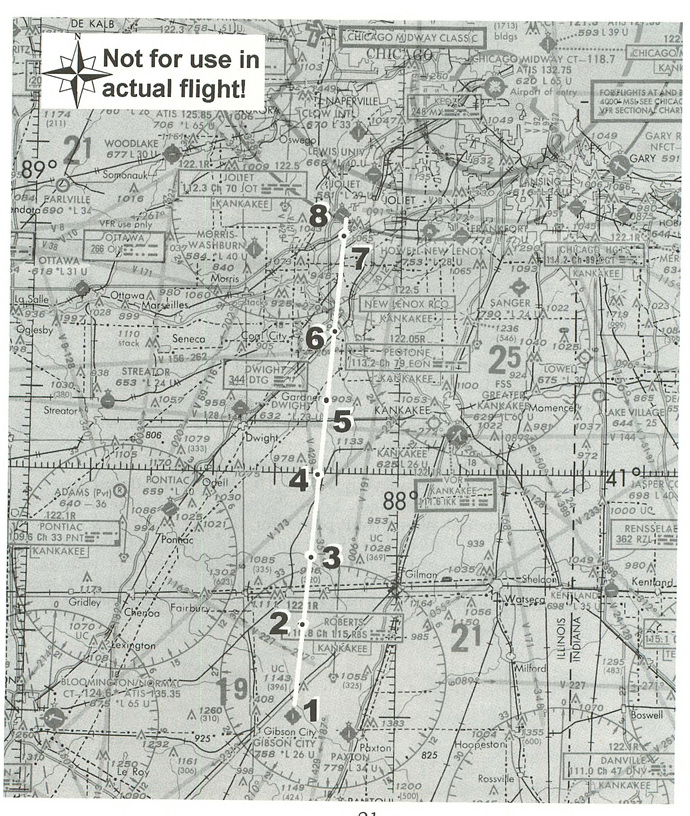
Since your last flight in this region ended in Gibson City, you’ll start there and fly directly to Joliet. Your planned route is highlighted on a section of a World Aeronautical Chart (WAC). (For a more detailed view of the route, you should use a sectional chart.) As you can see, a direct route between the two airports is almost due north—actually, I make it out to be 1º magnetic. The distance for this route is 62 nautical miles.
If you were to plan the flight going to VORs, you would probably choose Roberts (RBS) and Peotone (EON) as your waypoints, which would add 12 more miles to the route. This means 20% more fuel burn and 20% more flying time compared with the shorter, direct route.
But what can you use as checkpoints along the direct route? As the chart shows, there seem to be few notable features in the real world, and FS5.1 will show even less than that.
The answer is that you can use the VORs that are to either side of your route. The first step is to draw your line of flight on the chart, and then make tick marks at regular intervals along the line. You’ll want to pick a distance that will make the navigation easier; in this case, I have planned the flight at a sedate speed of 120 knots, so you should travel each 10 mile segment in five minutes. I have made the tick marks for your check points 10 nautical miles apart.
The next step is to choose your VORs. The ideal candidates are fairly close to your route of flight, so that you get a large bearing change as you proceed along your path. For the first half of your route, the Pontiac VOR (PNT 108.2) will do nicely. About halfway to Joliet, the Pontiac VOR will be fairly far behind you, so the bearing angles will change more slowly, so it will not be as useful, but fortunately, the Peotone VOR (EON 113.2) is in a perfect position to do the job.
|
Now, draw lines from the VORs to each checkpoint along your route. Then record the bearing to the VOR from the checkpoint, and measure the distance. For each checkpoint, you should have a bearing and distance to a VOR.
Your flight log is already filled in for your flight. The mileage and time between checkpoints are at even intervals. The time to the first checkpoint is longer than the others to account for take-off and climb to cruising altitude (assuming about a 500 fpm rate of climb).
As you fly, you’ll watch your OBS and DME readouts for your NAV radios. As you reach each checkpoint, change the OBS setting for the planned bearing at the next checkpoint.
You can use the DME and OBS information to tell whether you are to the left or right of your planned course, and ahead or behind schedule. For the first half of the flight, a DME distance from PNT smaller than shown in the flight plan means that you are to the left of your course, and a greater distance means that you are off to the right. If the OBS needle is to the right, then you are ahead of schedule, and to the left means that you are behind.
For the second half of the flight, the indications are reversed, because the VOR is located on the opposite side of your course. A distance from EON smaller than planned means that you are off to the right, and the OBS needle to the right means that you are behind schedule.
The only other planning detail is the question of how high to fly. The hemispheric rule indicates that you should fly at odd thousands plus 500 feet, and given the relatively short flight, you might consider either 3,500 or 5,500. Since there are no airspace restrictions to worry about and the tallest obstructions en route are only a bit higher than 1,000 feet MSL, you might as well go with the 3,500 altitude and enjoy the sights.
Remember that you have to get down to Joliet’s 1,382 foot pattern altitude before you enter the pattern—plan on making a 45-degree entry onto a left-downwind leg for Runway 30. At a 500 foot-per-minute descent rate, this means you’ll have to start down about four minutes out, or soon after Checkpoint E.
Getting Ready to Fly
The first step is to position yourself at Gibson City field. Use the World Set Exact Location command and enter the following values to place your plane in position at the end of Runway 36.
North/South Lat.: N 40 28 38
East/West Lon.: W 088 16 03
Altitude (ft): 761
Heading (deg magnetic): 1
Next, tune your NAV radios for the two VOR beacons you will use. Tune NAV1 to 109.6 for PNT, and set its OBS to the first checkpoint’s bearing: 289º. Tune NAV2 to 113.2 for EON, and set its OBS to 70º.
Both OBS dials should read “TO”, with the NAV1 needle deflected to the right, and the NAV2 needle deflected to the left. The DME readouts should be about 29.6 miles for DME1, and 52.2 for DME2. (You can also use the Nav/Com Navigation Radios menu choice to verify that you are receiving the signals from the correct VORs.) And make certain that your transponder is squawking 1200, the VFR code.
All that’s left is to take off, and watch the clock. Adjust your speed and course so that you hit each checkpoint right on time. With a little practice, you’ll find that this method is almost as easy as using a GPS, and a whole lot cheaper.
< Situation file: XC-CH3
Table of Contents
Previous Section: NORDO to Gibson City — Morris to Gibson City
Next Section: Section B: Los Angeles