Cross Country
by Alfred Poor
Appendix B
As Real As It Gets
Microsoft Flight Simulator may well be the best-selling computer game of all time, in spite of the fact that there is no way to keep score or win, aside from not crashing. One reason behind its success is its realism—from the navigation radio beacons to the accurate scenery to the complex weather feature to the detailed cockpit panels, it goes a long way toward convincing you that you’re actually flying in a real airplane.
Now, I’ll concede that not many people are going to be fooled into thinking that they are really in a plane when flying FS 5.1, but the realism is sufficient to help you “suspend disbelief”, as the saying goes, and convince yourself that the experience is real.
If you’re one of the millions who enjoy flying FS 5.1—whether or not you have ever flown a real plane—there are a number of ways that you can enhance the realism of the experience. Some of these additions cost money, while you can implement others for free. I divide these changes into three categories, and I present them more or less in increasing order of cost: procedures, environment, and controls.
Realistic Procedures
“Kick the tires and light the fires.” It sounds great, but it’s a derisive summary of the preflight procedures used by too many pilots in the real world. Safe pilots carefully follow an extensive preflight ritual before they even get into their aircraft. They also use checklists for almost every aspect of flying, from starting the engines to shutting down on the ramp at the end of the flight.
Unfortunately, FS 5.1 (and its earlier versions) do little to encourage sim pilots to follow standard procedures; you load the program to find yourself sitting at the end of the Meigs runway with full gas tanks, the engine idling, and the parking brakes engaged. Pop the brakes, ram the throttle forward, and you’re flying.
At the default settings, nothing ever goes wrong with the FS 5.1 airplanes—you don’t even run out of fuel. But just because nothing can go wrong doesn’t mean that you shouldn’t practice safe flying procedures. It only adds a minute or two to each flight, and can make you feel much more in touch with your aircraft and more immersed in the flying experience.
The typical aircraft owner’s manual includes checklists for a number of procedures, including preflight, take-off, cruise, landing, shut-down, and various emergencies. Many of these steps cannot be executed with FS 5.1; there’s no way to check the oil level in the engine, or drain the fuel sumps to check for water in the fuel lines. There are many steps that you can follow, however.
I have created some procedure checklists for you that work well for the default Cessna 182 when flown in fixed-pitch mode, which I have included in this appendix. You might want to make photocopies of these lists so that you can keep them handy when you fly. (If you use them on every flight, as you should, its better to wear out the copies than the originals in the book.)
Procedure Checklists PREFLIGHT INSPECTION BEFORE STARTING ENGINE STARTING ENGINE |
If you want more detailed checklists, or a checklists for another aircraft, try your local airport to see if you can purchase a copy of the aircraft owner’s manual for the type of airplane you want. You can also look in aviation publications such as Trade-A-Plane for sources for manuals and other references.
Performing the Pre-Flight
Here’s how to execute the standard walk-around and run-up before you take-off to fly. Follow along with the checklists.
Start by turning off the engine (if it’s on) by pressing the M key and then the minus key until the magneto switch is in the Off position. Then walk around the entire plane. Use the Spotter Plane view, placed at the same elevation as the plane, and position the view (or use the zoom feature) so that the aircraft fills the screen. Look over the plane from all eight angles (I find that pressing the Scroll Lock and then the numeric keypad keys works best for this.) You’re looking for any damage or wear and tear; “hangar rash” is a not-uncommon malady caused by close contact with the wingtips of other aircraft or the walls of hangars. On a real plane, you’d use this walk-around to also visually inspect fuel and oil levels, drain the sumps, check the tires, make sure all the control surfaces are attached properly, and more.
Next, it’s time to get back in the cockpit and prepare to start the engine. I’ll assume that you’re using the keyboard for the engine controls; a control panel makes these steps more realistic, but I’ll get to panels later in this chapter. Make sure that the Carburetor Heat is off (H key), and that the mixture is full rich (Ctrl-Shift-NumPad9, enabled in the Sim Realism and Reliability menu). Check to make sure that there are no other aircraft, vehicles, people, or other obstructions near the propeller. Turn the Magnetos to Start (M key then the Plus key as needed), and the engine should start. (The Magneto switch will also drop back to the Both setting.) Check your Oil Pressure gauge to make sure that there is some oil pressure — below the green is okay when idling on the ground. Then make sure that your strobes are on (O key).
If you’re not already on the runway, taxi to the threshold before the runway to perform your run-up tests on the Before Takeoff checklist. Set the parking brakes (Ctrl-Period). Then look out the side and back views as you move the elevator, aileron, and rudder controls. Make sure that all the control surfaces are moving in response to your controls, and that they are not obstructed. Also make sure that they are moving in the correct direction — there are accidents each year where a plane’s controls have been rigged wrong, so that their control cables are reversed. The time to identify this problem is on the ground, before you’ve started your takeoff roll.
Check your panel gauges, including compass, directional gyro, altimeter, and attitude indicator. Make sure that you have fuel in your tanks, and that the mixture is set to full rich. Adjust the elevator trim for takeoff (one notch above neutral).
Now advance the throttle to about 1700 rpm. (You did set the parking brakes, right?) Aircraft engines are designed with a redundant ignition system; there are two spark plugs with separate sources of ignition spark for each cylinder. If you turn off the spark to one set of plugs, the engine power will drop a little, but not a lot. Turn the Magneto to the Left setting (M key then press the Minus key once) and the RPM readout for the engine should drop by less than 150. Press the Plus key to switch back to Both, then the Minus key twice to set it to Right. The drop should be about the same as for the Left magneto setting. Put it back to Both, and then press the H key to turn on the carburetor heat; the RPM should only drop about 50, but this indicates that the carb heat is indeed working.
Return the throttle to idle, then set your radios. Check that your wing flaps are in the desired position (which in most cases will be all the way retracted), release the brakes, and you’re ready to go flying.
|
End of the Flight
When you land, there’s not much to do after you taxi to the ramp, but there is a checklist for shutting down the plane that you should follow. Make sure that the carb heat is off and that your flaps are up, then set the parking brakes. Now, you can turn off the engine by turning the magnetos to the Off setting, but this will leave fuel in the cylinders and could cause problems for you the next time you want to start the engine. Instead, use the mixture control; pull it all the way down (Ctrl-Shift-NumPad3 as needed) to put the control in the full-lean position. This cuts off the fuel flow to the engine and it stops. Then you can turn off the magnetos and go home.
Realistic Environment
Most sim pilots dream of taking a ride in a real, full-motion simulator. I’m one of the fortunate ones who has had the chance to enjoy this experience—thanks to MicroWINGS and SimuFlight in Dallas, Texas—when I flew a simulator that modeled a Hawker twin-engine business jet.
The flight was fantastic, but I discovered that while the motion aspect of the simulator did enhance the realism, it probably wasn’t all that essential to the overall experience.
Perhaps that sounds incredible, but stop and think a minute; have you ever attended an IMAX movie? The seats don’t move, yet the audience sways back and forth as the image shows a rollercoaster ride or a view from a helicopter or whatever. It really feels like you’re moving, even though you’re not. There have been times that I have felt so disoriented that I’ve nearly fallen out of my (motionless) chair.
How does the IMAX experience provide such a visceral sensation of motion, even though the audience is stationary? I learned the answer to this from Tom Kopke, an FS fan who also happens to be an engineer who works on the development of future flight simulators for the aerospace industry. He talks about “immersion”, which refers to the pilot’s psychological acceptance of a simulated experience as real. While motion can help achieve immersion, it’s not necessary. Instead, if you load up the other senses—sight and sound—then your brain will “fill in the blanks” and invent the sensation of motion to go along with what you’re seeing and hearing. It’s the loud soundtrack and the screen that fills your field of vision that makes the IMAX experience so effective.
There are a number of ways you can enrich your flight sim environment to increase your immersion in the experience. Some involve sound, while others involve sight.
The Sound Machine
Good sound starts with a good sound card in your computer. The industry standard is the Creative Labs SoundBlaster card, and while there are lots of “SoundBlaster-compatible” cards on the market, I can’t find a compelling reason not to get the real thing. If you already have another brand of sound card and it is working okay, there’s no reason to change, but if you’re shopping for a new card, I recommend you stick with a Creative Labs product.
The next step is to get a good pair of speakers. Now, it’s true that most sound cards include an on-board amplifier that can drive a pair of speakers, but these have very little power and are only suitable for driving the smallest, most-efficient (and generally least-expensive and lowest-quality) speakers. For best sound quality, you’ll want to get self-powered speakers, which means that they have their own amplification built into the speakers themselves. Some of the best speakers on the market are those from Altec Lansing; they cost more than most other speakers, but they are worth it in terms of quality.
To get the throbbing feel of a hefty Continental or Lycoming engine spinning the prop out in front of you, you need more than just a pair of desktop stereo speakers; you gotta have a sub-woofer. This is a non-directional speaker that provides just the very low-frequency sounds, and adding one adds immensely to the simulation experience. Again, Altec Lansing makes some of the best sub-woofer units, and you can get them in bundles with the stereo speakers.
To further add to the realism, consider a surround-sound speaker system. There are some that use sound phase-shifting to manipulate the signal, and others use multiple speakers spread around your room. My favorite, however, are the self-powered tower speakers from Altec Lansing (yup, you guessed it!) which provide Dolby Surround-Sound decoding with left, right, center, and surround channels. Even though there is no Dolby encoding in the FS5.1 sound effects, the surround effects of these towers (plus the bundled sub-woofer) go a long way toward wrapping you in sound.
Now, if you already have a good stereo sound system installed in the same place as your flight sim computer, you’re all set. Just run the line-out output from your sound card to an auxiliary input on your stereo amplifier and you’re in business.
If you have a separate amplifier—such as a stereo system—or are willing to add one—such as an inexpensive single-channel amplifier that you can get at Radio Shack—then there is one more piece of sound equipment that you should consider: the Thunderseat. This is a hollow, molded-plastic seat that looks like it might have been taken off a dune buggy, and it’s mounted on a wooden platform. Inside the platform, there’s a huge sub-woofer mounted to the bottom of the seat, and the hollow cavity inside the seat becomes a resonance chamber. The Thunderseat requires an external amplifier, but it greatly adds to the realism of simulated flight; you can actually feel the engine noise in your body.
There’s more to listen to when flying a real airplane than just engine, gear, and flap noises. You can add a lot of realism with Air Traffic Control (ATC) radio transmissions. There are two ways to do this. One way is to add Microsoft Flight Simulator Flight Shop to your FS5.1 installation. Among other features, this allows you to create interactive adventure flights that will give you clearances and instructions from controllers using digitized voice files as you fly along. None of the flights in this book are designed to use ATC instructions, however, so this is not so important for these trips.
The other way to add realistic sounds—especially if you live within 25 or 30 miles of a major airport—is to get a digital aviation-band radio scanner; Radio Shack has models that cost about $100. Set this up to play in the background as you fly, and you’ll find it provides an ideal distraction as you try to navigate yet still pay attention to the radio calls for the real aircraft. Many of these scanners have an audio output; connect this to your sound card’s input (or your stereo’s, if you’re using one) so that the radio sounds are also amplified and come through the same speakers.
The Eyes Have It
Your computer’s visual configuration can also play a role in helping you achieve immersion in your simulated environment. You want to load up your visual senses, and there are a number of ways to do this.
The easiest of all is to simply turn off the room lights. Without your desktop clutter and to-do list posted on a bulletin board distracting your vision, it’s easier to imagine that you’re in a real airplane, even if you’re flying in the daylight.
Filling your field of vision also helps, so get the largest monitor you can afford. This can become expensive, certainly, but even stepping up to a 17-inch monitor from a 15-inch model can make a remarkable difference.
You can also improve your out-the-window display by building a “collimated display”. Collimated means that the light rays are made parallel, and by placing a magnifying lens in front of your screen, the light rays are redirected so that they are traveling more or less perpendicularly to the monitor's surface. This in turn moves the apparent focal point further out toward infinity, making the out-the-window view look more distant and realistic. As an added benefit, the image is larger as well.
The result is amazing; your eyes are tricked into thinking that the image is more distant than it really is. The illusion is reinforced by the fact that the image shifts a lot when you only move your head a little.
These plans are based on ideas presented by my friends and flight sim fans, Tom Kopke and Rick Lee. The design calls for a Fresnel lens, named for a 19th century French physicist who invented optical systems for lighthouses, and which is a relatively flat lens with many concentric ridges. Plastic Fresnel lenses are used for everything from book magnifiers to solar heaters to overhead projectors. They are lightweight, relatively inexpensive, and are fairly easy to cut to size.
You’ll need a lens with a diameter at least as large as your monitor's diagonal dimension. You can find lenses for sale at science supply and surplus stores, but keep in mind that the quantity and quality may vary over time. You can also get a pretty serviceable lens from an overhead projector, if you can find one that is slated for disposal. You should plan on spending between $10 and $50 for a lens, depending on size and quality.
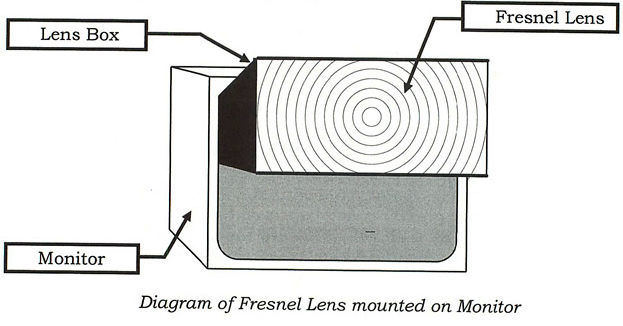
Before you cut your lens to size, cover your work surface with a soft cloth to prevent scratching. Use a utility knife to score the surface; a metal ruler helps keep your knife on track, and one with a cork backing won't scratch the delicate surface of the lens. Most lenses are one-sided—the ridges were formed only on one side—and it was much easier to work with the smooth side than the ridged side. After you have created a solid score in the lens, break it by putting the scored side down and bending up. Needle-nosed pliers are handy to trim off any extra that doesn't break cleanly, and then you can dress the edges with a file.
Cut your lens so that it is as wide as your monitor and at least 3/4 as tall as it is wide, keeping the middle circle of the lens centered on the middle of your screen.
The next step is to figure out how far to mount the lens from your screen, since this will determine how deep to make the sides of the mounting box. Fire up FS5.1 and experiment. I have found that about half the focal length works well; a lens with an 11.5 inch focal length should be mounted about six inches from the screen. Build an open box with curved edges on one side to match the surface of your screen, and the other side flat to hold the lens. 3/16th inch thick foam core presentation board makes an excellent construction material, and is available for about $3.50 at office and art supply stores. It’s easiest to build the box if you start with a strip as wide as the distance you want between the screen and the lens.
If you build with the foam core board, you can use pins to hold the boards together when testing their fit. Paint the inside of the box before you put the box together permanently; use chrome paint for the top and sides, and flat black for the bottom to simulate the cowling. For the final assembly, use a hot melt glue gun to assemble the box, then mask the front and back openings and paint the outside with flat black paint. Then glue the lens onto the front of the box; if you are using a one-sided lens, make sure that the ridges are facing you and the smooth side is toward the monitor.
Put Velcro hooks on the top of your monitor and on the sides of the box, using strips of Velcro loop material to hold the box in place. This creates an unobtrusive mounting arrangement that is easy to attach when you want to go flying.
Realistic Controls
Aside from sight and sound, the most important sense in flying is tactile. Now, I’m the first to admit that I have flown just a small handful of the hundreds of different types of aircraft that are out there in the real world, but I can tell you that I have never seen one where you fly the plane using a computer keyboard!
So the first extra that you should buy for your FS5.1 installation is an appropriate control. For most Cessnas and other general aviation aircraft, you’ll want to get a yoke. There are lots on the market, but the most popular, inexpensive model is the Virtual Pilot Pro from CH Products. This includes a yoke and throttle control, plus a wheel that you can use for elevator trim. It also has buttons and “coolie hat” switches that you can use to control the landing gear, flaps, and out-the-window views. In short, you can do most of your flying without touching the keyboard.
Aerobatic and homebuilt aircraft cockpits are more often fitted with a flightstick instead of a yoke, in which case a joystick is a more appropriate control. There are lots of excellent products that are studded with features, but I’d have to pick the Microsoft SideWinder 3D Pro over the rest of the field (in part because I’m already looking ahead to FS6, which is expected to run under Windows 95, and the SideWinder has some distinct advantages in that environment).
Next, you’ll need a pair of rudder pedals. Most users never turn off the Coordinated Flight option on the Sim menu, and they’re cheating themselves out of much of the fun in flying FS 5.1—especially when it comes to landing. In order to land in a crosswind, you need to be able to lower the upwind wing (as if turning) while adding opposite rudder (to keep going straight down the runway). It’s a wonderful trick to learn, but you need rudder pedals to make it work. Rudder pedals also make it possible to perform a “slip”, in which you hold the controls in much the same position as the crosswind landing, but even more so; this maneuver causes you to lose altitude rapidly without increasing your forward airspeed. It is my favorite trick for salvaging a lousy approach where I end up way too high on final. Thrustmaster makes a popular set of rudders with a wider stance, and CH Products make a set with a narrower track which is closer to the spacing in a typical single-engine airplane.
If you want to go whole hog, there are expensive control panels and other add-ons that provide yoke, throttle quadrant (with mixture and prop control), magneto switch, gear lever, and more. There are even some new radio stacks available that let you tune your NAV radios and adjust the OBS settings, and see the frequency readouts right on the stack (in addition to the on-screen panel display). Some of the companies making these products include NT Systems, Flight Link, and Thunderseat. You can spend from $1,000 to $3,000 on one of these systems, but you’ll end up with a control panel that can control every aspect of the FS5.1 aircraft—you’ll only need to touch the keyboard to start and end the program.
For the ultimate in realistic controls, you can build your own cockpit. I have seen enclosures with full panels, dual flight controls, separate displays for the panel and out-the-window view, and even projection video for the out-the-window view. If you’re looking for something a bit unusual to build in your basement or family room (or even a large closet, as at least one person did), here’s the perfect flight sim project.
Table of Contents
Previous Section: Appendix A: Situation Files and the Disk
Next Section: Appendix C: Flight Simulator 5.1 Techniques