The Official F-15 Strike Eagle Handbook
by Richard Sheffield
Flying the Aircraft
Takeoff
If you're flying in Rookie mode, you won't have to worry about taking off—you'll already be flying when the screen comes up. Other modes require you to take off manually. The process is very simple: Just hit the Afterburner key and let the plane roll until you're above stall speed; then ease back on the stick. There are two things you should also keep in mind. First, if you're too light on the stick, you may only lift the nose up. It may look like you're flying, but the main gears are still firmly on the ground. When the altitude indicator in the right side of the HUD begins to move, you're airborne. Second, don't wait too long to lift off. If you run off the end of the runway at high speed, both you and your aircraft will be destroyed—hardly a good way to start and finish a mission.
Landing (Runway)
The most important—and difficult—part of learning to land is learning how to get properly lined up with the runway. Imagine that the runway isn't a short concrete strip but, instead, a straight highway that extends for miles to the north and south. (Remember that all runways and carriers in F-19 are lined up pointing north-south.) This is a long and wide highway, but you can only land on the portion near the base.
If this were the case, getting lined up would be easy: You could just fly over to the highway, turn, and follow it all the way back to the base. You would be perfectly lined up. Learning how to use a couple of the instruments you have on board will allow you to do this.
Getting Lined Up
The instruments you really need to pay attention to in order to get properly lined up are the heading indicator along the top of the HUD and the NAV cursor (the small triangle-shaped pointer that moves along the heading indicator to guide you toward different locations).
To see how to use these instruments to line up for a landing, you can set up the game up as follows and try the procedure.
Mission: Libya
Targets: Pick a mission with targets in the southeastern area—around Benghazi and Benina.
Mode: Pilot
Training: Once airborne, hit Alt-T to switch to Training mode (now enemy weapons won't damage your aircraft). Fly to the targets and take them out. You can do this on afterburners if you like—you can hit Alt-R to refill the gas tank and reload weapons.
• Now that you're ready to head for home, you should be heading north. Make your heading 000. Once you go “feet wet” over the water, your heading indicator should look like Time A or Time B in Figure 9-1, depending on your position.
• If you're west of Benghazi and closer to the aircraft carrier, the NAV cursor will point there—the NAV cursor will point to the closest friendly base. Either way, you're going to continue on to Suda Bay and land on the runway.
• Once you're over the water, turn right to a heading of 050.
• Climb to 4000 feet.
• When you get closer to Suda Bay than the carrier, your HUD should look something like Time C in Figure 9-1. The NAV cursor is pointing toward Suda Bay, which is now to your northwest (to your left).
• Continue on this heading and note how the NAV cursor moves to the left, toward the 000 indicator.
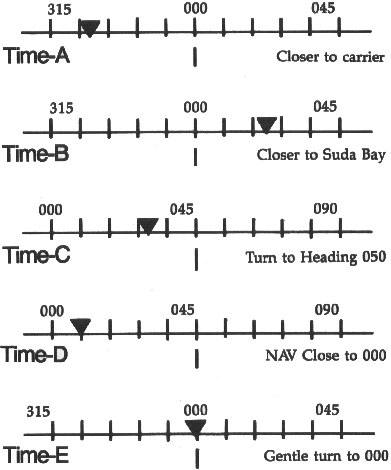
• When the NAV cursor is one major division away from 000 (Time D in Figure 9-1), start a gentle turn to your left, toward the base. Your goal is to pull out of the turn with your wings level, just as the NAV cursor and the 000 indicator reach the center of the HUD (Time E).
• Now you're heading straight toward the base on a heading of 000 and lined up for landing. If you've maintained your altitude of 4000 feet, you should get a good look at the runway and be able to make any small adjustments necessary.
• Now back off on the throttle until your airspeed falls below 300 and start your descent to the runway.
• As soon as the wheels touch down, cut the engine power to minimum and hit the brakes button once.
NOTE |
There's some leeway programmed into the system. If you come up a little short (less than a kilometer), you should still be OK. Also, if you run a little off the end of the runway, you should be OK if your speed is less than 40 knots or so. |
Landing (Carrier)
Carrier landings in this simulation really aren't that much harder than runway landings. In fact, due to the nature of carrier landings, you can hit the flight deck much harder than when landing on a runway.
Your line-up and approach should be the same as for a runway landing, but you might want to make a steeper approach so you can get a good look at the carrier deck and the arrestor cables. The landing portion of the carrier deck is canted 15 degrees, so to use that part of the deck for landing, you need to land on a heading of 165 degrees. It really doesn't matter, however; landing straight-in on a 180-degree heading will work just fine.
WARNING |
The carrier deck is 125 feet above the water, so keep an eye on your altitude as you approach. |
Unlike runways, which work fine in either direction, you can only catch the cables on a carrier from the north (headed south on a 180-degree heading). There are no cables to catch you on the front of the ship. Landing on a 000 heading is possible, but there are no cables to stop you. However, if you come in very close to stall speed with the brake on, you should be able to stop on your own. You may then have to taxi around to get enough deck in front of you to take off again.
Table of Contents
Previous Section: Winning Tactics for F-15 Strike Eagle II
Next Section: Weapons Deployment