Microsoft Flight Simulator Handbook
by Jonathan M. Stern
APPENDIX G
Installing and Configuring Flight Simulator
Whether you have a disk or CD version of Flight Simulator, installation is relatively easy once you configure your computer's memory. You need at least 530K of conventional memory and 2M free memory configured as expanded memory. Place the disk or CD in the appropriate drive, select the drive, type setup, and press Enter. Then follow any on-screen instructions.
Options
You'll be asked several questions about the setup of the program. I suggest the following selections:
| Select | Do Not Select | Optional |
| Sound | Dynamic Scenery. This selection provides moving objects (for example, other airplanes, sailboats, fuel trucks) at several airports. It dramatically slows the screen refresh rate of the simulation. | |
| Automatic Weather Generation. Creates cloud and wind situations that may be inappropriate for, and increase the difficulty of, basic flight training. | ||
| Startup Situation: Normal Flight | Log Flight Time. This selection will automatically prepare a pilot logbook that will keep track of your flying hours. | |
| Joystick. If you have a joystick or control yoke, you should select this feature and choose selections appropriate to your equipment. |
Before long, you should be looking at a screen with a Cessna instrument panel across the bottom and a view of Lake Michigan and downtown Chicago, Illinois, across the top.
Setting up the Trainer Situation
There are many additional settings that can be made from within the Flight Simulator program. Your selections will depend on your own personal preferences and the type of equipment that you are using to run Flight Simulator. Most selections require a trade-off between features and screen refresh rate. The lower the screen refresh rate, the more unrealistically difficult it becomes to control the simulated airplane.
There are several settings that enhance the realism of the flying experience. Some of them also, however, increase the difficulty of using the simulation and may impede the learning process. For starters, make the following selections:
| Menu | Sub menu(s) | Effect |
| Options | Preferences/Instrument. Select Display Indicated Airspeed. | The airspeed indicator will display "indicated" rather than "true" airspeed. This makes the simulation more realistic. |
| Views | View Options/Axis Indicator. Select Small V. | This places a small "V" at the center point of the airplane's windscreen. While real airplanes do not have a "V" on the windscreen, ink marks are sometimes placed on the windscreen as a visual reference point during training. |
| Sim | Auto Coordination should already be selected (i.e., checked). | This setting automatically provides rudder input to correspond to aileron use. Unless you use add-on rudder pedals, this setting should be used because It is unrealistically difficult to control both rudder and ailerons from the keyboard. |
| Sim | Realism and Reliability. | |
| Prop Advance: Fixed Pitch should already be selected; select Magnetos | This setting provides the performance of a fixed pitch propeller, thereby avoiding the need for pilot control of the propeller. This allows the user to concentrate on other tasks, while accurately simulating the type of propeller found on most initial training airplanes. In a later chapter, when we get a high performance checkout, we will change this setting. By selecting magnetos, the ignition switch is fully functional. |
Saving the Airplane
Save the airplane as it is currently configured by performing the following steps:
- Select Option/Save Situation.
- Type Trainer in the Situation Title Box.
- Press Enter twice.
Beginning a Flight
Now, each time you want to begin a flight in your Trainer (see Figure G.1) setup, you need only perform the following steps:
- Select Options/Situations.
- Select Trainer from the Situation List.
- Press Enter or OK.
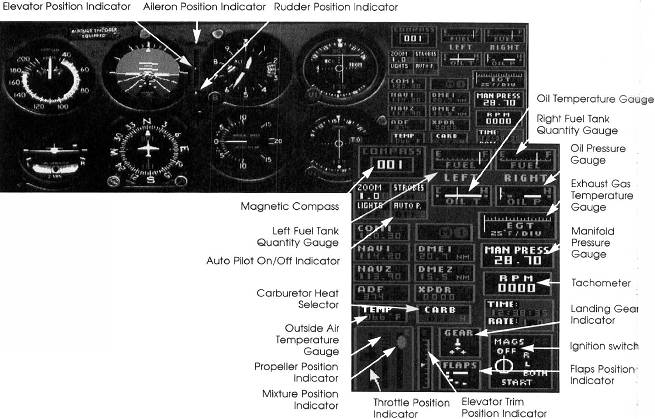
Table of Contents
Previous Section: Resources for Flight Simulator
Next Section: Index