Flying on Instruments with Flight Simulator
by Jonathan M. Stern
Chapter 6
NDB Approaches
Fly to airports using the automatic direction finder (ADF) and nondirectional beacons (NDB). Take off from Kankakee and make for Dwight.
Begin this chapter with the following settings to Flight Simulator:
|
Assuming everything went right during your approach and landing at Greater Kankakee, you're now safe and sound on the ground, near the fueling area. The weather hasn't changed since you left Chicago, but it's time to begin the next leg of your trip to Dwight, Illinois.
Unlike Chicago Meigs Airport, there's a T in an upside-down triangle in the bottom margin of each of the Greater Kankakee IAP charts. Earlier, you learned this symbol means there is a published departure procedure for the airport. In fact, the T means that either there's a published departure procedure or that the minimum weather conditions for takeoff are nonstandard. Takeoff-weather minima, however, apply only to commercial aircraft operators.
The standard takeoff minima are one statute mile visibility for aircraft with two engines or less, and one-half statute mile visibility for aircraft with three engines or more.
If you look under Kankakee in Appendix A, you'll find only a nonstandard takeoff minimum listed. For commercial operators which operate under Federal Aviation Regulations (FAR) Part 135, the takeoff minimum on runway 4 is reduced for single- and twin-engine aircraft to one-half mile.
This doesn't apply to your flight, for two reasons. First, you'll depart on runway 22, the same runway you landed on.
Second, unless today's fantasy trip includes being a Part 135 commercial operator, the nonstandard minimum has no application to your flight.
Pre-Flight
Before you take off from Kankakee, turn to page 152 of Appendix B—the NDB RWY 27 IAP chart for Dwight. Notice that there's a terminal route from the Peotone VOR to the Dwight nondirectional beacon (NDB). The terminal route is the Peotone 253° radial at 2300 feet. Your clearance for this flight might be something like
Cleared to the Dwight Airport via the Peotone two-five-three radial, climb and maintain 2,300.
Set up your aircraft for departure by tuning the NAV-1 radio to the Peotone VOR, the ADF to Dwight's NDB frequency, and the COM radio to the Kankakee CT. Figure 6-1 shows you what your instruments should read.
Figure 6-1. Pre-Takeoff Avionics Settings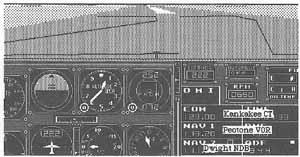
Tune your NAV-1 radio, ADF, and COM to these settings before taking off from Kankakee.
Look at the Chicago Area Chart in your Flight Simulator manual, or in Appendix C. Try to visualize the Peotone 253° radial extending from the VOR. If it's helpful, place a pencil or a ruler along the radial. Now look at runway 22 at Greater Kankakee. You'll fly from runway 22 to intercept the Peotone 253° radial.
Intercepting the 253° Radial
 Take off from Greater Kankakee's runway 22 and immediately use this procedure to intercept the Peotone 253° radial.
 Turn the airplane to parallel the desired course (253°).
 Rotate the OBS to center the needle with a FROM indication since you'll be tracking from Peotone.
 Calculate the difference between the desired radial and the radial that you're presently on (if you're currently flying on the 216° radial, you're 37° off the desired radial).
 Reset the OBS to the desired course of 252° or 254° (or 253° on the Amiga or Atari ST versions of Flight Simulator).
 Turn toward the needle, past the desired course by two times the number of degrees you're off course, but never more than 90°. Thus, if you're on the 216° radial, you're 37° off course and should turn right to 327° [253° + (2 * 37)]).
 When the needle moves toward the center, turn to 253° and make any necessary corrections for wind, using the procedures discussed in Chapter 4.
By using this procedure, you'll intercept and follow the terminal route that will take you directly to the Dwight NDB. When Dwight NDB is within range, the needle on your ADF should point to Dwight NDB and be within a few degrees of 0.
Automatic Direction Finder
An automatic direction finder (ADF) is a relatively simple radio receiver that points directly at the transmitter to which it's tuned. In this respect it's far simpler than a VOR receiver. Many pilots, however, are confused by the use of an ADF.
The ADF display is a single needle on top of a compass rose. Unlike a VOR, ADF guidance is relative to the heading of the aircraft. The 0 on the compass rose represents the nose of the airplane, and the 18 represents the tail. If the needle points to the 6, the NDB to which the ADF is tuned is 60° to the right of the airplane's nose. This 60° is referred to as the relative bearing of the NDB.
| On some versions of Flight Simulator, the ADF display uses a square box with marks at the four cardinal headings in lieu of a compass rose. On these displays, the relative bearing is displayed digitally at the top of the instrument. |
The heading that will point the airplane right at the NDB is called the magnetic bearing. The magnetic bearing is found by adding the relative bearing to the airplane's current heading. For instance, if the airplane's current heading is 085° and the relative bearing is 60°, then the magnetic bearing is 145° (Figure 6-2).
Figure 6-2. Magnetic Bearing of 145°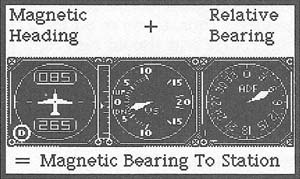
Add the airplane's current heading (85°) to the relative bearing shown on the ADF (60°) to find the magnetic bearing to the ADF station (145°).
If the sum of the magnetic heading and the relative bearing exceeds 360°, an additional step is needed to calculate the magnetic bearing. For example, assume the relative bearing is 300° and the magnetic heading is 205°. Since headings, bearings, and courses range from 0° to 360°, the magnetic bearing could not be 505°. Simply subtract 360° from the sum to find the magnetic bearing. In this example, the magnetic bearing is 505° – 360°, or 145° (Figure 6-3).
Figure 6-3. Magnetic Bearing of 145° Again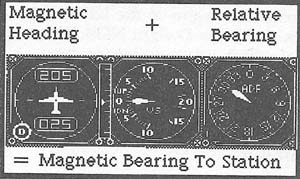
When the sum of the magnetic heading and the relative bearing is greater than 360°, you need to subtract that amount to arrive at the true magnetic bearing to the ADF station.
Don't be surprised that the result was the same in both examples. The airplane used in this example stayed in the same position when it turned from a heading of 85° to 205°. As the airplane turned, the ADF needle turned at the same rate. Since the airplane was in the same position both times, it only makes sense that the same heading now points the airplane toward the NDB.
Knowing what you now know, you could figure out how to use the ADF to track NDB bearings, with or without wind. To make it easier, though, the procedures for tracking NDB bearings are outlined below within the discussion of the NDB RWY 27 IAP to Dwight.
On to Dwight
Since the ADF needle always points toward the transmitter, you can recognize the moment you pass over the NDB when the needle moves from a relative bearing of 0° to a relative bearing of 180° (or thereabouts). The speed at which the needle moves from nose to tail depends on how close you are to being right over the top of the transmitter. If you're exactly on course, the needle snaps around to the tail. More likely, you're slightly off course and the needle makes the change somewhat more leisurely. If you're significantly off course, the needle revolves slowly and may never move all the way to a relative bearing of 180°.
The NDB RWY 27 IAP is not significantly different from the VOR IAP you made at Greater Kankakee. Again, the IAP is of the terminal type since the NDB is located on the airport and the missed approach procedure begins at the NDB. There's only one initial approach fix (IAF), the Dwight NDB. There are three terminal routes, one of which you're following now.
Again, the procedure turn must be made within ten nautical miles of the NDB. The minima section reveals that the minimum descent altitude (MDA) does not differ if you circle to land on another runway, nor does it depend on which approach category your aircraft is in.
Procedure at Dwight
Since 2300 feet is the initial approach altitude (as you can see from the underlined 2300 in the the profile view), you're already at the appropriate altitude. When the ADF needle swings toward the tail, you've passed over the NDB. Turn left to 096°, the outbound heading shown in the planview. As you make the turn to 096°, the ADF needle will move toward the nose. Once again you'll pass over the NDB, this time heading away from it, or outbound.
It's necessary to calculate your distance from the NDB to make sure you remain within ten nautical miles. The only way to do this is to time your outbound leg. You should leave yourself at least three miles for the procedure turn, so start the outbound portion of the procedure turn no more than seven miles from the NDB. If your groundspeed is 120 knots, your airplane travels two miles per minute, and you should begin the procedure turn within ½ minutes of crossing the NDB the second time.
After you've passed the NDB, you may need to make a course correction. If the relative bearing is not 180°, turn toward the needle twice the number of degrees that the relative bearing varies from 180°. Figure 6-4 shows the airplane 20° off course (a 160° relative bearing on the outbound heading).
Figure 6-4. Twenty Degrees Off Course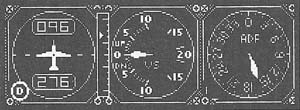
The ADF reading shows that the aircraft is 20° off course while on the outbound leg of the Dwight procedure.
The airplane should be turned 40° to the right (toward the ADF needle) to a heading of 136°. When the airplane is heading 136°, the relative bearing will be 120° (Figure 6-5).
Figure 6-5. Twenty Degrees Off Course with a 40-Degree Correction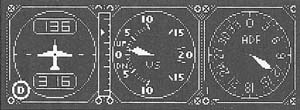
When you correct your course by 40°, the relative bearing seems to show that you're even more off course than before. Don't worry—you're not.
Keep the airplane on the 136° heading until the relative bearing is 140° (that's the amount of the course correction away from the tail [180 — 40]). At that point, the airplane is back on the outbound course, but not on the outbound heading. (The relative bearing of 140° plus the magnetic heading of 136° equals the inbound course of 276°.)
Assuming there's no wind, once you're back on the outbound course, you'll want to return to the outbound heading of 96°.
Wind
Once you've established the airplane on the outbound course, course corrections will be necessary if the wind isn't calm. Use this procedure to track the NDB bearing:
- If the needle moves 5° or more from the nose or tail (Figure 6–6, #1A), depending on whether you're inbound or outbound, turn the airplane 20° toward the needle (Figure 6–6, #1B).
- Fly the new heading until the needle is 20° away from the nose or tail, as appropriate. You're back on course (Figure 6–6, #2).
- Establish a wind correction angle by turning 10° toward your original heading (Figure 6–6, #3). The needle will now point 10° from the nose opposite the direction of your wind correction angle if you're inbound to the NDB, or 10° from the tail in the same direction as your wind correction angle if you're outbound from the NDB.
- If the needle drifts closer to the nose or further away from the tail, the wind correction angle is insufficient. If this happens, repeat the first three steps above, except use a 15° wind correction angle instead of 10° (Figure 6–6, #4).
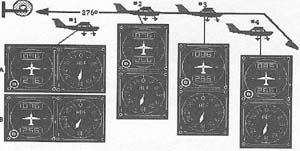
Follow this procedure to make course corrections while tracking the NDB bearing.
If you're traveling over the ground at 120 knots or less, you should begin the procedure turn 3½ minutes after passing over the NDB the second time. Once you've completed the procedure turn and have established yourself on the inbound course, you'll need to descend from 2300 feet to 1380 feet, and then from 1380 feet to 632 feet, the airport elevation. At a descent rate of 500 feet per minute, you'll need almost 3½ minutes of flying time if you're traveling at 120 knots.
Procedure Turn
Make the procedure turn by turning right to a heading of 141° for one minute, followed by a left turn to a heading of 321° until you're established on the inbound course. The procedure turn is at a 45° angle to the inbound course, so when the ADF needle is 45° to the left of the nose (a relative bearing of 315°), the airplane is on the inbound course and must be turned to the inbound heading.
Once you're on the inbound course, you may begin your descent to the minimum descent altitude (MDA), which for this IAP is 1380 feet. When you reach that altitude, level off the airplane and maintain 1380 feet until you have the runway in sight and are in a position from which a normal landing can be made (in which case you may descend below the MDA and land), or until you pass the Dwight NDB (in which case you must follow the missed approach procedure instructions printed in the profile).
Tracking Inbound
The same procedures used for tracking outbound are used for tracking inbound. Figure 6-7 shows an airplane on the inbound heading. Its ADF needle has drifted 10° to the left of the nose, meaning that the airplane is 10° right of course.
Figure 6-7. Ten Degrees Right of Course
This airplane is off course while inbound. The heading is correct, but the ADF shows that the aircraft is 10° right of the correct course.
Using the NDB tracking procedures, turn the airplane 20° to the left (toward the needle). As the airplane turns, the ADF needles also turns 20°, though in the opposite direction (Figure 6-8).
Figure 6-8. Ten Degrees Right of Course with a 20-Degree-Left Correction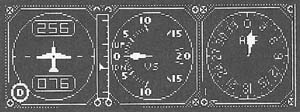
Correcting the course by changing the heading 20° also changes the ADF needle's position. Note, however, that the ADF needle turns 20° in the opposite direction of the course correction.
When the needle is 20° to the right of the nose, the airplane is back on course (Figure 6-9).
Figure 6-9. Back On Course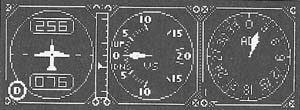
The airplane is back on course when the ADF needle reads 20° right of the nose.
Now, turn the airplane 10° to the right. The airplane will remain on course if 10° is the appropriate wind-correction angle.
Missing Dwight
If you followed all the instructions, you should now be executing the missed approach procedure. That's because the cloud base was set to 1192 feet—as you flew at 1380 feet, you never saw the runway.
Return to 2300 feet and head back to the Dwight NDB. Since the cloud ceiling is too low to let you land at Dwight, continue on to your final destination—Champaign, Illinois.
If you descended below the MDA before you had the runway in sight, remember one thing—there are old pilots, and there are bold pilots, but there are no old bold pilots.
Table of Contents | Previous Section | Next Section