Flying on Instruments with Flight Simulator
by Jonathan M. Stern
Chapter 5
VOR Approaches
Tackle your first instrument approach procedure as you use VOR radials to guide you to Kankakee.
You've just passed over the Chicago Heights VOR at 6000 feet. Your NAV-2 Omni-Bearing Selector (OBS) should be set to approximately 216° with a TO indication to guide you directly to the Peotone VOR. While the airplane is flying toward Peotone, tune 111.6, the Kankakee VOR frequency, into NAV-1. Until you get within a few miles of Peotone, the Kankakee VOR will be out of range.
| Note: The database on at least one early version of Flight Simulator was missing the Kankakee VOR.
If, by the time you pass the Peotone VOR (as shown by the FROM indication), you've not been able to receive the Kankakee VOR, use the Chicago Heights VOR instead of Kankakee. Read through this chapter, but substitute the Chicago Heights VOR for all instances of the Kankakee VOR. Proceed directly to Chicago Heights while descending to 2300 feet. You'll not be able to use the Peotone VOR to identify the AROMA intersection. Instead, substitute 4.8 DME for AROMA. When you complete the approach (there won't be an airport in sight), pause the simulation and begin Chapter 6. |
Descending Time
It's time to start thinking about a descent. Tune in the Greater Kankakee control tower on 123.0 to find out which runway is in use. The control tower reported runway 22 in use when I made the flight. Look in Appendix B, page 169, for the VOR RWY 22 approach to Greater Kankakee.
See the short, thin line extending from Peotone toward the Kankakee VOR in the planview? That line is called a terminal route and indicates that you can descend to 2300 feet and follow the 191° radial for 12 nautical miles to the Kankakee VOR. Flight Simulator only provides even-numbered radials, so use 190° or 192°. (The Atari ST and Commodore Amiga versions of Flight Simulator are exceptions to this last statement. You can set the OBI to any radial. If you're using one of these versions, you can use the actual radial described, not just an even-numbered one.)
But you're at (or should be at) 6000 feet now. Time to start down.
To calculate how many miles in advance you should begin your descent, use this formula:
groundspeed / 60 * (feet to descend / rate of descent) = miles
In this case, if your groundspeed is 120 knots and you want to descend at 500 feet per minute, you'll need 14.8 nautical miles (120/60 * (3700/500) = 14.8).
Figure 5-1. Descending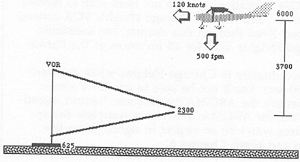
To descend from 6000 to 2300 feet at a rate of 500 feet per minute while flying with a groundspeed of 120 knots, you need to begin the descent about 14.8 miles from the Kankakee VOR.
Don't worry if you're not down to 2300 feet by the time you reach the Kankakee VOR. You can fly at least another ten nautical miles after reaching the VOR before a descent below 2300 feet is authorized. However, if you want to minimize the time required to fly the approach, you won't want to be very high above the minimum altitude when you cross the VOR.
If you find that you don't have enough distance remaining to make your descent at 500 feet per minute, you can compute the necessary rate of descent using this second formula:
feet to descend * (groundspeed/(60 * miles)) = required rate of descent
After crossing the Peotone VOR, establish yourself on the radial (190° or 192°), pause the simulation, and familiarize yourself with the Kankakee VOR RWY 22 IAP chart.
The Kankakee IAP
Take a look at this reduced version of the VOR RWY 22 IAP chart for Kankakee.
Figure 5-2. Kankakee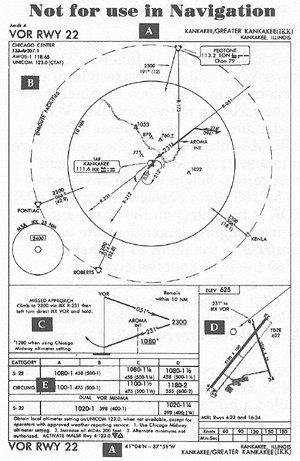
Margins (A). These tell you that this is the VOR RWY 22 IAP to Greater Kankakee Airport in Kankakee, Illinois. The latitude and longitude at the bottom center are provided for aircraft with inertial navigation systems.
The amendment number in the upper left-hand margin identifies how many times the IAP has been amended since it was first published. In this case—Amdt 4—the IAP has been amended four times.
Planview (B). The upper left corner of the planview contains communication frequencies used by aircraft landing at Kankakee. Frequency 123.0, labeled UNICOM, is available for traffic advisories.
The solid ring labeled 10 NM bounds the area ten nautical miles around the Kankakee VOR. Everything inside this ring is drawn to scale. Note that certain topographical features—the river, for instance—appear only inside this ring. The dashed ring outside the 10-NM ring tells you that things outside the 10-NM ring are not drawn to scale.
Four en route facilities appear on the outer ring. From the top and going counterclockwise, they are as follows: Peotone VOR, Pontiac VOR, Roberts VOR, and the intersection of two VOR radials at KENLA intersection. There is a terminal route from each of these en route facilities to the Kankakee VOR.
The second radial, extending from the Peotone VOR (the 175° radial) identifies AROMA intersection at the point where the Peotone 175° radial intersects the Kankakee 051° radial.
Obstacles which meet certain height criteria are charted inside the 10-NM ring. The 1053-foot obstacle north and a bit west of the Kankakee VOR is the tallest on the chart, and is shown by an obstacle symbol slightly larger than the others.
The height of the obstacle to the north of Kankakee VOR—the one marked 760 ±—is of doubtful accuracy.
Notice that the symbol used for the Kankakee VOR is different from the three used for Peotone, Roberts, and Pontiac. This means that DME information is not available from the Kankakee VOR. In Flight Simulator, however, all VORs transmit distance information.
Find the barbed arrow which points outward at a 45° angle from the Kankakee 051° radial (it has 276° above it and 096° below it). This is called a procedure turn and provides a way to reverse course in executing the IAP.
The scalloped arrow extending from the Kankakee 231° radial and the racetrack-shaped holding pattern (both near the airport symbol) show the missed approach procedure you'd use if you couldn't make a landing.
The final item on the planview is the Minimum Safe Altitude (MSA) circle in the lower left corner. The MSA will show an altitude or altitudes which assure the pilot of at least 1000 feet of vertical obstacle clearance within 25 nautical miles of the VOR or NDB on which the IAP is based. Here, an altitude of 2400 feet assures the pilot of at least 1000 feet between that altitude and the tallest obstacle within 25 nautical miles of the Kankakee VOR. The MSA is to be used for emergencies only.
Profile (C). The underlined 2300 indicates that an aircraft executing the approach can descend to a minimum altitude of 2300 feet while established on the Kankakee 051° radial. The notation Remain within 10 NM restricts the outbound leg and the procedure turn to an area within ten nautical miles of the Kankakee VOR. Once the aircraft has become established on the inbound course, descent to a minimum altitude of 1080 feet is permitted, as shown by the underlined 1080. (The asterisk note is irrelevant when you're using Flight Simulator.)
Once the aircraft passes the AROMA intersection while inbound, you can descend to the minimum descent altitude—1020 feet. The scalloped arrow and text provide the missed approach procedure.
Airport sketch (D). The airport elevation is listed as 625 feet mean sea level. The notation TDZE 622 means that the touchdown zone elevation (the highest point in the first 3000 feet of the runway) is 622 feet above sea level. Runway lengths and widths are also listed. The star shows the position of the airport rotating beacon.
The thin arrow details the relationship between the final approach course and runway 22.
Minima data (E). In reality, an airplane's approach category is based on its stall speed when it's getting ready to land.
Generally speaking, use the minima category below that's associated with the speed at which you're flying the final approach.
| Approach Category | A | B | C | D |
| Speed (Knots) | 0–90 | 91–120 | 121–140 | 141–165 |
Thus if you fly the final approach at 100 knots, use the minima set for category B.
S-22 minima are for straight-in approaches (the VOR RWY 22 IAP is executed and landing is planned on runway 22). If the VOR RWY 22 IAP is made with a landing planned on another runway, then the Circling minima should be used.
If a straight-in approach is planned with a final approach speed of 100 knots and using both VOR receivers, the applicable minima are a minimum descent altitude (MDA) of 1020 feet and a minimum visibility of one mile (1020-1).
The 398 is the height above touchdown (HAT) when you're at the MDA. The 475 shown in the same location for the Circling approach is the height above airport (HAA). The difference between the two numbers is that one (HAT) is referenced to the touchdown zone elevation (the highest point in the first 3000 feet of the runway). The other (HAA) is referenced to the airport elevation.
The figures inside parentheses are for military use only.
Note that a lower MDA is allowed when the airplane is equipped with two VOR receivers—that's because the AROMA intersection can be identified.
If you look at either the planview or the profile for the VOR RWY 22 IAP, you will see that the VOR is located on the airport. This IAP is called a terminal VOR approach. When you execute a terminal VOR approach, use the missed approach procedure when the airplane is over the VOR.
Figure 5-3. Go Ahead and Descend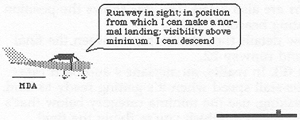
Every condition must be met before a landing can be undertaken.
Federal Aviation Regulations prohibit descent below the minimum descent altitude unless the airplane is “continuously in a position from which a descent to a landing on the intended runway can be made at a normal rate of descent using normal maneuvers…, the flight visibility is not less than the visibility prescribed in the standard instrument approach procedure being used,” and the pilot distinctly sees the runway of intended landing (or specified lights or markings associated with that runway). If any of these conditions aren't met, the pilot is required to execute the missed approach procedure.
Shoot the Procedure
Unpause Flight Simulator now and give the VOR RWY 22 IAP a try.
All IAPs begin at an initial approach fix (IAF), except for those where the aircraft must be given headings by an air traffic controller (called radar vectors) to intercept the final approach course. The VOR RWY 22 approach has only one IAF. Some approaches have many.
The VOR is the IAF for the VOR RWY 22 IAP. Notice that IAF is printed above the nav-aid box in the planview (to the left of the Kankakee VOR symbol).
Follow these instructions, using Figure 5-4 as a guide.
Figure 5-4. Shooting the Procedure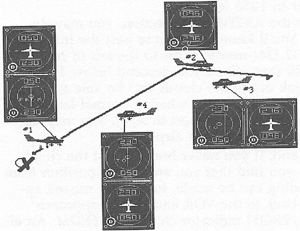
This illustration outlines the turns and OBI course indications for flying the VOR RWY 22 approach at Kankakee.
To VOR, turn and establish on 51° radial. Fly over the VOR; then make a left turn and fly away from the airport on the 051° radial, as shown in both the planview and the profile view. Since Flight Simulator provides even-numbered radials in most versions (exceptions are the Atari ST and Commodore Amiga versions), you'll have to modify the approach by flying either the 050° or 052° radial. Fly outbound from the VOR with a FROM indication and the OBS set to 050° (Figure 5-4, airplane #1). Fly far enough to give yourself room to reestablish yourself on the inbound course and descend to 1080 feet, but in no case fly more than ten nautical miles from the VOR. While you're doing this, reduce your speed to approach speed (90–110 knots in most single-engine airplanes).
Procedure turn. Try beginning the procedure turn when you're five miles from the VOR. Turn right to 096° and fly that heading for one minute (Figure 5-4, airplane #2). Reset the NAV-1 OBI to the inbound radial (either 230° or 232°), and set the NAV-2 OBI to 174° or 176° so that you'll be able to identify the AROMA intersection.
Turn left to 276°. After one minute, turn left to 276°, and fly that heading until the NAV-1 needle approaches the center (Figure 5-4, airplane #3).
Turn to inbound course of 231°. When the NAV-1 needle approaches center, turn to the inbound course of 231° and track the VOR inbound (Figure 5-4, airplane #4). Once the needle is centered and you're established on the inbound radial, begin a descent to 1080 feet.
When you pass the AROMA intersection, you may descend to 1020 feet. You'll know that you're past the intersection when the NAV-2 OBI needle shifts to the left of center.
Descend to 1020 feet. When you descend below 1192 feet, you should break out of the clouds and be able to see the airport. If you're in a position from which a normal landing can be made and you have the airport in sight, you may descend below the MDA and land the airplane.
On the other hand, if you never break out of the clouds, or if, when you do, you find that you aren't in a position from which a normal landing can be made, follow the missed approach instructions back to the VOR and try the approach again when the TO/FROM indicator changes to FROM. An alternative is to fly to another destination.
Figure 5-5. Land It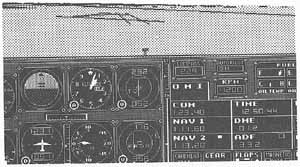
You're past the AROMA intersection (as shown by the needle left-of-center on the NAV-2 OBI), at an altitude of 1020 feet, and have the airport in sight. Land the airplane.
If you want to practice more VOR approaches before trying other types of approaches, skip ahead to Chapter 8. If you're ready to try NDB approaches, move on to Chapter 6. If your version of Flight Simulator is not equipped with an ADF, read Chapter 6 before proceeding to Chapter 7 and begin Chapter 7 after positioning your airplane at Dwight Airport.
Note: The ADF on version 1.0 of Microsoft Flight Simulator for the Macintosh doesn't function properly and cannot be accurately used for NDB approaches.
Table of Contents | Previous Section | Next Section