Flight Simulator Co-Pilot
by Charles Gulick
Flight and Panel Familiarization
Eagle Field Training Base (Local)
North: 17415. East: 7446. Altitude: 410. Pitch: 0. Bank: 0.
Heading: Cessna 330. Heading: Piper 331. Airspeed: 0.
Throttle: 32767. Rudder: 32767. Ailerons: 32767. Flaps: 0.
Elevators: Cessna 37119. Elevators: Piper 40959.
Time: 7:00. Season: 2. Clouds: 0.
Surface Wind: 3 kn., 330 deg.
We're in the process of a takeoff from Runway 33, Eagle Field (the simulator's World War I base). For most of this flight, I'll handle the airplane. Use your eyes and follow along with what I'm explaining. If you want to point at the instruments on your panel as I describe them, it may help fix their location in your mind.

First, pay attention to the airspeed indicator, the round instrument at the top left of your instrument panel. The needle indicates our airspeed in knots. On a takeoff run, like this, it tells us when we have flying speed. Notice that we're gaining speed as we roll.
Watch out front now until we leave the runway.

To the right of the airspeed indicator is the artificial horizon, also called the attitude indicator. The horizon and the earth are depicted on the lower half, and the sky on the upper half of the display. The two longer lines and the dot at the center represent, respectively, the wings and the nose of the aircraft. Right now the attitude indicator shows the nose slightly high in relation to the horizon, which in our present configuration means we're about to take off. After we take off, it's one indication that we're climbing.

To the right of the artificial horizon is the altimeter, an instrument which tells us our altitude above sea level in hundreds and also thousands of feet. When the longer needle is moving clockwise, as now, it confirms that we're climbing.

Directly under the altimeter is the vertical-speed indicator, or VSI, which tells us our rate of climb. The numbers on the top half of the dial mark off climb rates of 500, 1000, and 1500 feet per minute. You simply add two zeroes to the reading. The same numbers on the bottom half mark off descent rates. The needle tells us whether we're climbing or descending, and by how many feet per minute.
Look out the windshield now, and take in everything, from one side to the other. Let it register in your mind. Notice the mountain you're flying toward, the ground and marker lines, and the river, if you can still see them. Don't look absentmindedly. Really observe. This is part of flying intelligently and well; as an instructor might say, “Keep your head on a swivel.”

After a few passes across the windshield, drop your eyes to the airspeed indicator (top left on your panel—remember?) and begin a scan of all six of the instruments on the left side of your panel, working clockwise. We've already examined four of them: airspeed indicator, artificial horizon, altimeter, and vertical-speed indicator. To the left of the VSI is the heading indicator, which tells us toward what point of the compass we are flying, based on the 360-degree circle. 360 degrees, or 0, is north, 90 degrees is east, 180 degrees is south, and 270 degrees is west. So we're aiming 30 degrees to the west of due north. The next instrument, at the bottom left of your panel, is the turn coordinator. It tells us whether the wings are level, as they are now, or whether we're banking, and, if so, how steeply and in which direction. You'll learn more about banking a little later in this training. I don't expect you to absorb everything the first time out.

As you scan these six primary instruments and the world beyond your windshield, let the values and the sense of what you're seeing, both inside and outside the airplane, sink in. Out the window, what do you see and what don't you see anymore? On the panel, what are the instruments telling you? The airspeed indicator is steady at about 80 in Cessna, 85 in Piper. The artificial horizon is showing considerably more sky than earth now. The altimeter needle is moving clockwise, confirming that we're climbing to an ever-higher altitude. The VSI is indicating our rate of climb—presently better than 1000 FPM (feet per minute). The heading indicator is staying put at around 330 to 332, because we haven't turned from our original course. The little wings on the turn indicator are level, confirming that we're not in a bank to either left or right; the wings are level.
Of course I know about the mountain. I certainly wouldn't have you crash into a mountain on your first flight. Watch, and you'll see we fly right over it.
If you have saved the mode, press the Recall key to repeat takeoff at this point if desired.
I hope you're relaxed now. Take plenty of time to read what follows; do as I ask, and practice your scanning while we fly.
One of the biggest problems beginning pilots face is the tendency to overcontrol; they use too much control for too long, trying to get a desired result. With your help, I'll demonstrate this:
If you are flying Cessna, press your down-elevator key three times in quick succession.
If you are flying Piper, press your down-elevator key twice in quick succession, wait a second, then press the up-elevator key once.
Fix your eyes (for this demonstration only; we don't usually “fix” our eyes on anything when flying) on the VSI (the rate-of-climb indicator).
Even though you're still under full power, the needle swings violently downward. Where a few seconds ago you were climbing at better than 1000 FPM, suddenly you're descending at nearly the same rate. Then, just as suddenly, you're climbing again, at well above 1000 FPM, until finally the airplane settles into a climb of 800 to 900 FPM in Cessna, and about 500 FPM in Piper.
What happened?
In effect, you applied abrupt forward pressure to the control wheel (henceforth we'll call it “the yoke”), by moving the elevators rapidly from a high “up” setting to a neutral position. And that one act radically upset the balance of forces that were controlling the climb. The plane, suddenly told to stop nosing up altogether, quickly nosed down. The propeller, instead of screwing through the air in an upward direction (the British, with good reason, call the propeller an “airscrew”), began screwing downward. This and the weight of the plane caused a buildup of airspeed, which increased the relative wind—the air moving past the wings. The airfoil (shape of the wings) converted the relative wind to lift (an upward-pushing force on the wings), causing the airplane to pass back through level flight and then resume climbing. As the speed added by the descent bled off, the plane gradually lowered its nose again and assumed the climb natural to it in its present environment. (By “present environment” I mean this particular altitude, the current air density, your neutral elevator setting, and your engine at full power.)
Sometime hold a piece of paper at the edge, and angle it downward a bit while moving it a short distance rapidly through the air. You'll see the front edge rise. That's a rough demonstration of lift. The wind against the sheet of paper, created by your thrusting it forward, represents relative wind.
Changing RPM
We've been at full power now longer than is reasonable. So let's make a power reduction.
At or near the bottom right of your instrument panel is the RPM indicator. Using your throttle-control keys, reduce your power setting for an RPM reading of 2205 in Cessna, and 2200 in Piper.
After this power reduction, do your regular instrument scan. Your airspeed won't vary much. The attitude indicator will soon show your wings and nose on a level with the artificial horizon. The altimeter will gradually steady at about 6800 feet in Cessna, and 6000 feet in Piper. The VSI will oscillate a bit, until your aircraft finds its natural altitude for this power setting; then the needle will sit motionless at the 9 o'clock, or center, position. (In my Cessna, the VSI needle is pretty accurate. In my Piper, the needle sits a little high. But in either case, we have other ways of knowing if we're climbing—for instance the altimeter and artificial horizon.)
Our heading remains unchanged, because we've entered no banks and made no turns. The turn coordinator shows the wings level.
Additional Panel Familiarization
Now let's continue familiarizing ourselves with the instrument panel. Look at the six primary instruments again (shown in Figure 1–1). Read them left to right, starting at the upper left, clockwise:
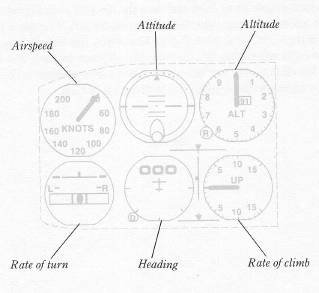
The instrument between airspeed and altitude is called the “artificial horizon,” because that's exactly what it is. If you were flying in an overcast and couldn't see the ground, you would believe what this instrument told you about the attitude of the airplane in relation to earth, horizon, and sky (which is why it's also called an “attitude indicator”). Right now it tells you that we're straight and level, which the rate of climb confirms.
The altimeter shows us steady at 6800 in Cessna, and 6000 in Piper. The rate-of-climb needle sits at zero. The heading indicator stays on 330 to 332, and the turn indicator shows no bank, no turn.
Now for a look at the rest of the instrument panel. I suggest that you read a sentence or two, then look up and examine each instrument.
Ailerons, Elevators, and Rudder
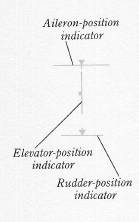
In an “I” arrangement between the VSI and the heading indicator are three important indicators. From the top down, they show aileron-control position, elevator-control position, and rudder-control position. In our flights, unless you elect to enable Reality mode, the aileron and rudder are coordinated, and their indicators will move together.
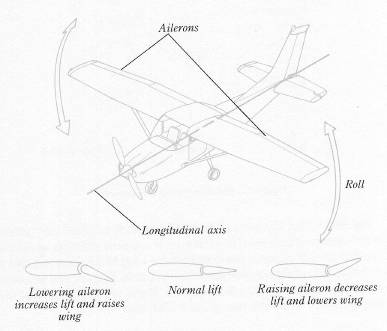
The ailerons are hinged, movable surfaces on the trailing edge of the wings, which enable us to bank and turn the aircraft (see Figure 1–2). If we apply left aileron, for example, the aileron on the left wing goes up and the aileron on the right wing goes down. This gives the left wing less lift and gives the right wing more lift, causing the airplane to bank and roll to the left—in the direction of the low wing. The aileron-position indicator shows how much aileron we're applying in the direction of turn.
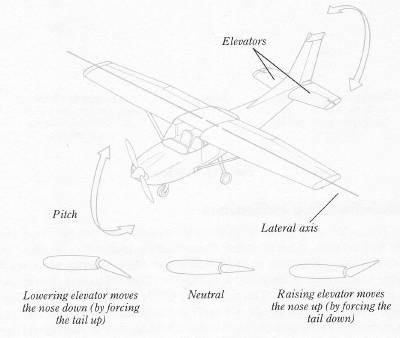
The elevators are movable control surfaces on the horizontal stabilizer at the rear of the plane (see Figure 1–3). They enable us to control the pitch of the nose, up or down, and thus our airspeed. Pressing your up-elevator key (go ahead and try it, just a single quick press) moves the elevators up, which forces the tail down and consequently the nose up. At your present speed, you will climb a bit. Conversely, pressing your down-elevator key once (go ahead and try it) moves the elevators back to neutral, which simultaneously brings the tail up and lowers the nose again. In your present configuration, you'll return to straight-and-level flight.
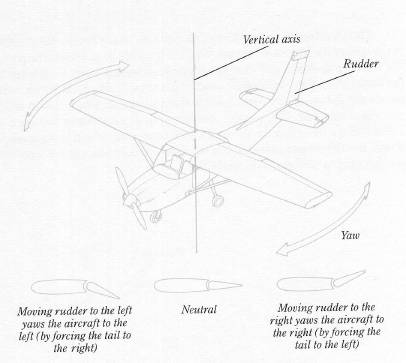
The primary purpose of the rudder is to counteract yaw—the tendency of the aircraft to turn on its vertical axis (see Figure 1-4). In coordinated flight, the rudder is set to the correct position automatically. Coordinated flight is the configuration you're in now.

Omni-Bearing Indicators
Just to the right of the six primary instruments are two additional circular instruments. They're called Omni-Bearing Indicators, or OBIs for short. As the name implies, an OBI indicates your OMNI bearing, when and if you are within range of and tuned to a VOR (Very high-frequency Omnidirectional Range) transmitter. The uppermost OBI is equipped with a landing-approach aid called a glideslope. We won't use these instruments until we get into more advanced training in Section II of this book. At this point I just want you to know what they're called and where they are located.
Flaps, Trim, Throttle
To the right of the OBIs is a narrow column of indicators in what looks like a tube. From top to bottom, they are: flaps-position indicator, elevator-trim-position indicator, and throttle-position indicator. In the Piper there are blank spaces between them, and a mixture-control indicator is wedged in at the right of the throttle-position indicator.
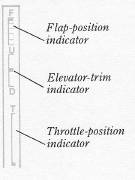
Flaps are sections on the trailing, or rear, surface of the wings which can be lowered into the airstream to produce additional lift and, at the same time, drag (drag being a retarding effect, analogous to dragging your feet when someone is trying to carry you). They are used to shorten the distance required for takeoff, to descend at steeper angles without seriously increasing airspeed, and to enable slower speeds—particularly landing speeds—by decreasing the speed at which the wing will stall, or cease to have lift.
Elevator trim will not concern us, because we will use the elevator itself as the trim device.
You're already familiar with the throttle, but begin to think of it not as a speed control, but as an altitude control. Its primary purpose is for reaching and maintaining specific altitudes. You increase throttle to climb, reduce throttle to descend. In both cases, airspeed remains virtually constant.
Right now these indicators show that our flaps are up, or at zero degrees (the successively lower positions indicate 10, 20, 30, 40 degrees in Cessna and 10, 25, 40 degrees in Piper); the elevator trim is at neutral (actually, in the mode we fly, it's inoperative); and the throttle setting is at less than full power. The RPM indicator is more important to our flying technique than the throttle indicator, because it provides more exact information. In Piper, your fuel mixture (the ratio of fuel-to-air going through the carburetor and into the engine, where the vapors explode) is full rich. The full-rich setting will be standard for all our flights. Cessna, incidentally, has no mixture control, which is often the case in lightplanes.
Compass, Radio, Fuel/Oil, Mags, Gear
To the upper right of your panel you'll find the magnetic compass. In Piper it sticks out on top of everything and reads 332, as you would expect. In Cessna it's plainly labeled and reads 330. When it oscillates between two numbers, it simply means it hasn't settled down yet.
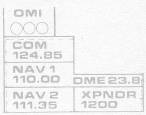
Just so you'll know (we'll learn more about these things when you're learning to navigate), the radio stack consists of six sections, all clearly named, if you'll look at them. The marker-beacon indicator has three lights reading O M I, for Outer, Middle, and Inner marker; they're used in instrument landings and indicate the distance from the runway. The COM or COM1, which stands for Communications radio, is used to contact airport towers and other aircraft. The two navigation radios, NAV1 and NAV2, are used to tune the aforementioned VOR stations. The distance-measuring-equipment readout, labeled DME, tells us our distance from any VOR we're in range of and tuned to. And the instrument with the four-digit code number labeled XPNDR, which stands for Transponder (not Expander), is a transmitter on which ATC (Air Traffic Control) sometimes asks you to “squawk” to help them locate you. We won't be using the Transponder in this book, but at least you now know what and where it is. (Here in the World War I zone we're out of range of all communication and navigation aids, or I would have you turn something on just for the fun of it.)

Also amply labeled are the fuel gauges, showing the amount of fuel in your two gas tanks (one in each wing); the oil-temperature gauge, (C)old to (H)ot; the oil-pressure gauge, (L)ow to (H)igh; the MAGS or magneto-switch-position indicator, presently indicating (B)oth left and right magnetos on (magnetos are small AC generators used in the ignition system); the Lights indicator, reading ON or OFF/1 or 0. The Cessna panel also has an indicator for landing-gear position, UP or DN, which now reads DN, the default position, of course. The landing gear in Piper is fixed.
Look carefully at three more things on your panel and you'll have it all:
First, your carburetor-heat indicator, showing whether or not you've applied heat to the carburetor. In Cessna, it's at the bottom of the slot under your throttle indicator. In Piper, it's all the way over at the bottom right. When the reading is CH, your carburetor control is off—pushed all the way in. When it's red and reads HT, it's on—pulled all the way out. This control prevents your carburetor from icing up. On your first landing, in the “Greasing It On” chapter, you'll learn how to use it.
Second is your tachometer, which you've already worked with—the indicator with the readout labeled RPM. It's way at the bottom right in Cessna and to the left of the carb-heat indicator in Piper. This is one of the most important instruments we have, because it is our guide to power settings. It tells us how fast the engine, and the propeller connected to its crankshaft, are turning, in revolutions per minute (RPM). The propeller spins clockwise, incidentally, as viewed from the cockpit.
And finally, we have a digital clock, which keeps actual time, ticking off hours, minutes, and seconds—very accurately, you'll find, if you check it with your wristwatch.
Those scenics we've passed look just like the one we took off from, don't they? Even the river looks the same. But no matter how hard you stare, you can't see the runway. It was on this side of the river—remember?—and more or less in the righthand corner of the area, in relation to the way we're headed. If there were a runway there we'd spot it easily from this altitude. Well, that area down there is indeed the place we took off from—minus Eagle Field for some weird reason. We'll explore this phenomenon one day.
Before we end this flight, let's talk a little more about what we call “scanning.” When we start flying in weather, you'll see why I emphasize this practice. If you develop the right habits as you learn, flying in weather will be a cinch for you—as will every other kind of flying.
Remember to scan your primary instruments, then the outside world, and occasionally (perhaps between every fifth or sixth primary scan) the other instruments and indicators. Don't just look, but mentally take note of each reading or indication, something like this:
“Airspeed: 115,” or “130,” or whatever you perceive it to be to the nearest ten knots, and as you get sharper, to the nearest five knots.
“Attitude: wings level. Pitch zero,” referring to the white lines etched on the instrument. As you'll recall, the two lines in the center represent the wings of the aircraft, and the dot represents its nose. Each of the four short lines represents five degrees of pitch (nose up or down) in relation to the horizon. When the attitude indicator shows the horizon below your wings, you're pitched up; when above, you're pitched down; when right on, pitch is zero. If you were nose high, you might think “Pitch up one,” meaning one five-degree mark; if nose low, “Pitch down a half,” meaning half a mark, etc. You'll see what a bank looks like on the attitude indicator pretty soon.
“Altitude: 6700 and steady,” or “6200 and descending”—whatever it reads. The large hand always reads hundreds of feet; the small hand reads thousands. And the independent little white marker (which we rarely use in normal flying) reads tens of thousands, so when it gets to the 1 you're at 10,000 feet, plus whatever thousands the small hand reads, plus whatever hundreds the big hand indicates. Don't be confused by the small hand, which reads thousands. When it's between numerals on the dial, read the lower numeral and multiply it by a thousand feet. Ignore the intermediate steps. Your big hand, remember, is reading the hundreds. (Did you notice, by the way, that you've lost some altitude lately? That kind of thing happens often when you're flying at what you think is a fixed altitude. Don't correct it now, but in our regular flying, make it your business to hold whatever cruise or other altitudes we decide on.)
Continuing your scan and readout:
“Rate of climb: Zero” or whatever it shows. The dial markings denote hundreds of feet per minute, with numerals only at 500, 1000, and 1500. So if the needle is on the first little mark above 5 you'll say “Rate of climb: 600” or “Climbing 600” or whatever is comfortable for you, as long as it tells you something and helps control what you're doing.
“Heading: 330” per the heading indicator.
“No bank. No turn.” You're now looking at the turn coordinator. You can call it “the bank and turn” if you like, because it will tell you if one of your wings is lower than the other, which means you're in the bank, which means you'll turn in the direction of the low wing. So if your left wing were down, pointing in the vicinity of the L on the instrument, you would be turning left. On the other hand, if your right wing were down, pointing at the R, you'd be banking and turning to the right. It follows that you can just say “Level” when the turn coordinator indicates no bank, no turn.
The reason you don't scan the other instruments that relate to your flying condition—such as the compass, gauges, and tachometer (RPM)—with every revolution of your head is that they aren't likely to change as fast as the primary instruments. The magnetic compass will change if you change your heading, but your heading indicator will record that fact more quickly and reliably, since the compass takes a while to settle down. The RPM will change if you change power settings (the amount of throttle you are giving the engine) or if you go into a nosedive. Also, Piper RPMs will vary somewhat during descents. But for the most part, the RPM will remain where you set it.
You check the fuel, oil temperature, and oil pressure for signs of anything untoward. Running out of fuel before you reach your destination, for example, is what we call untoward. Or developing a gas or oil leak or having your oil temperature suddenly rise, indicating an overheated engine. (However, such things as leaks and overheating engines occur in the simulator only if you're flying Reality mode and have Reliability set to less than 100.)
If you're flying Piper, be aware that gas feeds from whichever tank the switch is set to, and the best idea is to switch regularly to balance the weight in the wings. Cessna does the dual feeding automatically.
You're coming along fine. But don't become so fascinated with your prowess at panel scanning that you ignore the world outside. Your eyes should check out front between passes over the panel. And very regularly, look out all sides of the aircraft; you never know what you might see—or miss. For example, you might miss the very airport you're headed for, or see a lake that shouldn't be there, or another of those mysterious Eagle Field scenics.
This ends your familiarization flight. Rest, if you need it, or continue to the next flight. Just press the Escape key to get back into the Editor.
Table of Contents | Previous Chapter | Next Chapter