Flight Simulator Co-Pilot
by Charles Gulick
Preflight, Taxi, Takeoff, Turns
Eagle Field Training Base (Local)
North: 17417. East: 7448: Altitude: 410. Pitch: 0. Bank: 0.
Heading: 22. Airspeed: 0. Throttle: 0. Rudder: 32767.
Ailerons: 32767. Flaps: 0. Elevators: 32767. Time: 14:00.
Season: 2. Clouds: 0. Surface Wind: 3 kn., 270 deg.
Check your heading just to be sure the simulator has pointed you 22 degrees. If not, press the Recall key.
This is where the airplane is usually parked at Eagle Field, close by the east end of the hangar. The last person to fly the plane always leaves it here, so the next person knows where to find it. This is where we'll put it when we come back from a flight, unless we're the last pilots of the day, in which case we'll put it in the hangar.
Directly ahead outside your windshield is the last foothill of the mountains that rim this area to the north. Look out your left side, through the hangar, and you'll see another mountain range, with an arrow shape painted on the rocks halfway up. Those mountains border the whole area to the west. A left rear view would show you the rest of them, but the hangar is in the way. One mountain peak, which you can't see from here, is snowcapped.
It's important to familiarize yourself with all landmarks in the area of an airport, because they can help you get your bearings aloft.
Go into radar and take the highest view that still shows the hangar in detail. Your airplane is pointed toward Runway 9/27. We number runways this way because each strip is actually two runways, since you can take off and land in either direction. The numbers correspond to compass headings, but with the zeros dropped, for example: Runway 27 here at Eagle bears 270 degrees, or due west, while its reciprocal, Runway 9, points due east. In aviation language, the reciprocal of any heading is its exact opposite—that heading plus or minus 180 degrees. Sometimes we “do a 180” to get out of weather or other trouble. In Piper, your heading indicator automatically reads out the reciprocal of whatever heading you're on. In Cessna you don't have that luxury. In both planes you can (though you shouldn't have to) find a reciprocal by setting a given heading on your OBI. We'll cover operation of the OBI when we get into navigation technique.
Runways are usually designed to take advantage of the prevailing winds in the area of an airport. The prevailing winds here at Eagle are from the west, so 27 is the runway we'll use most often. The runway in use at any given time is called “the active runway” or just “the active.”
Major metropolitan airports like JFK in New York and O'Hare in Chicago have up to a half dozen or more strips. JFK has five strips, which means ten runways. O'Hare has seven, for a maze of 14 different runways. All these runways consider the wind direction, as well as other factors, including traffic. Twelve of O'Hare's, for example, are in pairs, each of which faces the winds that prevail around the Windy City.
When two runways are on the same compass heading, a Right or Left is added to their number. Thus O'Hare has a 32 Right and a 32 Left, designating the way they lie as viewed by a pilot planning to land on one of them. Of course Left and Right trade places when the wind shifts: Runway 32R becomes Runway 14L, and 32L reciprocates by becoming 14R.
Another thing you should know about runways at large airports is that the shortest and narrowest are most often, though not always, used by light-planes like ours. Relegating the behemoths to the big strips keeps them out of the way of planes that have more important places to go, like ours.
I want you to be serious about your flying. So before we fly I want you to understand how we know this airplane is airworthy. The first thing we do before we ever climb aboard is perform a preflight check. Here are the kinds of things we check:
Condition of tires. Brake lines for leaks. Fuselage, particularly around the landing gear, for wrinkles or signs of stress. Fuel, by feeling the gas in the wing with our fingers (we don't rely on gauges; we get a ladder or a box to stand on if we have to, so we know for sure that we have two full tanks of fuel). We also drain a little fuel into a jar or glass and check it to be sure it's clear and that there's no water in it.
We open the engine cowling on the pilot's side and check the left magneto switch and ground wires for looseness or fraying. We look for cracks in the carburetor and cabin heat shrouds. We drain some more fuel, this time from the strainer near the firewall, and check for contaminants. If everything looks right, we close the left cowling and secure it.
We inspect the static-system vent and Pitot tube to be sure no insects or other foreign bodies are blocking it, which could foul up our altimeter, rate of climb, and airspeed indicators. We check the prop for nicks and to be sure the hub nuts are safetied, and we look into the engine-cooling openings behind the prop for anything that shouldn't be there (birds or their nests, stray cats, remains of a ham on rye, etc.). We check the carburetor-intake screen and oil radiator for damage or obstructions.
On the right side of the engine we open the cowling, check the ignition leads and the right magneto, check the oil and secure its cap, and take another long look. As my first flight instructor, Arnold Kufta, used to say, “you're looking for anything unusual,” though of course it all looked unusual to me. If everything seems to be in place, we close and secure the cowling.
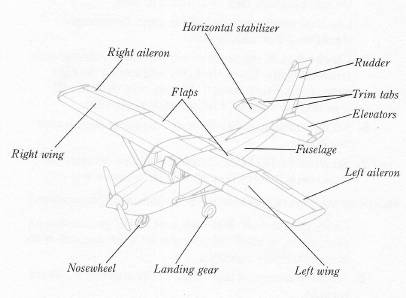
We inspect the landing-gear strut fittings to be sure they are safetied. Then we examine the undersides of both wings for any signs of stress or damage, and the strut attachments to be sure they are safetied. We manually move the ailerons up and down, checking for any slackness or friction while we inspect the hinges. We operate the elevators, again manually, checking for full travel and for safetying of the hinge bolts. We check top and bottom surfaces for wrinkles and other signs of stress. We move the rudder back and forth, making sure it has unobstructed travel. On each wing of the airplane we check the flap hinges for cracks and excessive wear.
If, based on our preflight inspection, everything looks okay, we climb in the airplane. If not, we don't. When we do climb aboard, with all the foregoing checks, inspections, and information in our heads, we know for sure that the airplane will fly.
Once in the cockpit, here's a checklist of jobs you should perform: (A bracketed R after an item means it is significant only in Reality mode, and then—except for trueing directional gyro and altimeter—only if Reliability is set to less than 100. You should be aware that all these checks are essential when flying an actual aircraft.)
- Check carburetor-heat off. The last person who flew the airplane, including you, may have left it pulled out after landing. (In the actual airplane, carb heat is a push-pull control.)
- Start your engine [R]. Your magneto switch is set to both, the battery master switch is turned on, and the starter is engaged. (The propeller turns clockwise as seen from the cockpit.)
- Check magnetos [R]. Make sure your left and right magnetos are operating, then switch back to both.
- Check oil temperature and oil pressure. Both gauges should read near their centers.
- Check lights. In the daytime, you don't need running or instrument lights. Check the lights indicator on the right edge of your panel, and if they're on, turn them off. (If your readout is digital, 1 means on, 0 means off.)
- Set directional gyro [R] when your magnetic compass settles down.
- Set altimeter [R] to the current barometric pressure. In flight, reset it every 15 or 20 minutes to assure accuracy.
Before we start to taxi, perform the following takeoff preparations:
- Check carb heat off. Make this part of your preparation for every flight, or you'll find your aircraft's performance is not at all what you're expecting.
- Put on 10 degrees of flaps. That will be standard for all our takeoffs.
- Be sure that your elevator is at its center position. (It will be if you set the Elevators parameter at 32767 in the Editor; but if you've been flying and are going to take off again without returning to the Editor, use the procedure described in the “Straight and Level” flight. Remember that in Piper center position is not “operational neutral.”)
- Apply two quick notches of up elevator. (This is analogous to setting takeoff trim in the aircraft.)
Every time I tell you something like “get ready for takeoff,” I expect you to go through the takeoff preparation checklist. If you take off without going through the four steps above, we won't be talking the same language.
Now we'll taxi along the tarmac to Runway 27. Use enough power to get the airplane moving. Two notches are needed in Cessna; one in Piper. But coast shortly after you get moving, because the last turn onto the runway is a sharp one. While taxiing, if we were flying an actual aircraft, we would operate our ailerons, elevators, and flaps, checking them visually out the windshield to the left and rear. But you can't see any of these things from where you are sitting, so I'll excuse you. (We would also stop short of the active, turn into the wind, do the magneto checks described earlier, and run the engine up to be sure we had takeoff power, followed by proper idle on closing the throttle. But the simulator brakes won't hold well enough to let us do that.)
In an actual plane, by the way, you would be steering with your feet, because your left and right rudder controls would be on the floor.
Follow the tarmac, and use radar if it helps, to get to 27. Go back and try again if you have problems. Piper is much harder to steer than Cessna; you have to anticipate your turns, watching out front and applying small amounts of left or right pressure, then immediately neutralizing to avoid overcontrol.
Once you're on the runway, keep going. Don't stop or try to put the nose of the plane precisely on the center line, but steer as you roll, trying to get and keep the far end of the runway at the center of your windshield. Even if you roll onto the grass, it's not the end of the world. Just steer back to the runway, and work to get the far end of it straight ahead of you.
When you're reasonably lined up, smoothly put on all your power. (Never use the shortcut the manual suggests for instant full throttle or instant full cut. Never. All power settings should be arrived at smoothly.)
Watch your airspeed. When it indicates 80 knots, rotate, using one press of up elevator. You'll see the moment of rotation out your windshield.
Now pay attention to your VSI. As soon as it indicates a climb (it'll lag the actual liftoff), give one press of down elevator. This lets off the back pressure you used to rotate.
Dump your flaps (set them back to 0 degrees).
Wait while your VSI swings down and starts back up. When it indicates about 1000 FPM up, take off the rest of your trim: Cessna, use two quick notches of down elevator; Piper, use one notch of down elevator.
Now slowly reduce your power in Cessna by four notches (to 2105 RPM) and in Piper by two notches (to 2250 RPM), applying each notch when the VSI needle is moving up. You'll settle in a 500-FPM climb at better than 100 KIAS with your elevators at operational neutral.
Keep climbing straight out. Notice the snowcapped peak over to your left and the shape directly ahead, an abandoned airport named Wigwam.
When your altitude is 2000 feet, start a standard rate turn to the left, rolling out on a heading of 180. If you do this well, you'll be flying along side the mountain range and a mile or so east of it. (The grid lines on the ground lie north/south and east/west and mark off square miles.)
Get straight and level at 2500. This simply requires, if you have done everything right so far, a power reduction about 20 feet below your target altitude: in Cessna, reduce two notches, for an RPM reading of 1905; in Piper, reduce three notches, for an RPM reading of 1950. If you recall, that's the procedure we learned in the “Standard Climbs and Descents” flight. See how everything get's integrated?
When the last grid line disappears under your nose, give me a standard-rate left turn to a heading of 90 degrees. Don't forget to precede the bank with a notch of back pressure, as you learned when you practiced turns. Then take that pressure off when you've completed the turn. You'll be flying east along the southernmost line of grids. Take all your left side views and admire the river and landscape.
Again, as the final grid line disappears, apply a notch of back pressure and turn left to head 360 degrees (i.e. 0), due north. Don't forget to take off the notch of pressure when you level the wings. Procedures like these, if you always do them the same way, will become habitual. You'll soon do them instinctively, which is what we want.
Now get into slowflight. If you don't remember how to do this, press the Pause key and review the “Slowflight” chapter beginning on page 26.
When the base of the mountain is even with the bottom of your windshield, turn right to a heading of 90 degrees, using the notch of back pressure (as usual) before you bank and take it off after you're level. Remember to start your rollout when you're about ten degrees from the heading you want.
Once you're in slowflight, level and headed 90 degrees, exit to the Editor and set up the parameters for your next flight. I'll show you how to transition from straight-and-level slowflight to a final approach and landing.
Table of Contents | Previous Chapter | Next Chapter