Cross Country
by Alfred Poor
San Francisco
Flight 1
Gold Rush!
Simulated flight may not be inexpensive—especially once you start adding flight controls and add-on scenery and all those other goodies—but it’s nothing compared with flying in the real world. An hour in a Skyhawk at many airports costs more than the FS5.1 CD-ROM program. Wouldn’t it be great to strike it rich, find the Mother Lode, and have all the flight time you wanted—both real and simulated?
Well, I can’t promise you riches, but here’s an entertaining diversion instead. Take a trip to California’s gold country, and maybe some of the good fortune will rub off on you!
At first blush, this flight is remarkably straightforward. Take off, turn to a heading and climb to cruise altitude, turn at a VOR, descend, enter the pattern, and land. There are a few twists in store, however, and you’ll find out just how precisely you can control your plane.
The flight starts at Reid-Hillview airport, just south of San Francisco Bay in San Jose. The destination is Columbia Airport, nestled in the foothills of the Sierra Nevada mountains. The town of Columbia has a colorful history; it was one of the richest placer-mining centers during second half of the last century. A state park in the old business district includes renovated buildings of the period. As for lodging during your visit, you can follow the example of the miners of the old days—just bring along a bedroll, because you can camp beneath the wing of your airplane at the airport for just $5 a night.
Planning the Flight
You’ll be departing from Runway 31R at Reid-Hillview. While you could head directly for Columbia, I’ll plan your flight to use a VOR near the mid-point just to make the navigation easier. (There are not a lot of visual checkpoints available in the default scenery along this route.) The Manteca VOR near Stockton makes a perfect mid-point.
Runway 31R has a right-hand traffic pattern, which is just as well since you want to head northeast, and you’ll also want to avoid the San Jose International Class C airspace to the west.
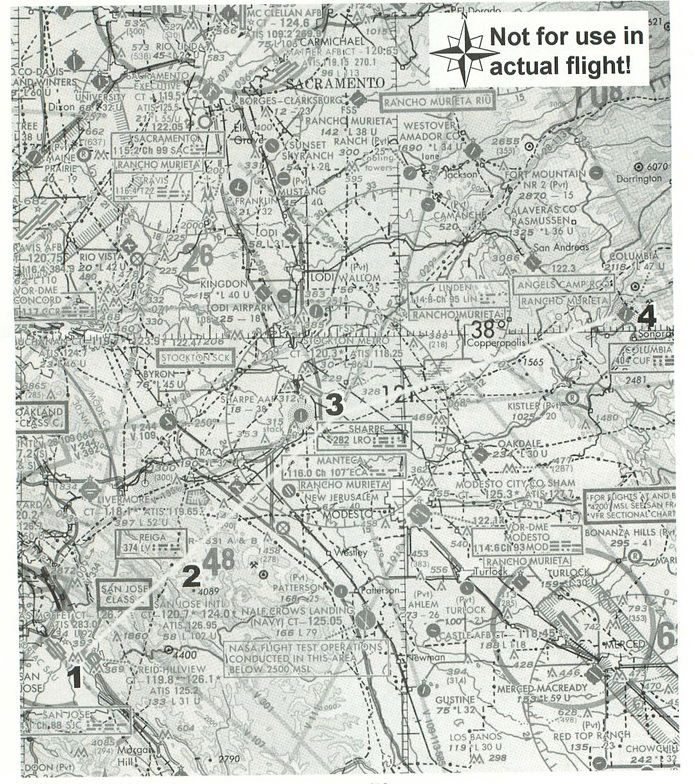
The scanned section of the chart shows your planned route. Since you will be flying more than 80 nautical miles—almost in a straight line—I do not have room on the page to show the regular sectional chart to scale. Instead, I have used a World Aeronautical Chart (WAC) that has twice as big a scale.
Even at this larger scale, you can see a lot of light-colored areas northeast of the Reid-Hillview. This indicates high terrain, and in this case, it’s the Diablo Mountain Range. You could take the time to go around it to the north or south, but that would add time. If you’re careful, and can accurately control your airspeed in the Cessna 182, you can climb right over the range and take a direct route to the Manteca VOR.
|
The course from Reid-Hillview to the Manteca VOR is 30 degrees magnetic, so once you’re close to pattern altitude after take off, you can turn to that heading. The next question is how high to climb.
The highest point in the Diablo Range is Mount Hamilton at 4400 feet, but you’ll pass north of that. You will still have to clear a 4089 foot high spot, however. But you’ll want to climb even higher that.
In getting the weather briefing for this flight, you have received information about the winds aloft. These are reported in terms of altitude, direction, and true heading (as opposed to magnetic heading). I’ll get to the details later, but there are some strong winds out of the west and they get stronger as you go higher, so we should plan to take advantage of them.
The hemispheric rule for VFR flights calls for eastbound flights to travel at odd thousands plus 500 feet. You could stop at 5,500 feet, but to take full advantage of the wind, I’ve planned on an altitude of 7,500 feet.
There’s a second advantage to the higher altitude; engine efficiency. The air is thinner, so you experience reduced drag, but this also means that there are fewer oxygen molecules available to burn in the engine. For maximum efficiency, you can lean the gas/air mix so you get the most miles per gallon. (In real planes, the goal is to minimize the gallons burned per hour, rather than miles per gallon, since the miles can be affected by external factors such as winds.) You’ll take advantage of that on this flight, too.
Once you reach the Manteca VOR, you’ll turn toward Columbia. I have planned on using the VOR for a back-bearing, but how can you find the field? It may be difficult to see in the figure, but the Columbia Airport symbol is surrounded by tiny magenta dots, which indicates the presence of a non-directional radio beacon, or NDB. You can track this using an automatic direction finder, or ADF. Unlike the VOR indicator which tells you whether or not you are on track, all the ADF can do is point toward the NDB. Go where the arrow points, and you’ll find the airport.
|
Finally, when you arrive at Columbia, you’ll have a choice of runways. If you want to practice soft field landings, try Runway 29, a 2,600 foot long turf strip. Otherwise, take Runway 35 which is paved. The pattern altitude is 3112 feet, with standard left-hand traffic. Oh yes, one more detail—try not to fly too far east past the airport; the Linden MOA (Military Operations Area) starts about five miles east of the field, and you don’t know if it is “hot” or not.
Flying the Log
The flight log is unusually short for this flight, mainly because there are not many visual checkpoints available along the route. The few points that do exist deserve some additional comments and advice, however.
First, you will need to trim your airplane for 70 knots on the initial climb if you are going to make it over the mountain range. You can use the side view to see when you cross over the top, but you won’t want to waste any altitude pushing the nose over for a peek on the way up. (There should be plenty of mountain filling your windshield to keep the palms moist, even without nosing over.)
Start leaning the engine once you pass about 3,000 feet, and check it again every 1,000 to 1,500 feet you climb. (See Appendix C for information on how to use the mixture control.)
When you reach 4,500 feet, you know that you will safely clear the top of the mountain range; transition to a cruise climb by trimming for an airspeed of 80 knots. This gives better visibility over the nose so you can spot other traffic more easily, and increases the airflow through the engine which helps keep cylinder temperatures down.
As you get up into the wind, you’ll have to account for drift. In order to keep the OBS needle lined up, you’ll actually have to aim a bit to the north of your intended track—by as much as 15 to 20 degrees. If you notice the needle starting to edge away from the center, change your course by five to ten degrees in the direction it has moved. Once you stop the movement, you know how much correction is required. Then overcorrect until the needle centers, and then swing back to the corrected heading.
When you reach the cruise altitude of 7,500, throttle back to around 2300 rpm or so and trim your plane for 130 knots and level flight. See if you can get it stable enough to fly steady without your touching the controls. By the way, it can be interesting to see just how much of kick in the tail you’re getting from the winds aloft. If you are flying directly toward (or away from) a VOR with DME capability, you can read your ground speed on the DME readout. Assuming that you are heading for the VOR tuned on NAV1, press F then 1 to select the DME readout, then press the Equal Sign key to toggle back and forth between distance from the VOR (in nautical miles) and ground speed to or from the VOR (in knots). The speed readout can take a little while to settle on a number (and it helps to be flying straight and level to get an accurate reading) but you’ll soon see your true speed over the ground.
As you approach the Manteca VOR, you’ll see colorful fields in the San Joaquin River Valley. When you reach the VOR, Stockton Metro airport will be close by on the left side; it’s easy to recognize by its parallel runways of different lengths. Note that VOR DME measures actual distance, so at your cruise altitude, you will still register as more than a mile away even when you are directly over it. If your DME reads less than 1.5 miles from the VOR as you pass it, you’ve done very well.
Then you’ll turn to a heading of about 50 degrees (again, correcting for the wind drift) and should set the OBS on NAV1 to 55 degrees which you can use as a back-bearing. Your ADF needle should be pointing straight ahead, or a little to the right (again, compensate for the wind that is pushing you to the right). The wind will be mostly behind you at this point, so check the DME for your ground speed. (Wow! A Cessna with afterburners!)
Olympia is 38 miles from the VOR, so you can use the DME distance readout for an indication of when you get to the airport. However, you’ll want to be at pattern altitude when you get there, so you need to figure out when you should start a standard 500 foot per minute (fpm) descent. Pattern altitude at Olympia is 3112 feet, so you have roughly 4,500 feet to lose, which will take nine minutes, so add one more to slow down for the pattern, and you should start your descent 10 minutes from the airport. If you are traveling at 150 knots, this would be 25 miles out, or 13 miles after turning at the VOR. Descend by slowing your engine by about 100 or 200 rpm without changing the trim; you should be able to find an engine speed that provides a 500 fpm descent while the plane continues to fly with an airspeed of 130 knots.
Don’t forget to make sure you have the engine mixture full rich (handle all the way up) by the time you get into the pattern. When you get to the airport, enter a left downwind for your chosen runway, land, and break out the bedroll! Oh, and watch out—there have been reports of deer on the runway, so look carefully when you’re on short final.
Before You Take Off
All that’s left is to set up the instruments and some other details. First, let’s get your airplane in position. Choose the World menu item, then Set Exact Location. On the screen that appears, enter the following items:
North/South Lat.: N037 19 48.3328
East/West Lon.: W121 48 59.4561
Altitude (feet): 136
Heading: 310
Choose OK. Now set the radios. Start by choosing the Nav/Com menu option, then ADF. On the screen that appears, enter a frequency of 404 (the NDB at Olympia) put a check in the box for Activate ADF gauge, then choose OK. When you see the panel again, you’ll see that the NAV2 gauge has been replaced with the ADF.
Set COM1 to 126.1 (Reid-Hillview tower frequency), NAV1 to 116.00 (Manteca VOR) with the OBS heading 30. And set your transponder squawk code to 1200, which indicates a VFR flight.
Choose the Sim menu, then the Realism and Reliability item. Put a check in the box for Mixture Control to enable that feature, and then choose OK.
Now, the remaining tricky part is to set the winds aloft. Choose the World menu item, then Weather. On the screen that appears, choose Winds, then choose create. A new screen appears. Leave the Type as Steady, and enter a Base of 2500, Tops of 4500, Speed of 20 knots, and Direction of 270. Note that Direction is True, not Magnetic North. Leave the Turbulence setting at 1 for no turbulence). Then choose OK. Then use
Create to make two more layers (all with a Type of Steady and no Turbulence):
Base Tops Speed Direction
4500 6500 30 275
6500 8500 40 280
So now you should be ready to head for them thar hills, and who knows? Maybe you’ll find your pot of gold waiting for you when you land.
< Situation file: XC-SF1
Table of Contents
Previous Section: Section D: San Francisco
Next Section: Lake in the Mountains — Columbia to Lake Tahoe