Cross Country
by Alfred Poor
San Francisco
Flight 2
Lake in the Mountains
People often ask me whether it’s easier or more difficult to fly FS5.1 than it is to fly a real plane. The answer is “both”, and this cross-country flight demonstrates my ambivalent response. Some aspects of the flight will be much easier on your computer because you won’t have to deal with some of the terrain and wind problems you would encounter in the real world, but the absence of topographical detail for the section you will fly over makes navigation a lot more difficult.
The previous flight ended up in Columbia, California—site of an old gold-mining town—and this flight will take you from there to the emerald in the state’s sight-seeing treasures: Lake Tahoe.
The default scenery includes a number of airports in the region, including two near Reno, Nevada. We’ll head for the one at the southern end of the lake, in the California town of South Lake Tahoe. Lake Tahoe airport has only one runway, 18-36, but it is 8,544 feet long—which is just as well given the field’s 6,264 MSL elevation. The air is much less dense at that altitude, so you need more runway for take-off and landing than you would at sea level.
When you get to Lake Tahoe, there are plenty of things to do: excellent skiing conditions in the winter, and lots of summer outdoor activities such as a hike in to Vikingsholm, a recreation of a 9th-century Viking fortress. Or if you just want to take it easy by the largest alpine lake in North America, try camping at South Lake Tahoe City Beach.
Planning a Route
As the old commercial said, however, “getting there is half the fun” and this trip is no exception. The portion of the WAC (World Aeronautical Chart) for this region shows your route marked out on it. There are a number of important details to notice.
First and foremost, check out the dark, shaded land regions. Those indicate areas of high terrain. Right by the bend in the course there is a notation “6070”. That is the altitude of a peak on a ridge at that location. Closer to Lake Tahoe, there’s a peak near the route marked at 10,400 feet. So one of your first concerns will have to be gaining sufficient altitude.
Here’s one place where real world flying is a little easier. The FS5.1 default scenery does not show the mountainous terrain. In the real world, you could simply keep track of ridges and fly up valleys and through passes to get where you want to go, but the FS5.1 scenery doesn’t show these. Nor does it show the various roads and rivers indicated on the chart. As a result, you will have no visual checkpoints that you could use for pilotage. Since there is a 36 mile stretch that you have to fly by ded reckoning, this will be harder than it would be for real.
Also in the real world, you’d have a 22-mile long lake as a landmark, but the FS5.1 scenery doesn’t include this either.
|
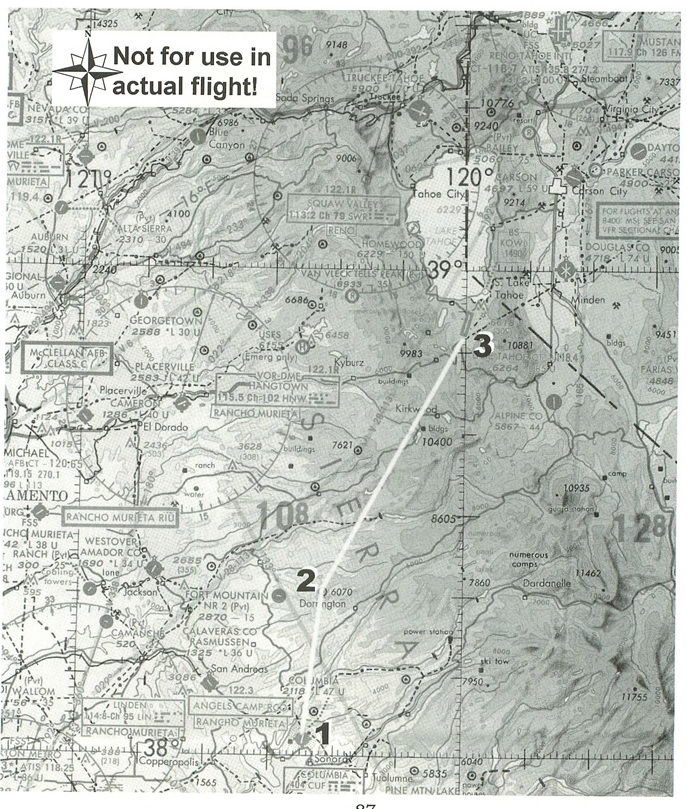
So if you can’t use pilotage, how are you going to find your way from Columbia to Lake Tahoe? If there were a radio beacon (NDB or VOR) on the field at Lake Tahoe, you could just fly right to it... but there isn’t. You could fly to a VOR and then head out on a course that would take you to the field, but that involves a lot of extra flying; the VOR nearest Lake Tahoe Airport is more than 21 nautical miles away.
The answer is that you can use the closest VOR, Squaw Valley (SWR 113.2), and your DME readout on your panel to find the airport. Consulting the AOPA Aviation USA airport directory (available from Sporty’s), you can find a notation marked “Waypoint: SWR-113.2 127º 21.4”. This indicates that the airport is located 21.4 nm from the Squaw Valley VOR along the 127º radial. By setting up your NAV radio correctly, you can pick an approximate course and then use the radio beacon to home in on the location.
There are other points to consider on the chart. For example, there is a large, cross-hatch bordered section northeast of Columbia, marked “LINDEN MOA”. This is a military operations area. According to a notation elsewhere on the chart, it is active from 0500 to 2000 Monday through Friday and starts at 12,000 feet. You could probably cut across underneath this area, but to be extra cautious, I’ve planned the route to go around it instead. It only adds a few miles to the flight, and means that you won’t have to be quite as concerned about encountering a jet fighter closing on your nose at rates exceeding 500 knots during your climb out.
To do this, you’ll take off and head for the Squaw Valley VOR. When you have gone 18 miles, you will be able to turn and head for Lake Tahoe without cutting the corner on the Linden MOA. You can measure how far you have flown using the DME readout for the NAV radio. When you reach the turning point, Lake Tahoe should be on about a 10º Magnetic heading. The flight log that I have worked out for the flight shows these details.
|
And finally, there’s the question of how high to fly. Columbia is only at about 2,000 feet MSL, but Lake Tahoe is more than a mile up at 6,264, and is surrounded by hills as well. Since you’ll be flying east of a northerly heading, and the VFR rule is odd thousands plus 500, we’ll plan for 9,500 feet for your cruise altitude. (In real life, you’d use a sectional instead of the WAC to get better detail about terrain elevation, and you would plan the flight to follow contours and passes, but neither the WAC nor the FS5.1 default scenery provide this level of detail, so I will assume that this is a sufficiently safe altitude for your route—which is just one more reason why you should never use these flight plans for real-world flying.) Remember that the rules for altitudes don’t start until you are 3,000 feet above ground level, but we’ll follow the rule anyway.
Now here is a point where the simulator is easier than the real world. Flying in the mountains is tricky; you’ll find updrafts on the upwind side of a ridge, and downdrafts on the downwind side, and often more turbulence than you want all around. FS5.1 ignores the effect of terrain on air masses, so you can settle down and enjoy a smooth flight.
Let the Winds Blow
I am going to add some weather to complicate matters, however. Since you have to fly that long stretch without anything to guide you, calm conditions would mean that you could just point your nose on a heading and go for it. Instead, I’ll add some winds aloft to give you a crosswind component to contend with.
I’ll set up winds from 2,500 feet MSL to 10,000 MSL at a brisk 30 knots from 270º. Since Winds Aloft are entered as True headings, that translates to about 254º Magnetic (since the magnetic variation is about 16º East in that area).
This crosswind will have an impact on the courses you must fly. The first leg—toward the Squaw Valley VOR—requires a ground track of 350º Magnetic. Since you will be climbing out for most of this leg to reach altitude, we have planned on an airspeed of 70 knots. When you hit the level with the winds, that 30-knot breeze from the side is going to require a hefty correction; I estimate you’ll need to head 333º Magnetic to keep the VOR needle centered.
Once you reach cruise altitude and make the turn toward Lake Tahoe, I have planned on a cruise speed of 130 knots. The winds will be behind you giving a push, but you will still need to use a heading of about 357º Magnetic to maintain the desired 10º Magnetic heading for your ground track. The flight log reflects these wind corrections.
Note that I said you should use the east-of-north VFR altitude for your cruise altitude before, even though here the plan tells you to head west of north. The reason is that it doesn’t matter where the pointy end of the plane is headed, what matters is where it goes. In this case, you are headed west of north, but your ground track will (or at least, should) be east of north, thus I chose the odd thousand plus 500 altitude.
And when you arrive at Lake Tahoe, the wind will be just about sideways to the runway, but slightly favoring Runway 18, so expect to enter a left downwind when you get to the pattern.
Getting Ready to Fly
Start by putting your plane at Columbia Airport. Since there is no entry for this field in the World Airports menu, you will have to use the Set Exact Location command on the World menu to enter the following values:
North/South Lat.: N038 01 27
East/West Lon.: W120 24 51.9
Altitude (feet): 2121
Heading: 345
Using the Weather command on the World menu, choose Winds, then Create to create a new layer. Make sure that the Wind Aloft setting is checked, then choose Type as Steady, Base of 2500, Tops as 10000, Speed as 30, and Direction 270. Dial in as much or as little turbulence as you wish; but since you’ll be landing in this wind layer when you reach Lake Tahoe, we recommend that you leave Turbulence set to its lowest setting for now.
On your control panel, set your transponder to the code for VFR flight: 1200. Tune your NAV1 radio to the Squaw Valley VOR, at 113.2, and turn the OBS heading to 350 which should center the needle with a “TO” indication on the gauge.
Making the Flight
You’ll take off headed straight for the VOR. Note that the DME reading for the VOR is about 69 miles when you are at the field. As mentioned earlier, climb out at about 70 knots, and when you get to 51 miles from the VOR, you can make your turn to the north to go on course. At that point, adjust the OBS setting on your NAV1 so that it is at 307º (the reciprocal bearing for the 127º radial). When the needle is centered and your DME reads 21.4 miles, you should be right over the airport. Make sure that you descend to the 7500 foot pattern altitude before you get to the runway, and enter a left downwind for Runway 18.
One word of warning: FS5.1 has a magical “elevator” scenery effect, so be prepared for it. As you fly near the field (about pattern distance), the terrain will rapidly rise up to meet you. Fly away from the runway, and it will just as rapidly move back down. Don’t let it throw you; just pay attention to your altimeter and don’t be distracted by this weird visual effect.
And once you make it on the ground, prepare to park your plane and have some fun in the sun at Lake Tahoe.
< Situation file: XC-SF2
Table of Contents
Previous Section: Gold Rush! — Reid-Hillview to Columbia
Next Section: Big Mountains, Little Mountains — Lake Tahoe to Yuba County