Microsoft Flight Simulator Handbook
by Jonathan M. Stern
Daylight ILS Approach
Begin your ILS training using one of the situations you saved earlier. Recall the BayWatch situation using the Options menu and the Situation selection. As you will recall, you saved this situation when you passed over the top of the Woodside VOR-TAC, several miles South of San Francisco.
- Study the ILS Rwy 28R IAP to San Francisco. A transition from Woodside, the three-letter identifier for which is OSI, is depicted on the chart. The transition reflects that you fly the OSI 348° radial for 10.8 nautical miles while descending to a minimum altitude of 4,100 feet.
This feeder route takes you from OSI to the BRIJJ LOM, which is shown as an IAF, or initial approach fix.
- Ensure that Woodside is tuned in the NAV 1 radio, and set the OBI to 348 degrees. Unpause and continue to San Francisco.
- You can select the ADF with the Ctrl and Tab keys and tune in BRIJJ on 379. When you arrive at BRIJJ, you can expect two things to happen. First, you should expect the outer marker light and aural signal. Second, you can expect the ADF needle to start to move left or right and then indicate station passage.
When you, in fact, arrive at BRIJJ (which is best indicated by the ADF needle), you need to take one turn around the holding pattern to align yourself with the final approach course and to get down to the initial approach altitude of 1,800 feet (see Figure 18.52).
Figure 18.52. Your arrival at BRIJJ is best indicated by the rotation of the ADF needle past the 90 or 270 degree point.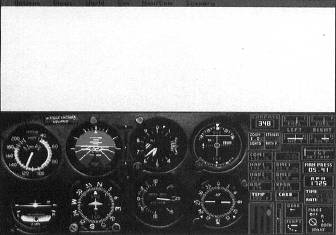
- From the angle at which you arrive at the holding fix, make what's known as a direct entry, turning left to the outbound heading at standard rate. In other words, you should make a left turn to a heading of 101° as the airplane passes BRIJJ. When the airplane rolls out on the outbound heading, start timing, and begin a left standard rate turn toward the final approach course when one minute has passed.
- While you are on the outbound leg, you should slow the airplane to its 90 knot approach speed. Also, tune the NAV 1 radio to the localizer frequency, 111.7, and, as a reminder, turn the OBS until the final approach course of 281° is displayed on the OBI.
During the inbound turn, you need to pace your turn so that you roll out on the inbound heading when the localizer needle centers. Given the direct entry you made in the holding pattern, you may overshoot the final approach course in a standard rate turn, in which case you have to continue the turn beyond 281° to reintercept the localizer course (see Figure 18.53).
- On the other hand, if you are approaching 281° and the CDI has not come off of the right stop, you need to roll out of the turn with an intercept angle, perhaps 20°, which gives you a heading of 301 degrees.
- When the localizer needle begins to center, turn left to track the localizer inbound. This will likely be the case if you began the left turn to enter the holding pattern as soon as the outer marker signal began (you did not wait for the ADF needle to turn). Because the localizer is more sensitive than a VOR, use small corrections of no more than 2 or 3 degrees at a time while inbound on the final approach course.
- As you approach BRIJJ, the glideslope needle begins to move downward from the top of the NAV 1 display. As the glideslope needle approaches the bullseye, you should lead it slightly by extending the landing gear and pitching to maintain the rate of descent that keeps the airplane on the glideslope (estimated by referring to the glideslope angle and using the rate of descent table).
- Run the Before Landing checklist. Adjust throttle setting, as necessary, to maintain your desired approach speed. At 90 knots groundspeed, the necessary rate of descent on this IAP is approximately 480 feet per minute. By extending landing gear, it may be unnecessary, or necessary to a lesser degree, to adjust pitch and power. In any case, speed and descent rate should quickly be stabilized.
- You should pass over the outer marker at 1,768 feet. As you continue the approach, strive to keep both the localizer and the glideslope needles centered. Make small corrections toward the needles as necessary, incorporating the NAV 1 display into your instrument scan pattern.
- The DH for this approach is 211 feet, exactly 200 feet above the touchdown zone elevation of runway 28R. As the airplane descends below 500 feet, you should break out of the clouds and see the runway environment (see Figure 18.54).
Figure 18.54. Everything is looking good at decision height for you to continue the approach and land on runway 28R.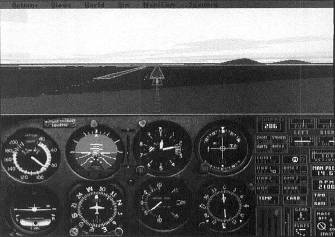
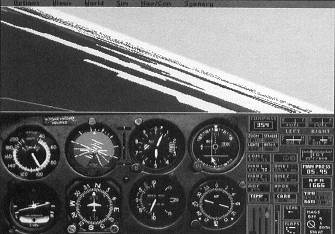
- Even after you have visual contact with, and identification of, the runway environment, you should stay on the glideslope. If visual contact with the runway is lost, for example from fog, staying on or above glideslope offers some added protection. Moreover, certain visual illusions occur in IMC that may lead you to believe that you are higher than you actually are.
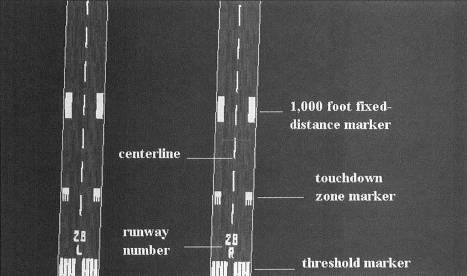
A runway served by an ILS approach should have markings like those shown in Figure 18.55.
Figure 18.55. There are numerous types of markings found on runways served by instrument approach procedures.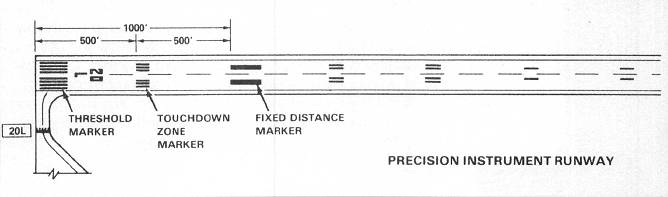
In addition to a runway centerline and number, precision instrument runways incorporate a threshold marker, touchdown zone marker, 1,000 foot fixed-distance marker, and 500 foot side striping (see Figure 18.56).
Common on Flight Simulator runways are displaced thresholds preceded by arrows, as shown in Figure 18.57.
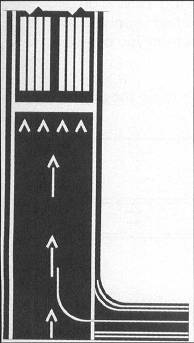
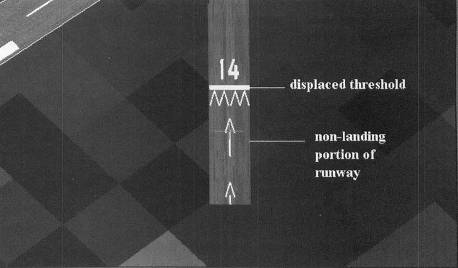
This type of marking indicates that taxi, takeoff, and rollout are permitted, but landing aircraft may not touch down prior to the displaced threshold (see Figure 18.58).
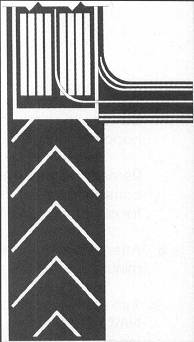
Another type of displaced threshold is marked with chevrons. Chevrons indicate that the pre-threshold runway may not be used for takeoff, landing, or taxiing, as shown in Figure 18.59.
When the airplane reaches 211 feet, you must immediately decide whether to continue the approach below the DH or execute the missed approach procedure. The middle marker should be a backup reminder of when you must make that decision. If the runway is in sight and you are in a position from which a normal landing can be made, land at San Francisco International Airport and complete the flight.
Table of Contents
Previous Section: ILS Approaches
Next Section: Night ILS Approach