Flying on Instruments with Flight Simulator
by Jonathan M. Stern
Chapter 2
Basic Attitude Instrument Flying
Learning how to scan the instruments—the right ones and in the right order—puts you on the right track for flying on instruments.
The basic formula for flying an airplane is
Attitude + Power = Performance
This formula simply states that for any given attitude (pitch and bank) and power setting, a certain performance will result. If you understand this formula, you'll understand what instrument scanning is all about.
Scanning
While flying in clouds, or when the ground isn't visible, pilots must constantly be aware of the attitude, power setting, and performance of their airplane. Since the sense of balance isn't adequate to keep an airplane flying right side up, the pilot must scan the instruments to make sure things are as they should be.
Although many different scan patterns may work, most instrument-flying authorities recommend a pattern that includes checking the attitude indicator between checks on every other instrument. Since attitude plus power equals performance, once you've set the power, it's imperative to set and maintain the desired attitude.
After checking the attitude indicator, scan the other instruments to verify that the desired performance actually occurs. If it does, then check the attitude indicator again to insure that the attitude is maintained. But if the performance is not what you want, use the attitude indicator to correct the attitude. This may sound complicated, but it's not—at least not when you're in the airplane looking at your instruments.
The exact scan pattern you use depends on the maneuver you're performing. All possible maneuvers of an airplane have only four fundamental components:
- Straight and level
- Climbs
- Descents
- Turns
These components—alone or in combination—cover all possible flying maneuvers. For each component, there's one instrument which gives the primary indication of pitch performance (PP), one instrument that gives the primary indication of bank performance (PB), and one instrument that gives the primary indication of power performance. The primary pitch and primary bank instruments vary with the maneuver component being performed. But the primary power instrument is always the airspeed indicator.
Straight and Level
Figure 2-1 shows the instruments of an airplane in straight and level flight. The aircraft is flying at 4980 feet, with an airspeed of 140 knots, and on a heading of 270°.
Figure 2-1. Straight and Level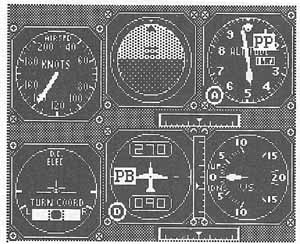
In straight and level flight, the primary indicator of pitch performance (PP) is the altimeter. The primary indicator of bank performance (PB) is the heading indicator.
To maintain straight and level flight, the pilot might use this scan technique:
 Attitude indicator—wings level, pitch level
 Altimeter—20 feet below desired altitude
 Attitude indicator—pitch up slightly to climb to 5000 feet
 Heading indicator—right on heading
 Attitude indicator—maintain wings level
 Altimeter—approaching 5000 feet
 Attitude indicator—pitch down slightly to maintain 5000 feet
 Airspeed indicator—as desired
The scan should occasionally encompass the other instruments. For straight and level flight, the altimeter gives the primary indication of pitch performance and the heading indicator gives the primary bank-performance information. If the altimeter and heading indicator remain on the same marks, the airplane is flying straight and level.
The airspeed indicator is always the primary performance indicator for the power setting. The more power (throttle) applied, the faster the airspeed. Throttle back on the power and the airspeed drops.
In straight and level flight, it's useful to occasionally scan the vertical-speed indicator and the turn coordinator as backups to the primary instruments. If the vertical-speed indicator shows a 1000-foot-per-minute descent when the altitude is holding steady on the altimeter, there must be a problem with one of those two instruments. A third instrument can be checked to determine which of the two is malfunctioning. If the airspeed is normal for the throttle setting and level flight, then the pilot determines that the vertical-speed indicator is malfunctioning. On the other hand, if the airspeed is excessive, the pilot decides that the altimeter is not functioning.
Practice flying straight and level now. When the airplane is standing still on the ground, the instrument readings—with the exception of the airspeed indicator—will be similar to readings during straight and level flight. The attitude indicator will show wings level and level pitch; the altimeter will remain constant; the turn coordinator will be level; the heading indicator will remain constant; and the vertical speed indicator will be on 0.
 Take off, climb to 5000 feet, and fly straight and level on a 270° heading. Try using the instrument-scan pattern described above. Look out the various windshield views to correlate what you see with the instrument readings. When you feel comfortable with straight and level flight, pause the simulation and continue reading.
Right Turn
Figure 2-2 shows the instrument panel of an airplane in a level right turn. As in straight and level flight, the altimeter is the primary pitch instrument in a level turn.
In this turn, the pilot is trying to maintain a standard rate turn. Therefore, the turn coordinator becomes the primary bank instrument and should take the place of the heading indicator in the scan pattern described for straight and level flight. If the pilot chose to make a 30° banked turn instead of a standard rate turn, then the attitude indicator would become the primary bank instrument (this is the only situation in which the attitude indicator is a primary performance instrument).
Figure 2-2. Right Turn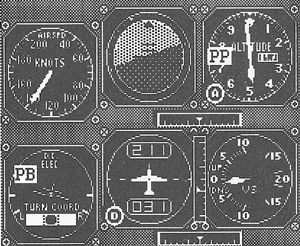
In a level-turn maneuver, the altimeter serves as the primary pitch (PP) instrument, while the turn coordinator becomes the primary bank (PB) instrument.
The scan pattern for this right turn might be
 Attitude indicator—shows approximately 20° right bank and level pitch. The bank angle necessary for a standard-rate turn can be estimated using the following formula:
Bank angle = Airspeed [Knots] / 10 + 7
 Altimeter—at desired altitude
 Attitude indicator—same appearance as last scan
 Turn coordinator—shows standard-rate right turn
 Attitude indicator—same as last scan
 Airspeed indicator—at desired cruise speed
 Attitude indicator—same as last scan
 Heading indicator—are you approaching your desired heading? As a rule of thumb, rollout of the turn should begin when the airplane is within one-half of the bank angle of the desired heading. If a 20° bank is used in the turn, and the desired heading is 260°, begin your rollout when passing through heading 250°.
Unpause Flight Simulator now and practice making turns to predetermined headings while maintaining 5000 feet. Practice both left and right turns.
As a general rule for flying on instruments, never use a turn steeper than standard rate or a bank angle greater than one-half the number of degrees to turn, whichever is less. Thus, if you want to turn through 40° of heading, don't use a bank angle steeper than 20°.
When you feel comfortable with both left and right turns, pause and keep reading.
Climb
Take a look at Figure 2-3, which shows the instruments of an airplane climbing at 500 feet per minute. Because a straight climb (without banks or turns) is being made, the heading indicator is the primary bank instrument. If the heading doesn't change, then the wings are level.
The vertical speed indicator is the primary pitch instrument for a constant-rate climb.
On the other hand, if you wanted to climb at a constant airspeed, not at a constant rate, the airspeed indicator would be the primary pitch instrument instead.
For a constant rate, constant airspeed climb, adjust the airplane pitch to establish the rate of climb (500 feet per minute, for instance); then adjust the throttle setting to maintain the desired airspeed. You may need to correct both the pitch and power setting to keep climbing at the same rate and with the same airspeed.
Figure 2-3. Climb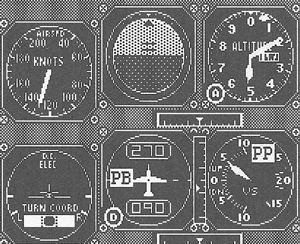
In a straight climb at a constant rate (as shown by these instruments), the heading indicator is the primary bank (PB) instrument, and the vertical speed indicator is the primary pitch (PP) instrument.
The instrument scan should include the secondary instruments—both as a backup and so that you know when to level off at the desired altitude. As a rule of thumb, the level-off should begin when the altitude is within 1/10 the rate of climb. For example, if the desired altitude is 6000 feet and the rate of climb is 500 feet per minute, begin leveling off as the airplane passes through 5950 feet.
Practice by climbing from 5000 feet to 6000 feet on a constant heading at 500 feet per minute while maintaining 80 knots. Keep trying to do it until you get everything right.
Descent
A constant-rate descent, as shown in Figure 2-4, is not much different from a constant-rate climb. The same primary instruments are used.
The major difference is that in the descent, earth's gravity is working for you rather than against you. Because of this, it's possible to build up excessive speed, speed that demands that you reduce the throttle setting.
Figure 2-4. Descent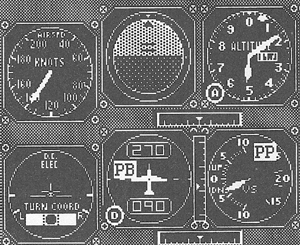
The same primary instruments—the heading indicator and the vertical speed indicator—are used when conducting a constant-rate descent as when in a constant-rate climb.
Additionally—again because of gravity—the level-off should begin when the airplane is passing through an altitude 1/5 the rate of climb from the desired altitude. If the airplane whose instruments appear in Figure 2-4 is descending to 5000 feet, the pilot should begin leveling off when the airplane passes through 5080 feet (400 feet per minute divided by 5 equals 80 feet).
Descend from 6000 feet to 4000 feet at 1000 feet per minute while maintaining 120 knots. If you do it just right, it will take you exactly two minutes and you'll travel four miles.
Climbing/Descending Turns
You've learned how to use your instruments to perform the four fundamental flight maneuvers. All that remains of basic attitude instrument flying are the two hybrids, climbing and descending turns.
These maneuvers are simply combinations of the components you've already seen demonstrated. If they appear more difficult, it may be due to the fact that more things are going on at the same time. In a climbing turn, for instance, not only is the heading changing, but the altitude is increasing. Therefore it's more important that you continue to scan the instruments and not fixate on any particular one. If you study only one instrument—say, the altimeter—it's likely you'll neglect to roll out on your desired heading.
Since the airplane shown in Figure 2-5 is making a standard-rate turn, the turn coordinator provides the primary indication of bank performance. And because a constant-rate climb is being carried out, the vertical speed indicator is the primary pitch performance instrument.
The heading indicator and altimeter serve as secondary pitch and bank instruments and provide the information you'll need to know in order to roll out of the turn and level off from the climb. As with all maneuvers, the airspeed indicator serves as the primary power performance indicator.
Begin the rollout from the turn when the heading is within ½ the bank angle of the desired heading, and start the level-off when the altitude is within 1/10 the rate of climb of the desired altitude.
Figure 2-5. Climbing Left Turn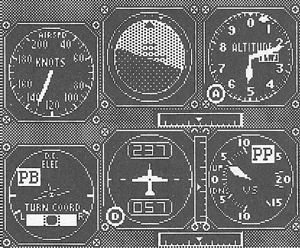
This aircraft is in the middle of a constant rate, climbing, standard rate turn.
Now try climbing from 4000 to 5000 feet at 500 feet per minute in a standard-rate left turn, finishing at the heading with which you began the turn. In other words, make a spiraling climb.
If you do this just right, you'll reach 5000 feet as you roll out at your initial heading.
Descend to 2000 feet at 1000 feet per minute while turning toward the departure airport. Land and proceed to Chapter 3.
Table of Contents | Previous Section | Next Section