Jet Fighter School
Air Combat Simulator Tactics and Maneuvers
by Richard G. Sheffield
CHAPTER 13
The Missions
Learn how to complete each mission in F-15 Strike Eagle with this collection of tactical and strategic tips.
You have a choice of seven combat missions—all based on actual incidents—in F-15 Strike Eagle. Completing those missions can be difficult at times, seemingly impossible at others. That's why I'm offering these tips and techniques. I hope they help you end each mission successfully. Keep in mind, though, that there are many other ways to accomplish the same thing. My advice is not the only, or necessarily the best, plan of attack.
Mission #1—Libya, 1981
Scenario. On the morning of August 19, 1981, two F-14 Tomcats of U.S. Navy Squadron VF-41 (Black Aces) were patrolling 60 miles south of the carrier Nimitz in the Gulf of Sidra near Libya.
Two Libyan SU-22 Fitters were detected and the F-14s were dispatched to intercept. As the F-14s closed on the Libyans, one of the SU-22s fired a missile (probably an AA-2 Atoll). The F-14s broke away rapidly to avoid the missile and engaged the Fitters. In the short battle that followed, Squadron Leader Commander Henry Kleeman and Lt. David Venlet, Kleeman's RIO (Radar Intercept Officer); Kleeman's wingman, pilot Lt. Lawrence Msczynski, and Msczynski's RIO, Lt. James Anderson, each shot down an SU-22 with an AIM-9L Sidewinder missile shot.
Mission 1 is based on this incident, and more. You get to do what the F-14 pilots could not—carry the attack to bases in Libya.
Since this is the first mission, it's also the easiest. You won't encounter SAMs during the flight.
Tactics. To complete this mission, quickly do away with the enemy plane you find in front of you as the simulation begins. A Sidewinder or several quick gun bursts should do the trick.
Next, place the NAV cursor over the primary target, descend to 3000 feet, and fly toward the target. Use medium-range missiles to keep other enemy aircraft busy while you make your bomb run.
Drop as many bombs as possible on the target and pull up. With the main target destroyed, you can continue to attack ground targets or drop the rest of your bomb load and head back to the coast where you can engage enemy planes until you run out of ammunition or fuel.
When your fuel falls to 5000 pounds, it's time to head for home.
Mission #2—Yom Kippur War, 1973
Scenario. In October of 1973, hostilities between Egypt and Israel again reached the boiling point. On October 6, 1973, Egyptian tanks crossed the Suez Canal. At the same time 100 Syrian tanks moved into the Golan Heights area of Israel.
During the Yom Kippur War many large-scale air battles were fought between Israeli F-4 Phantoms and Syrian and Egyptian MiG-21s and MiG-17s.
The Israeli Air Force (IAF) estimated a kill ratio of about 40 to 1. The Israeli F-4s downed 164 Egyptian aircraft in air combat while losing 4. On the Syrian front, meanwhile, 3 Israeli jets were lost while destroying 95 Syrian aircraft.
Tactics. Take advantage of the limited capabilities of the Egyptian SA-7 SAMs. Flying above 32,000 feet puts you out of SAM range; using afterburners lets you outrun any air resistance on the way in.
Go toward the primary target at high altitude and high speed, pass over the target, and begin your descent. Turn back toward the target, approach at 2000-3000 feet, drop as many bombs as possible in your single run, and continue on toward the base at high speed and altitude.
Mission #3—Haiphong, North Vietnam, 1972
Scenario. Following a North Vietnamese incursion across the Demilitarized Zone (DMZ) in late March, bombing of North Vietnamese targets was again authorized.
This mission is based on the missions flown by F-4 and A-6 pilots during the bombing campaign codenamed Linebacker I.
Tactics. Take advantage of the poor, low-level performance of enemy radar used to guide the SA-2 and SA-3 SAMs.
Immediately after starting the simulation, descend to below 1500 feet and stay there. Enemy MIGs weren't active during the first stages of Linebacker I and shouldn't be a problem.
Place the NAV cursor over the first target and make your bomb run. If you don't have another person helping as weapons officer, it's best to pass over the second target, then regroup.
Place the NAV cursor and turn around, making your second bomb run so you will be heading out to sea once it's completed.
Mission #4—Syria, 1984
Scenario. When the Syrians started moving modern Soviet-built SA-9 SAMs near the border, the Israelis decided to act. The locations of the emplacements were determined using RPVs (Remotely Piloted Vehicles). These small unpiloted drones carried cameras and accurately located the targets. F-15s and F-16s then flew a number of successful bombing missions. The Syrians used heavy smoke in an attempt to hide the locations of the SAMs, but the Israeli preflight homework paid off.
Tactics. This is the first mission with all the threats working against you. The Syrians have radar and infrared-homing SAMs, MiG-21s, and MiG-23s. Your primary target is a long way from home—the distance can be a very real threat in itself.
This mission is best handled in two phases. First, take out the two closest SAM and airport locations. This will make it easier to get in and out during the second phase. After taking out the first four targets in phase 1, return to base to re-arm, refuel, and repair. You can fly more missions to soften up the path to the primary target, but the mission can be completed on the second flight by flying in fast toward the target with a light load of two or three bomb loads. If you're really confident take only one. (The fewer the better, because fuel conservation is important.)
Afterburners can be used for a while, but not for the whole trip. Go straight in, make your bomb run, and head straight home. Heading home can be done at high altitude if you've cleared out most of the radar-guided SAMs. If you do run out of fuel, don't bail out immediately, since the plane will glide a considerable distance with no bomb load.
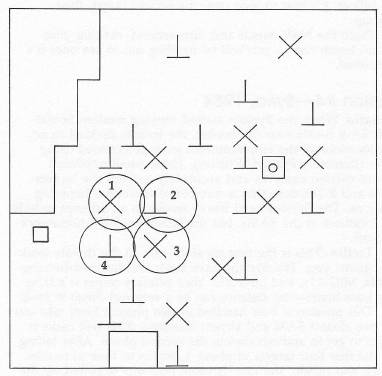
Figure 13-1. Mission 4The numbers indicate the first-phase targets in the order of attack. Target #2 is an infrared-homing SAM site; target #4 is a radar-homing SAM site.
Mission #5—Hanoi, North Vietnam, 1972
Scenario. On May 10, 1972, United States aircraft first used laser-guided bombs in an attack on North Vietnam. These highly accurate devices could be guided to within several feet of a target, which was illuminated by a laser beam from an aircraft off the target.
The F-15 Strike Eagle manual lists both primary targets as oil depots; one of the main targets for the May 10 strike, however, was the Paul Doumer Bridge, a major link in rail and road traffic in and out of Hanoi. A small strike force scored a decisive victory by landing 12 direct hits on the bridge with laser-guided bombs.
Tactics. In this simulation, unlike the real event, SAMs will not be a factor. Since you don't have to worry about SAMs, the best approach is to take the targets one at a time. Go for the closest target first—climb to 10,000 feet, set the NAV cursor, and hit the afterburners.
Drop all but two bomb loads to increase your speed and range. Fire Sparrow missiles at any enemy planes which come up against you and keep heading straight for the target. You should be able to outrun the enemy planes if necessary.
Fly directly over the target and past it for about ten miles; then cut off the afterburners, perform a Split-S maneuver back toward the target, and make your bomb run heading back toward base. Note that if both your bombs land on target, the mission counts as completed and you won't be able to go back out after the second target.
To attack the second target, similar tactics are used. Follow a path north along the coast at 85 percent power carrying two bombs. When you're almost even with the target, cut in and head toward it. Keep your power level at 85 percent as long as possible, but hit the afterburners once you're attacked. Go straight in for your bomb run, drop your bombs, light the burners, perform a vertical half-loop, and head straight for home. You should be able to outrun most of the enemy air traffic.
Climb to 20,000 feet just in case you run out of fuel and need some altitude to coast back to the carrier.
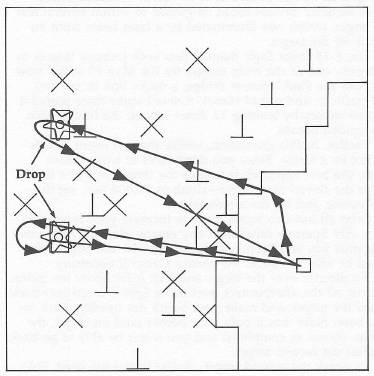
Figure 13-2. Mission FiveThe flight plan for mission 5 shows how you can successfully strike at both primary targets.
Mission #6—Iraq, 1981
Scenario. Etzion Air Base in the Sinai Desert is normally a very busy place. On June 7, 1981, it was even busier than usual. Early that morning, a group of Israeli F-15s and F-16s began a highly controversial mission.
The Iraqi nuclear reactor south of Baghdad was about to become operational and the Israelis believed it was capable of producing weapon-grade fissionable material. In anticipation of its completion, the Israeli Air Force had been practicing an attack on the reactor for over a year. The time had come for the plan to go into action.
The attack force flew around Jordan, through Saudi Arabia, and into Iraq low and fast. When questioned by Jordanian air controllers, they convinced them that they were Saudis on a training flight. The attack was carried out so quickly that neither SAMs or Iraqi aircraft had time to react. The one-ton bombs carried by the F-16s were extremely accurate. The reactor and surrounding buildings were destroyed.
Tactics. When flying the simulation, you won't have the benefit of reality—you'll experience heavy SAM and occasional MiG opposition.
This mission can be completed in one flight with a little luck and a lot of jinking to avoid SAMs. Again, fuel conservation is very important, so immediately drop all but two bomb loads and shoot off half your missiles.
Descend to below 1500 feet and head straight toward the target. You'll receive a lot of attention from the SAM operators, so be prepared to respond with jinks and brief afterburner spurts to avoid the infrared-homing missiles.
Make your bomb run; then perform a vertical half-loop and hit the afterburners. Set the NAV cursor for home base and climb to 35,000 feet to avoid the infrared-homing SAMs. Continue on afterburners until you're out of range of SAMs; then keep your speed up over 1500 knots by losing altitude as you approach base.
Be sure to lose altitude fast enough because fuel will be critical at this point. Also be alert for enemy aircraft. There won't be many, but they can show up at the worst time.
Mission #7—The Persian Gulf
Scenario. Several times a year the U.S. Navy conducts maneuvers in the Persian Gulf to show our determination to keep this vital shipping avenue open. This mission pits your F-15—flying on Combat Air Patrol—against attacking Iranian jets and missiles.
Tactics. Since this is the final mission, you probably expect it to be the toughest. You won't be disappointed.
There's no easy or best way to complete this mission. All the possible threats are waiting for you with expert-level operation. Skill and patience will be necessary to destroy all three primary targets and return safely to base. You'll probably take a hit or two in the process.
Once hit you should immediately determine the handling capabilities of the aircraft and return to base if necessary.
This mission can be broken down into two, or possibly three, steps.
1. The first flight is the optional one, and consists of a “Wild Weasel” style raid on one or two SAM locations on the western bank of the Gulf. Destroying these targets will make the flight up to the northernmost target much safer, but will expose you to heavy missile fire during your bomb run and increase your exposure to Iranian aircraft also in the area. You'll have to make this decision: Do you want to complete the mission in two highly dangerous trips or three only slightly less dangerous steps?
To fly this optional mission, first decide how many targets you intend to bomb: one or two. The southernmost SAM site on the western bank shouldn't pose a threat, so concentrate on the other two.
If you decide to attack only the middle SAM site, this can be done fairly safely by approaching low on afterburners, bombing, then heading back to ship on afterburners. If you intend to destroy both targets, you'll need to conserve fuel and use the afterburners only sparingly to avoid SAMs.
2. I recommend attacking the northernmost target first since it's the most difficult. It's very frustrating to fight your way in and out, destroying the first two targets, only to fail in your attempt on the third. By attacking in this order you can rack up several bomb hits on each of the lower primary targets and increase your point total. If you got more than one hit on these targets on the first part of the mission and returned to base, the mission would be over.
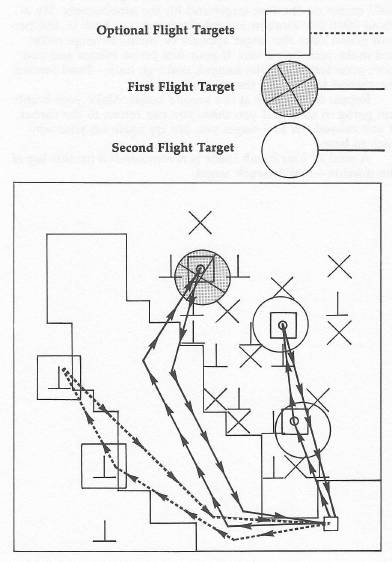
Figure 13-3. Mission 7Mission 7 requires at least two, and possibly three, strikes against the various targets.
To attack the northernmost target, fly up the Gulf over water at medium altitude (at least 35,000 feet). Proceed with only two bomb loads and at 85 percent power once you reach altitude. Fuel will be critical on this leg of the mission. When you're slightly south of the target, cut in toward land, between the two SAM sites. Use a steep descent to keep your speed over 1000 knots. Make your bomb run (dropping both bombs) and return by the same path at high altitude on 85 percent power. Remember to drop the external tanks as soon as you reach 13,500 pounds of fuel—the extra drag and added weight reduce your speed and fuel efficiency.
3. Once you've successfully completed the first part of your mission, the second part should be no problem. Set the NAV cursor on the first target and hit the afterburners. Fly at about 3000 feet straight toward the target, cut back to 100 percent power once the target appears on medium-range radar, and make your bomb run. If your first bomb misses and you can't accurately drop the second, don't go back—head toward the second target with the afterburners lit.
Repeat the process at the second target. Make your bomb run going in so that if you miss, you can return to the carrier. If you missed the first target you can try again on your way back to base.
A total of four bomb loads is recommended for this leg of the mission—two for each target.
Table of Contents | Previous Chapter | Next Chapter