Learning to Fly with Flight Simulator
by John Rafferty
FLIGHT 16
Automatic Direction Finding
Olympia to Bremerton National
Automatic Direction Finding (or ADF) equipment is very simple in concept, but it can be tricky to use if you have a cross-wind or if you try to get fancy. On this flight, therefore, we'll keep things fairly simple and stick to the basics.
You'll depart from Olympia Airport in Washington State, and you'll find your way to Bremerton National using the ADF receiver, homing on a station near that airport. You'll also use ADF for picking up a checkpoint en route.
(Note that ADF is not provided on the Microsoft Flight Simulator for IBM.)
Briefing
The ADF receiver is basically a radio receiver—in fact, you can tune it to any ordinary radio station and listen to music during a flight. However, it's ordinarily tuned to a special kind of navigational facility called a nondirectional beacon.
Nondirectional Beacons. A nondirectional beacon, or NDB, is simply a low-frequency radio transmitter on the ground. Unlike a VOR transmitter, the NDB sends out a single signal in all directions, much like a conventional radio station.
A number of NDB locations are shown on each of your Flight Simulator charts. Each is marked by a small circle (about ¼-inch in diameter) filled with dots. Near each, there's a box indicating the station name and frequency.
Near the bottom of the Seattle Area chart, for example, you'll find symbols for two NDBs, Mason Co (348) and Carney (274). Both of those NDBs will be used on the present flight.
The ADF Receiver. The ADF equipment appears on the simulator panel only after you've selected the ADF option from the Edit Page. (On the 68000, you just click on the ADF selector). Then the window for NAV-2 becomes the ADF window, and the digital readout for the NAV-2 frequency becomes the ADF frequency. That is, you can have either NAV-2 or ADF, but not both, and once you've selected ADF you can't go back to NAV-2 unless you reset the computer (except on the 68000 version, which allows you to toggle back and forth between ADF and NAV-2 at will).
ADF Frequency. You tune in the ADF in essentially the same way that you tune the NAV receivers: There are three digits in an ADF frequency, and you toggle each independently. (On the 68000, just click on the numerals to change them.)
ADF Window. When the ADF option has been chosen, the NAV-2 window changes. The instrument face is then marked off in degrees just like a compass, with a single needle at the center. There's also a digital relative-bearing readout at the top of the window (except on the 68000).
Basic ADF Operation. The ADF receiver couldn't be any simpler in its basic operation. When you tune in a given NDB's frequency, the ADF needle simply points to that station.
If the nose of of the aircraft is pointed directly at the station, for example, the needle will point straight up. If the right wing points directly at the station, the needle will point right. If you're flying directly away from the station, the needle will point straight down, and so on.
The ADF Relative Bearing. The ADF needle (and digital readout at the top of the ADF window) gives you the relative bearing to the station. The relative bearing is not a bearing in the usual sense. Think of the direction you're heading as 000° relative, if your right wing is pointing directly at a station, that station bears 090° relative to you. A station directly behind you is 180° relative, and to your left is 270° relative.
For example, if your present heading is 090°, and the station is directly ahead—the nose of the airplane is pointed straight at it—then the ADF needle will point straight up, and the relative bearing will be 000° (not 090°), because the difference between your present heading and the heading to the station is 0°.
If your present heading is 090°, but the station is 30° to the right of your course, then the needle will point a little to the right, and the relative bearing will be indicated as 030° (since the difference between your present heading and a heading to the station is 30°.) If you wanted to turn and fly directly to the station, then the actual heading to the station would be 090° plus 030°, or 120°.
The main point to remember is that the relative bearing is not the actual direction to the station, but the difference of the number of degrees between your present heading and the heading to the station. The actual heading to the station, therefore, is the present heading plus the relative bearing given by the ADF.
ADF Checkpoints. If you tune the ADF to a station that lies off to one side of your course, you can use it for checkpoints in essentially the same way as you've previously used NAV-2. If the station is to the left of your course, for example, then just as you pass abreast of that station, the ADF needle will be pointing to the left, showing a relative bearing of 270°, indicating arrival at that checkpoint.
Suppose in the above example your course is 343° instead of 000°, as will be the case on this flight, as shown by Figure 3-4. When you're directly opposite the NDB, the needle will be pointing to the left and will still indicate a relative bearing of 270°, regardless of the airplane's current heading.
ADF Homing. You can also tune in an NDB and fly directly to the station. You're pointed directly at the station when the needle is straight up and the relative bearing is 000°.
For example, to home on an NDB that's ahead of you but a bit to the right of your course, so that the ADF needle is pointing up to the right, you simply turn right until the needle is straight up and the relative bearing is 000°, (If you try to home on a station in this way when you have a crosswind, the path of your approach will be an arc rather than a straight line; more on using ADF in wind on a later flight.)
Station Passage. If you're flying directly to an NDB, so the needle is pointing up and the relative bearing is 000°, then as you come in over the station, the needle will start to move down—either to the right or to the left, depending on your precise position. As you leave the station behind you, the needle will settle in the opposite position, pointing straight down to 180°.
Preview
Departure. You'll depart Olympia Airport on Runway 35 and proceed north, climbing to 2500 feet. The flight plan follows below and the flight path is shown in Figure 3-4.
Homing on Carney. The ADF will be tuned to Carney, and after takeoff you'll simply take up a heading to home on that NDB. That is, you'll turn the airplane until the needle points straight up and the relative bearing is 000°; then hold that heading to the station.
First Checkpoint. After you're established on course, reset the ADF to Mason. When the needle points left and the relative bearing is 270°, you're be directly abreast of Mason, which is your first checkpoint.
Second Checkpoint. Then tune back to Carney again, as you continue homing on that station. Station passage—when the needle starts moving down around to one side—is your second and final checkpoint. At that time, the airport will be in sight, and you can set up and begin your descent.
| Flight Plan: Olympia to Bremerton ___/___/___
Time Off: ___:___
|
Set-Up for Olympia:
|
From the Right-Hand Seat
Departure. Figure out which runway is Runway 35, and taxi into position.
Then note the ADF. The needle is pointing almost directly up, with the relative bearing not far from 000°. Your heading on the runway is about 350°, and the airplane is pointed almost directly at Carney.
Take off, then use gentle banks to adjust the heading so that the ADF relative bearing is 000°. A heading of just about 343° should do it. Sometimes it's difficult to get it right on the nose, but extremely shallow banks will help; don't fret if the relative bearing is no more than 5° off.
Climb to 2000 feet and level off.
Checkpoint 1. Once you're established on course with a relative bearing of 000° on the ADF, reset the ADF frequency to Mason (348).
As you come up abreast of Mason, the needle will be pointing left, and the relative bearing will be changing—you're at the checkpoint when the needle is directly to the left and the relative bearing is 270°.
Note the time, and fill in the flight plan in the usual manner. The ETA you calculate now for checkpoint 2 will be especially helpful as you approach that point, since you're not using DME. But be ready—it's only about 4 minutes away.
Checkpoint 2. As you approach the station, the needle will begin to drift to one side or the other at that point, but hold your heading—don't start chasing the needle as it begins to drift away.
When the needle is pointing directly left or directly right, you're right over the station. You needn't bother recording the time, however, because the airport is now in sight, just ahead and slightly to the right.
Approach. At station passage over Carney, set up immediately for the approach and begin your descent to traffic pattern altitude of 1300 feet.
Turn right, so as to circle around to the far side of the airport. You'll be entering the downwind leg on heading 010°, to land in the opposite direction—Runway 19.
Level off at 1300 feet; then maneuver to enter downwind.
Then try another precision landing.
Figure 3-4. Olympia to Bremerton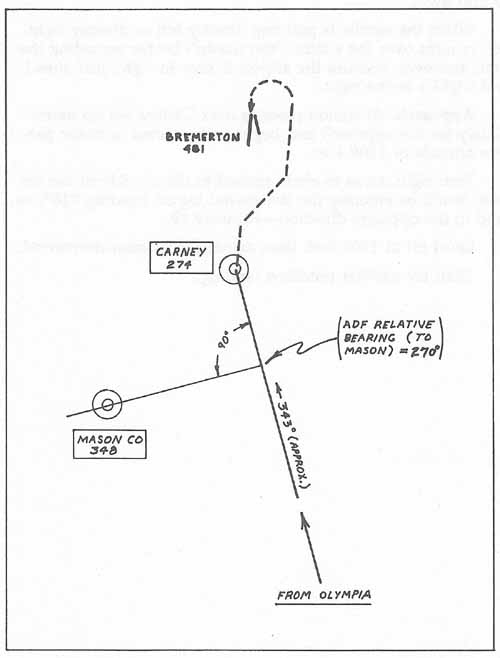
Not for use in navigation.
Table of Contents | Previous Section | Next Section