Learning to Fly with Flight Simulator
by John Rafferty
FLIGHT 19
VOR Approach (I)
Riverside to Santa Ana/John Wayne Airport
In the absence of an ILS, the VOR-type of instrument approach is the most frequently used. You tried one out yourself, in fact, back on flight 6.
While one ILS approach is very much like the next one, no two VOR approaches will be alike. You'll find some VOR approaches relatively easy to execute, but others require fast thinking, a lot of NAV radio switching, and considerable skill.
In all cases, however, I think you'll find them exciting and fun to do.
Preview
You'll start off with the VOR approach to Runway 19 Right at John Wayne Airport, as shown in Figure 4-3. This is not a particularly difficult approach, but there's enough to do on the way to keep you on your toes.
You'll depart Riverside Municipal on Runway 27, and will continue west on the runway heading as you climb to 3000 feet. You'll then turn left to intercept the Santa Ana 180° radial, and will track it inbound to the airport. Meanwhile, NAV-2 will be set to Seal Beach, and you'll use it to pick up checkpoints as you track inbound to the airport.
Before departing, compare Figure 4-3 with the actual published plate for this approach—which is provided in Chapter 5—to get familiar with the style and format of official charts. Note that wherever the plate identifies an odd-numbered radial, I've changed it to the closest even-numbered radial, since you can't get odd-numbered radials on the simulator; however, you'll find that this won't make any noticeable difference. (On the 68000 version, you can get odd numbered radials on NAV-1.)
Set-Up for Riverside:
|
From the Right-Hand Seat
Departure. Depart on runway 27; maintain the runway heading; and climb to 3000 feet.
NAV-2 is set for Prado Intersection (Seal Beach R-043); R-043 is the correct radial, but you can use 042 or 044 on the simulator without noticing any difference; the same applies to R-097 below. In any event, note that 043° (Prado) is just a backup reference for us; if the needle begins to center while you're still on this leg, just ignore it.
Turning Inbound. Monitor NAV-1. When the needle is approaching center, turn left to 180°; center the needle; and track inbound to the Santa Ana VOR. At this point you should be about 20 miles DME from the airport.
If you've already reached or passed Prado (R-043), set NAV-2 to R-058, for Ollie Intersection.
Setting Up. Set up for the approach before you reach Ollie.
Initial Descent from Ollie. At Ollie (R-058), throttle back and begin your initial descent to 2000.
When established on a 500fpm descent, reset the NAV-2 omni bearing to R-080 for Tusti Intersection.
Do not descend below 2000 until you reach Tusti. Add power to maintain 2000 feet if necessary.
Continuing the Descent from Tusti. At Tusti (R-080), resume a 500fpm descent.
Switch NAV-2 to R-097 for Leota Intersection.
Leota Intersection. From Leota (R-097) it's 1.9 miles—or just about a minute—to the VOR, which is your decision point.
Landing. When you have the runway, complete the landing visually. You'll have to make a 10° turn to the right to line up. Use power to adjust your glide path, and note that the field elevation is just 54 feet.
Figure 4-3. Approach Procedure, Santa Ana, VOR RWY 19 R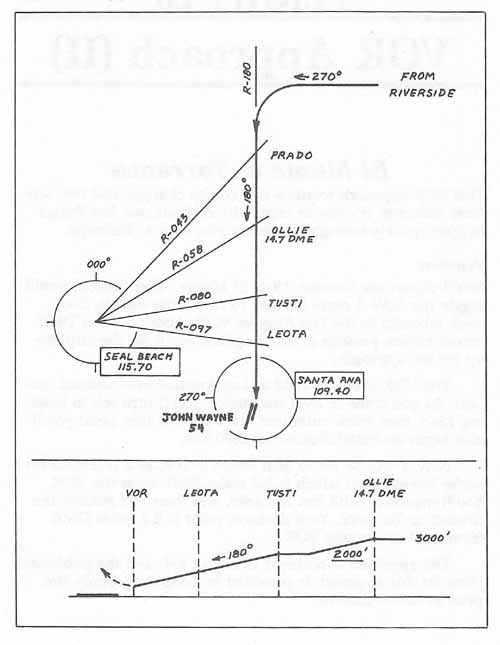
Not for use in navigation.
Table of Contents | Previous Section | Next Section