Learning to Fly with Flight Simulator
by John Rafferty
Phase 1: Airplane Familiarization
We're on the ramp at Kennedy, with the engine running. First, let's take a look at the primary controls and the principle instruments on your panel—just enough to get you started.
Briefing
We'll be considering the following:
- type of airplane
- engine RPM and tachometer
- airspeed indicator
- compasses
- control yoke, or stick
- altimeter
The Airplane. The original Microsoft Flight Simulator for IBM PC and PC Jr. simulates a Cessna 182 Skylane. Flight Simulator II from SubLOGIC simulates a Piper Archer, but the 68000 versions of Flight Simulator II for Amiga, Atari and Macintosh also simulate the Cessna.
The two airplanes are similar in most relevant respects, except that the Cessna's wings are on top while the Piper's are on the bottom. Both provide virtually all the standard instruments, equipment, and avionics options that one would expect to find on the real thing—everything you need for truly sophisticated, totally authentic aviation. The IBM version does not provide ADF equipment, but you can still do just about everything an airline captain does in getting an airplane from one airport to another—and you can do it in the very same way.
Figure 1-1. New York/Kennedy International to Bridgeport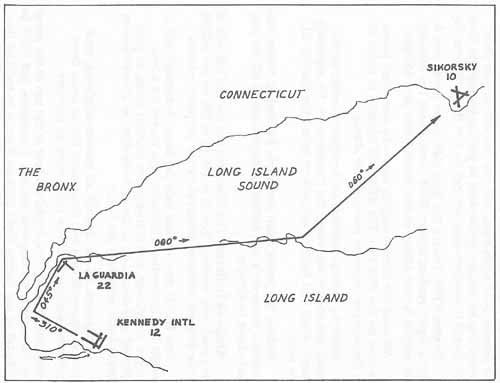
Not for use in navigation.
Engine RPM. Toward the right side of the panel, you'll find a digital readout labeled RPM (Revolutions Per Minute). The engine is now idling, so the readout now says 650rpm.
Advance the throttle slightly now—by one notch (press F4 once on the IBM PC). The RPM will increase to about 850 as the airplane begins to move slowly ahead.
Note the vertical indicator to the right of center on the panel; this shows you where the throttle is set. It's especially handy when you want to advance or retard the throttle all the way.
Reduce the power again and apply the brakes. Notice that it takes a moment or two before the engine comes all the way back down to 650rpm.
Airspeed Indicator. The instrument at the top left side of the panel, with readings from 0 to 160 (0 to 200 on the 68000) ???in reality, the gyro will drift over time, and should periodically be reset to the heading shown by the magnetic compass when that compass is at rest. (On the 68000, just click on the Gyro Compass knob.)
The upper readout is now 310. That means your present heading is three one zero degrees, by standard aviation practice. It is not referred to as three ten or three one oh. Use of the correct pronunciation reduces the chances of miscommunication between the pilot and Air Traffic Control.
The lower digital readout on the gyro compass is the reciprocal heading—the compass heading in the opposite direction, 180° from the actual heading. (There's no reciprocal readout on the IBM version.) Since your actual heading is now 310°, the reciprocal is 310 minus 180, or 130°. Most of the time you'll just ignore this reciprocal readout, but it can be very handy at times, as you'll see on a later flight.
To visualize compass headings: Picture the airplane in your mind as if it were sitting on a giant compass rose, with you looking down on it.
Unless you're already familiar with compass headings, it will help you if you take a moment right now, use a scrap of paper, and make a quick sketch for yourself. Draw a circle, make the top of the sketch north, and mark it 000°. East is to the right, 090°; south is the bottom, 180°; and west is to the left, 270°.
Thus, your present heading of 310 is between 270° and 000°, or roughly northwest. Complete the thought by sketching a small airplane at the center of your compass rose, with its heading at 310°.
Now, whenever you have to think about compass headings, just mentally picture this sketch. Visualize the airplane's heading as you did above, and you shouldn't have any trouble with your heading.
The Control Yoke or Stick. The Yoke refers to the control column that's found on some airplanes, which serves the same function as the stick on other aircraft. The keystrokes for the yoke controls and the use of the 68000 mouse for these controls are summarized in Appendices B and C. To keep things simple, in the discussions I'll usually just refer to the yoke position as the position of the stick.
- Elevator. If you pull back on the stick, you raise the elevator—the horizontal control surface on the tail—and this causes the nose to rise. Conversely, pushing forward on the stick lowers the elevator, causing the nose to fall.
- Ailerons. Turning or pushing the stick to one side or the other moves the ailerons, the horizontal control surfaces on the wings. In the air, the ailerons cause the wings to bank to one side or the other, causing the airplane to begin to turn. Right stick (or right aileron), for example, banks the wings to the right and causes the airplane to begin a right turn.
- Coordinated Rudder. On most conventional aircraft, you use the rudder pedals along with the ailerons to make coordinated turns, but in auto-coordination mode on the simulator, the rudder and ailerons are coordinated automatically. Some actual airplanes also use this kind of coordinated control, however, so using this mode is not unrealistic.
- Nose Wheel Steering. When you're on the ground, the rudder control also turns the nose wheel, for taxiing. In auto-coordination mode, of course, the rudder is controlled by left or right stick.
- Control Position Indicators. A set of slots near the center of the panel shows the position of the elevator, aileron, and rudder. First, move the stick right and left and watch the horizontal indicators respond—you're in auto-coordination mode, so both the aileron and rudder indicator move together.
Now move the stick forward and back, as you would to lower or raise the nose in flight. Watch the pointer closely as it moves up and down along the vertical slot—the indicator jumps in distinct, individual notches as you move the stick, about three such jumps from one tick mark on the indicator to the next. For instructional purposes, I'll refer to notches and tick marks by those terms.
Altimeter. The altimeter is the third instrument from the left in the top row. It has two hands, like a clock, with readings from 0 to 9.
The small hand on the altimeter indicates thousands of feet; the big hand indicates hundreds. Picture the small hand between 0 and 1 and the big hand at 7—your altitude is 700 feet. Now picture the small hand between 3 and 4 with the big hand still at 7—your altitude is 3700. (There's also an indicator on the rim of the instrument for 10,000-foot increments.)
Be aware that the altimeter is basically a barometer. When set to the current atmospheric pressure (which is given to you by the control tower), it indicates distance above sea level—not distance above the ground. The reading looks like zero at present, because at Kennedy your distance above sea level is a mere 10 feet.
However, when you're sitting on the ground at most airports, the altimeter reading will be well above zero. It's especially important to be aware of this when you're coming in to land—you have to know the airport's elevation (as given on your charts) in order to interpret the altimeter correctly.
During flight, therefore, your distance above the ground is the altimeter reading at that point minus the elevation of the ground above sea level at that point. Seemingly minor arithmetic errors in this respect have often turned out to be fatal.
But this will be enough to get you flying, so let's move on to the next phase.
Table of Contents | Previous Section | Next Section