Realistic Commercial Flying with Flight Simulator
by John Rafferty
Chapter 2
VFR Cross-Country Check Ride
On this first cross-country, our emphasis will be on basic VOR navigation. You can't do much serious flying until you're comfortable using the VORs, so try to get the basics down pat. Most of the ground school briefing for this flight deals with those basic VOR procedures.
We'll also be concerned with preflight planning and using a flight log to keep track of where you are. Even if you have no experience in any of this, you'll find that none of it is really very difficult, especially if you take things one small step at a time.
Our flight will take us up along the Connecticut shore, from Sikorsky Memorial to the Madison VOR, to the Norwich VOR, and from there we'll turn right and fly outbound from Norwich to Block Island. Later, we'll return by the southerly route, via the Hampton and Calverton VORs on Long Island.
Preflight
Preflight Weather
We've already called Flight Service and have given the briefer our route and our intended time off, using a conventional briefing form to take notes during the discussion. The briefer indicates we should have clear weather, excellent visibility, and only very light winds all along our route; the forecasts for all stations between New York and Martha's Vineyard call for more of the same all day. Weather should therefore be of no particular concern on this flight—although we don't forget that forecasts can turn out to be wrong.
Flight Log
Consult the New York and Boston area chart (or use an official New York sectional chart if you have one) while we plan the flight.
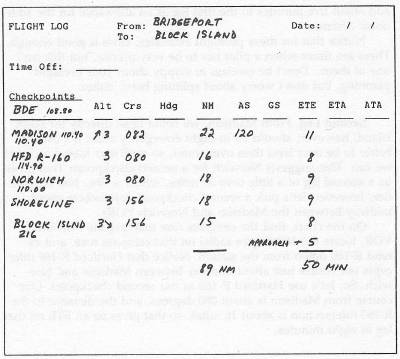
First Leg. The obvious choice for a first checkpoint is the Madison VOR. The course from Bridgeport to Madison looks like 082 degrees and the distance measures about 22 nautical miles (NM). At 120 knots (2 NM per minute), the 22 miles should take about 11 minutes, so 11 minutes is our ETE (Estimated Time En route) for the first leg.
This ETE estimate assumes a speed of 120 knots in a straight line between the two checkpoints. That is, it doesn't allow for our initial climb from the airport or for the possibility that we'll have to take off in the wrong direction and then circle around. If you normally climb at about 120 knots, you don't need any special allowance for the climb; otherwise, you can make a small upward adjustment to the first ETE to allow for a slower speed. Also, if the departure runway turns out to be in the wrong direction, you can add about five minutes to the first leg as an allowance for the additional distance.
Notice that for these preflight estimates, close is good enough. There are times when a pilot has to be very precise, but this isn't one of them. Don't be careless or sloppy about your preflight planning, but don't worry about splitting hairs, either.
Second Leg. From Madison, we could head directly for Block Island; however, should an in-flight emergency arise, it's usually better to be over land than over water, so we'll stay inland as far as we can. This suggests Norwich for a second checkpoint. That gives us a second leg of a little over 30 miles, which is fine. Just for practice, however, let's pick a second checkpoint somewhere about midway between the Madison and Norwich VORs.
On the chart, find the compass rose marking the Hartford VOR, locate the 160 degree radial on that compass rose, and extend R-160 down from the station. Notice that Hartford R-160 intercepts our course just about midway between Madison and Norwich. So, let's use Hartford R-160 as our second checkpoint. Our course from Madison is about 080 degrees, and the distance to the R-160 intersection is about 16 miles, so that gives us an ETE on that leg of eight minutes.
Third Leg. The third checkpoint, then, is Norwich. The course is still 080 and the distance is 18 miles for an ETE of nine minutes.
Fourth Leg. At Norwich we'll turn right and track outbound on R-156 to Block Island. We can use the shoreline as a fourth checkpoint, giving us a distance of 18 miles and an ETE of nine minutes on the leg.
Final Leg. That leaves about a 15-mile final leg to Block Island, with a resulting ETE of eight minutes. Let's add an extra five minutes at the end to allow for slower airspeed on the approach and for circling the airport to land.
Of course, by the time you have the airport in sight on the last leg of a flight, you no longer care much about the ETE on that leg. However, you still need to estimate the time en route on that last leg if only because you'll need an estimate of the total time en route when you file your flight plan.
Also, you could have made a navigation error so the airport doesn't show up as expected; in that case, having an ETA for the airport will help you determine something is amiss.
|
Departure
On the Ramp at Sikorsky, Outside the BFC Hangar
I'm handling the radio on this one, so you can just navigate.
Cleared to taxi for Runway 6.
When Approaching Runway 6
Cleared for departure.
(Remember to write down our time off.)
When Established on 500 FPM Climb
Climb and maintain three thousand, cleared direct to Madison.
- Check Nav 1: It should be on 110.40 for Madison.
- Toggle the Nav 1 bearing to center needle, with flag reading To.
- Note the Nav 1 bearing; turn to that heading and home on the VOR.
- Continue climbing to 3000 feet.
- Set Nav 2 the same as Nav 1 for a backup, if you wish.
- Add 11 minutes (our ETE to Madison) to the time off.
- On the log, enter the result as our ETA at Madison.
- Level off at 3000.
- Monitor the DME and the clock. Keep rechecking the things you've already done.
When 3 Miles DME from Madison
Think about what you should do at the checkpoint. Ignore the Nav 1 needle if it drifts; just hold your heading until station passage.
At Station Passage Over Madison
Glance at the clock and write down the time—our ATA (Actual Time of Arrival) at Madison.
Turn to heading zero eight zero (080) degrees.
- Nav 1 to 110.00, for Norwich.
- Toggle the OBS to center the needle—flag reading TO.
- Observe the bearing and turn to that heading.
- Keep the Nav 1 needle centered to home on Norwich.
- Add eight minutes (the ETE to R-160) to the Madison ATA noted above.
- Enter the result as our ETA at the next checkpoint, R-160.
- Nav 2 to 114.9, for Hartford (to identify the checkpoint).
- Toggle the Nav 2 OBS to 160 degrees (Hartford R-160).
- When the Nav 2 needle centers, we'll be at checkpoint 2.
- Monitor the Nav 2 needle and the clock.
- Keep rechecking what you've already done.
Which airport is that down there, just ahead?
At Checkpoint 2: Hartford R-160
- Note the time and enter it as our ATA at checkpoint 2.
- Add nine minutes (the ETE to Norwich) to the ATA you've just noted.
- Enter the result as our ETA at Norwich.
- If you wish, for future reference, set Nav 2 to 110.00 (Norwich).
- Nav 2 bearing to 156 degrees, our outbound heading from Norwich.
- Monitor the DME and the clock.
- Keep rechecking what you've already done.
When 3 Miles DME from Norwich
- Leave Nav 1 on Norwich but toggle the bearing to 156 degrees.
- Think about what happens when we reach the checkpoint.
1 Mile DME from Norwich
Begin a half-standard right turn to heading one five six degrees.
- Glance at the clock
- Note the time.
- Enter our Norwich ATA.
Outbound from Norwich on R-156
- If the Nav 1 needle is not centered, get us onto R-156.
- Add our ETE to the shoreline to the ATA at Norwich, above.
- Enter the result as our ETA at the shoreline.
If DME-Equipped (Versions Other than IBM)
- Select DME in place of Nav 2.
- Tune the ADF to 216 for the Block Island NDB.
- The ADF arrow indicates your relative bearing to the station.
- When headed toward the station, the relative bearing is zero degrees.
20 Miles DME from Norwich
Throttle back a bit, begin a gradual descent to 900 feet.
At 900 Feet, When the Airport Runway Layout Is Distinct
You're cleared for a visual approach Runway 28 using left-hand turns.
- Circle around to the right of the field, at 900 feet.
- On the far side of the airport, turn left onto the downwind leg.
- Downwind heading for Runway 28 is 100 degrees (280 - 180 = 100). Set up the airplane for landing (slow, one notch flaps).
- Continue past the end of the runway, turn onto the base, and land.
On the Runway
You're cleared to taxi to the gas pumps.
That wasn't bad! And now, how about some lunch?
Save the present flight parameters to memory and/or to disk, if you wish, or later on you can enter the setup values provided for the ramp here at Block Island.
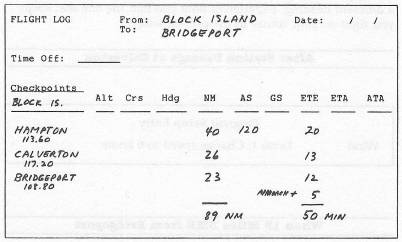
Return Flight to Bridgeport
I'm handling the radio again, but you can do everything else on your own. I've already started roughing in the flight log: Check-points are indicated along with the distance for each leg, but you can figure the courses and ETE's. When you're ready, get us into position on the ramp and warm up the engine.
|
When Ready to Depart
You're cleared to taxi for Runway 28. you're also cleared to depart.
Taxi into position, note the time, and take off.
When Airborne
Leave the airport traffic pattern and head for the Hampton VOR.
When Level at Cruising Altitude, Homing on Hampton
|
The wind is from your right, blowing you off course to the left. Therefore the Nav needle will be drifting from center and moving toward the right.
When it does, get back on the radial with the needle centered, but this time adopt a heading to compensate for the wind. In other words, take up a heading about three degrees to the right of your previous heading.
If the needle still drifts from center, return to the radial and try a different heading. Experiment until you find the one that keeps you right on your course in the present wind.
After Station Passage at Calverton
|
When 15 Miles DME from Bridgeport
We're cleared for a visual approach to Runway 6, left-hand turns.
On the Runway
We're cleared to the BFC ramp.
Congratulations! Once we're parked, remember to enter the flight data in your pilot's logbook.
Briefing 2
VOR Concepts
The term VOR refers to a very-high-frequency omnidirec tional range, which is basically a special type of ground-based radio station. While a conventional radio station sends out one radio signal in all directions at once, the VOR transmitter in effect sends out 360 separate signals, like the spokes of a giant wagon wheel. Each “spoke” is called a radial, and there's a separate radial for each degree of the compass.
Thus, the term R-000 refers to the radial sent out directly to the station's magnetic north, R-090 is the signal sent directly to the east, and so on. As an example, if you were flying somewhere directly to the east of a given VOR, R-090 would be the radial from that station and R-270 would be the radial directly to that station.
On aviation charts, the location of each VOR is marked by a compass rose with a nearby box to give its name and frequency. If there are many VORs in one area, the compass rose for one station or another may be omitted on the chart to reduce clutter.
VOR and DME Information
If you were flying within receiving range of a given VOR and had a way to determine which of its 360 radials you happened to be on at that moment, you would know a lot more about your location in the sky. Take a moment to consider each of the following.
- First, knowing which radial you're on would tell you exactly which heading to turn to if you wanted to fly directly to that station.
- Second, if you had a chart showing the location of that VOR, you could draw a line out from that station representing the radial you're on, and you would know you were somewhere along that line.
- Third, if you could then do the same thing for a second, different VOR, you would know exactly where you were on that map because you would be at the point where those two radials intersect.
Your Nav 1 and Nav 2 receivers let you tune in the frequency of any particular VOR you wish to receive and they let you select any one of the 360 radials from that station. When the airplane's position is actually on the particular radial that has been selected, the needle in the Nav receiver window is centered.
In addition, the airplane's Distance Measuring Equipment (DME) is linked to Nav 1. The DME readout on the panel gives you a constant indication of the distance in nautical miles to the VOR transmitter that's being received on Nav 1.
Homing on a VOR
To fly directly to a given VOR, first tune either Nav receiver to that VOR's frequency (such as 108.80); then toggle the omnibearing selector (OBS) on the receiver until the needle is centered with the flag reading TO (not FROM. The bearing shown at the top of the instrument when the needle is centered is your present radial, so it's also the heading to turn to if you want to home on that station.
The bearing at the bottom of the instrument is the reciprocal—180 degrees opposite—of the bearing on top. This is the heading that will take you directly away from the station instead of to it.
If you were to note the reciprocal bearing and then toggle the OBS to put that reciprocal bearing in the top window instead, the needle would center again, but the flag would read FROM. Although this might sound a bit confusing, normally you won't have any problems setting the bearing in actual practice.
Intercepting and Tracking a Radial
You'll often have to intercept a given VOR radial and then track it inbound to the station.
First, figure out where the radial is relative to your position. Select the VOR frequency, toggle the OBS to select the bearing for the desired radial, and be sure the flag reads TO. Then note the position of the needle. If the needle is left of center, the radial is somewhere off to your left. Likewise, if the needle shows right of center, the radial is somewhere off to your right.
Now visualize the airplane and radial together as if you're looking down on a giant compass rose; this will help you get a mental picture of the situation.
To intercept the radial, turn left or right as indicated by the position of the needle. You can usually figure on taking up a heading about 20 degrees to the left or 20 degrees to the right of the radial's direction. For example, suppose you need to intercept R-000 (which is the same as R-360) and the Nav needle is presently to the right of center. Later, when you're actually on that radial and headed inbound, your heading will be 000 degrees; thus, if you now turn to heading 020 degrees, you'll eventually intercept that radial.
As you approach the radial, the needle will move toward center. When it reaches center, simply turn left to 000 degrees and proceed inbound to the station. If the needle drifts from center again, as it often does, simply repeat the process.
If the needle initially is to the left instead of the right, turn left to a heading of about 340 degrees (360 – 20). Hold that heading until the needle centers and then turn right to 000 degrees and proceed inbound.
If you're far from the station, an intercept angle of about 20 degrees will usually work okay. If you're very close to the station, an angle as small as 5 degrees or even less may be adequate. After you've practiced and made some mistakes, you'll begin to develop judgement and a sense of feel for the procedure.
To intercept and track a radial outbound from the station, the procedure is essentially the same except the flag should read FROM instead of TO when an outbound bearing is selected.
Station Passage
You'll often track a radial inbound to a station, pass over the transmitter, and then proceed outbound on the same or on a different radial. When you pass over the station, the needle will drift off center and the flag will momentarily read OFF. Don't try to center the needle when you're very close—say, within three miles on either side of the VOR—because you'll only end up chasing the needle all over the sky.
If you'll be leaving the VOR on a different radial, toggle the OBS to the outbound bearing when you're two or three miles before station passage. Hold your inbound heading, start your turn at about one mile DME (depending on the sharpness of the turn), and then just hold that outbound heading until you're two miles or so from the station. Then, you can worry about getting lined up on the radial to center the needle.
Cross-Country Flight Planning
Whenever you're aloft, it's imperative to know exactly where you are at all times. This is usually accomplished by being constantly aware of your arrival time at the next checkpoint. Preflight planning and basic dead reckoning help you stay on top of that information.
Unless the flight is very short, you usually won't try to fly a straight line all the way to your destination. Rather, the preferred route will take you from one VOR to another along the way. This makes navigation easier and more reliable, and commercial flights on IFR flight plans usually have no choice.
Having selected your route, you then select a series of check-points along the way. Usually, these consist of the individual VORs you'll be passing over; however, sometimes it might be desirable to include an intermediate point between two of the stations.
Preparing and Using a Flight Log
The flight log enables you to plan the flight and then keep track of your progress. For your own logs, you can make copies of the blank flight log form provided in the back of this book (Appendix A). Some pilots prefer to use such a form while others prefer a pad of plain blank paper.
To set up the log before a flight, first list your checkpoints in the left-hand column. Then, for each leg, fill in the information you know before the flight. During the flight, you'll fill in the remaining information as it becomes available; that way, at any point in the flight you'll have a good idea when you should arrive at the next checkpoint. The ATC controller will often ask you for your ETA at such a fix. Each item on the flight log is briefly described below.
Altitude (Alt). Simply fill in the altitude you expect to fly on each leg, as a reminder—more on altitudes later.
Course (Crs). For each leg, use the chart to determine the actual compass direction between the two checkpoints. With no crosswind, the actual compass heading on each leg and the course you determine from the chart will be the same. Later, however, when you have to deal with crosswinds, you'll probably have to crab the airplane a few degrees into the wind; then, the heading shown by the compass will be a bit upwind of the actual course of the airplane over the ground.
Nautical Miles (NM). For each leg, use the chart to determine the distance between checkpoints in nautical miles.
Airspeed (AS). The airspeed on the simulator is around 120 knots (120 nautical miles per hour). With no headwind or tailwind, the airspeed and ground speed will be the same; later, when you deal with realistic winds, the airspeed and ground speed will differ.
Estimated Time En route (ETE). This is the number of minutes you expect to take flying a given leg. For practical flight planning purposes, with an airspeed of around 120 knots you can get a close enough estimate of your ETE for any leg by simply dividing the distance (NM) on that leg by 2.
That is, 120 knots is 120 nautical miles per hour, or 2 nautical miles per minute. Thus, you'll cover 2 miles in 1 minute, 20 miles in 10 minutes, 30 miles in 15 minutes, and so on. If you cruise a bit faster than 120 and want to be a bit more accurate, you can divide by 2 and then just subtract a small fudge factor, based on your actual experience. Generally, however, it's desirable to be able to make these ETE estimates very quickly and easily in your head.
Estimated Time of Arrival (ETA). This is the expected time of arrival at a checkpoint. You'll fill this in later while you're in the air. When you know the actual time you start on a given leg, you can then add the ETE you've already filled in for that leg to the time you start it to estimate your time of arrival at the checkpoint.
Actual Time of Arrival (ATA). As you arrive at a given checkpoint, you note the time and record it as your ATA for that leg. This becomes the starting time for the next leg—the time you'll use to determine your ETA for the next checkpoint.
You'll find that this whole procedure is actually much easier to do than it is to describe.
Automatic Direction Finding (ADF)
Versions other than IBM are equipped with ADF. When ADF is selected, it replaces Nav 2. Except on the 68000 versions, once ADF is selected you can't go back to Nav 2 without resetting the program.
ADF equipment receives conventional broadcast radio stations and special nondirectional beacons (NDBs) designed for aerial navigation. The simulator provides a number of NDBs, but no broadcast stations. When you select a given NDB frequency, the ADF needle in effect points toward that station. That is, if the station is directly ahead, the ADF needle points straight up. If the beacon is 90 degrees to the right of your heading, the needle points to the right to 90 degrees.
The numeral to which the ADF needle points is called the relative bearing. This is the difference between your present heading and the bearing directly to the station. Thus, if you're headed directly toward the station, the needle points straight up, indicating a relative bearing of zero degrees.
You can home on an NDB by simply flying a heading that keeps the needle pointing straight up. ADF navigation does become a bit more challenging, however, if you have a crosswind to handle, or if you must track a specified inbound or outbound course.
Table of Contents | Previous Chapter | Next Chapter