Flying on Instruments with Flight Simulator
by Jonathan M. Stern
Chapter 4
Instrument Departures and En Route Procedures
Begin flying on instruments as you travel from Chicago's Meigs airport to Chicago Heights. Use the NAV radios and the Omni-Bearing Indicator as you fly through the cloud cover.
Begin this chapter with the following settings to Flight Simulator:
(Sometimes when you manually set the altitude in Flight Simulator, then exit the environment editor, you'll find your aircraft at a height approximately twice what you entered. If this happens, simply set the altitude to 0; then exit the editor. Your airplane will appear on the ground at the location you specified.) |
It's a cloudy wintery morning at Chicago's Merrill C. Meigs airport. Snow is beginning to fall, and the clouds are only 600 feet above the ground. Your airplane is warmed up and ready to begin the journey from Meigs to Champaign, Illinois, with intermediate stops at Kankakee and Dwight.
Getting Clearance
Before taking off, you're required by the Federal Aviation Regulations to file a flight plan and receive clearance from air traffic control. Since Flight Simulator doesn't perform this function, make up your own clearance for the planned flight.
A typical clearance includes the following information:
- A clearance limit. Typically—and for Flight Simulator purposes, always—the destination airport.
- A departure procedure. The heading and altitude at which to depart the airport.
- Route of flight. The route to the destination airport. For simulation purposes, the flight route is defined by the names of VORs or NDBs along the flight path.
- Altitude data. The altitude to be flown along the route.
For the first leg of this morning's flight, your clearance is:
Cleared to the Greater Kankakee Airport via direct Chicago Heights direct Peotone direct, climb and maintain 6,000.
Before you take off, look at the IAP chart for Chicago/Lansing Municipal Airport, found in Appendix B on page 139.
See the white T in the black upside-down triangle near the bottom of the chart? This symbol means that there's a published departure procedure for this airport. (You'll find the departure procedure in Appendix A, under Chicago, IL: Lansing Muni.)
Now look at the IAP chart for Chicago/Merrill C. Meigs Airport. It's on page 140 of Appendix B. Note that the T-triangle symbol doesn't appear there. That indicates there's no published departure procedure for Merrill C. Meigs Airport. Where there's no published departure procedure, you must use good judgment in avoiding obstructions during takeoff.
Pre-Takeoff Avionics
Since your clearance directs you to fly direct to the Chicago Heights VOR, tune your NAV-1 radio to 114.2. Rotate the Omni-Bearing Selector (OBS) until the TO/FROM indicator displays TO and the course deviation indicator needle is centered.
While you're on the ground, tune your NAV-2 radio to Peotone on 113.2 and center the needle with a TO indication. (This saves you time when you're in the air.) Tune in the control tower by setting the COM radio to 121.3; then “listen” to the airport information.
Figure 4-1. Pre-Takeoff Avionies Settings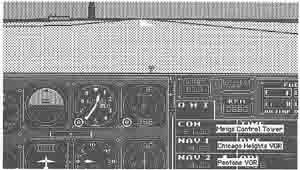
Your instrument panel should show these settings for COM, NAV 1, and NAV 2.
Cloud Quirks
To use Flight Simulator for instrument flying, you must be aware of one of its quirks. When air traffic controllers advise pilots of the weather, any reference to cloud heights is given as height above ground level.
With Flight Simulator, however, references to cloud heights are to height above sea level. To program cloud heights, then, you must add the height at which you want the clouds to appear to the airport elevation. Enter that sum in the environment editor. Remember that control tower reports of cloud heights will refer to mean sea level heights.
If you took off from Merrill C. Meigs with your environment editor showing the base of the clouds at 600 feet, you'd be inside those clouds immediately after takeoff (since Meigs' altitude is 592 feet above sea level). To prevent this, set the cloud base to 1192 feet (the airport elevation plus 600).
| The flights in this chapter, and in the next three chapters, all use 1192 as a cloud base. You don't have to set the simulator's cloud tops if you don't want to. On some versions of Flight Simulator, setting only a cloud base has an important side effect—you'll fly through the cloud layer (it's not very thick) and once above it, there's a horizon line. This horizon can be especially helpful when you're just learning how to fly on instruments. After you're more experienced, you may want to set cloud tops as well, so that you're flying in the midst of clouds during your entire flight. The view outside the aircraft should be completely white (or blank) when you're in clouds. |
Takeoff
 When you're ready, take off from Meigs. As you climb, bank right and turn to the heading shown on the Omni-Bearing Indicator (OBI). It should be close to 170°.

Centering the needle on the Omni-Bearing Indicator shows the course to the VOR station tuned in with the NAV 1 radio.
Continue climbing until you reach 6000 feet.
Reset the heading indicator to the magnetic compass when you level off at 6000 feet and are not accelerating. If the wind velocity is set to 0 in the environment editor, the needle should remain centered while you hold the heading shown on the OBI. If the wind velocity is greater than 0, though, you should use this procedure to track the VOR radial with a correction for wind.
Wind Compensation
- When the needle moves one dot or more either side of center, turn the airplane 20° toward the needle (Figure 4-3, airplane #2). The needle represents the course, and course corrections are made toward the needle. Remember, however, that if you're flying to the VOR with a FROM indication, or from the VOR with a TO indication, corrections must be made away from the needle.
- Fly the new heading until the needle approaches the center once again (Figure 4-3, airplane #3). If the needle continues to move away from the center, turn another 10° toward the needle and repeat this procedure up to a maximum correction of 90°.
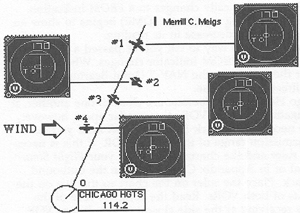
If wind is present in your simulation, you need to know how to conpensate for it as you fly on instruments.
The closer the airplane is to the VOR transmitter, the more sensitive the instrument becomes. When the airplane is within two miles of the transmitter, large needle deviations may occur. Don't chase the needle as it fluctuates when you're close to the transmitter.
Going On
As you pass over the Chicago Heights VOR transmitter, the TO indication automatically changes to a FROM indication. The distance-measuring equipment (DME) begins to show an increase rather than a decrease in its reading.
The most accurate way to tell you've passed a VOR station is when the TO/FROM indicator changes. When this occurs, center the needle on the NAV-2 Omni-Bearing Indicator and track directly to Peotone.
Chicago Heights and Peotone are close to one another. If you're navigating between VORs that are far apart, however, it might be necessary to track from one VOR until you're within transmission range of the second VOR. If this is necessary, use a ruler and the charts included in your Flight Simulator manual or in Appendix C to determine the outbound radial to track. Place the ruler on the chart so that it's on the center points of both VORs. Read the compass rose of the VOR you're receiving at the side closest to the distant VOR. The compass rose is graduated with 5° ticks. This is the radial that you should track outbound. Keep flying that radial (and that course if the VOR falls out of range) until you begin to receive the next VOR.
Now, turn the Omni-Bearing Selector (OBS) of the NAV-2 OBI until the needle is centered and a TO indication shows. Track that radial. (It should be close to what you read from the chart-and-ruler exercise.)
Figure 4-4 illustrates the procedure.
Figure 4-4. Flying Between Distant VORs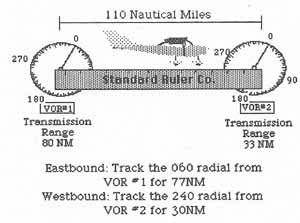
Use a ruler and one of the en route charts to track from one VOR until you're within range of a second, distant VOR.
Table of Contents | Previous Section | Next Section