Flights of 13MIKE
by Fred J. Calfior and Douglas W. Miller
FLIGHT |
Takeoff:
"Hey, what a deal! Okay, now check your flap settings, we've got plenty of fuel - full tanks, we're trimmed for takeoff, oil temperature and oil pressure are within limits. Good! Let's taxi onto runway 9, line up on the centerline, and let's hit the air.!"
1) Record TIME _______________________
2) Release brakes and taxi onto runway 9
3) Advance power to "FULL"
4) Maintain centerline of runway
5) At 50 knots airspeed lift nose wheel off runway
6) At 70 knots ease back on the yoke to establish a 10 degree pitch up attitude
7) Maintain a climb AIRSPEED of 80 knots
8) Raise Gear when there is no more runway to land on
9) At "500" feet above the ground raise the FLAPS to "0"
10) Reduce power to about "2300" RPM at "1000" feet above the ground (AGL)
"This should give you approximately an ‘800’ feet per minute climb rate on your Vertical Speed Indicator (VSI). You're looking good there!"
Climb out:
1) Maintain runway heading and climb to "2300" feet
2) At "2300" feet start a climbing RIGHT turn
"All your turns should be STANDARD RATE. You make a STANDARD RATE turn by keeping the wings on the little airplane displayed on the TURN COORDINATOR aligned with the ‘R’ indicator."
3) Start to roll out when you see "245" in the DG window
4) Maintain a heading of "256"
"Now you just keep that heading steady and keep in mind that winds can have a big effect on your actual ground track compared to what you have planned."
Level off:
1) Begin to level off when the altimeter reads "4400" feet
2) Maintain "4500" feet
3) Reduce power to about "2200" [2400] RPM
"As you can tell, the intensity of a cross country flight is ever-present at takeoff, then it settles down to a lull for the en route portion. Then it hums into activity once again when coming in for the arrival, and into the landing. For instance, see how that NA V 2 CDI needle is now starting to move towards the center? Watch how quickly things begin to happen now!!!"
Course change:
1) Watch your NAV 2 CDI, when the needle is one dot LEFT of center start your turn to a heading of "344" (standard rate)
2) When your heading indicator reads "335" start to roll out
3) After you have rolled out, press "P" to pause the simulation
** 4) Record your:
NAV 1 DME DIST__________(25 pts)
NAV 2 DME DIST__________(25 pts)
ALTITUDE__________(20 pts)
AIRSPEED__________(15 pts)
GEAR__________(10 pts)
FLAPS__________(10 pts)
MAGS__________(10 pts)
STROBE__________(10 pts)
LIGHTS__________(10 pts)
5) Press "P" to continue the simulation
6) Track inbound on the "164" radial (344 course) that your NAV 2 OBI is displaying
"To track inbound on a VOR radial, you keep the CDI needle centered making minor heading changes to compensate for winds."
Descent:
1) While tracking inbound on the POMONA VOR 164 radial, descend and maintain "2500" feet
"Now that we've commenced our descent, it's always a smart thing to get your destination's ATIS information, which by the way is on frequency 124.4, and check that everything looks okay in this cockpit! Man, oh man, you are flying this cross country superbly! Keep up the good work!"
2) Tune COM to "124.4" (La Verne ATIS)
"LA VERNE BRACKETT FIELD, INFORMATION GOLF, 1705 ZULU WEATHER, SKY CLEAR, VISIBILITY 8 WITH HAZE. TEMPERATURE 88, WIND 270 AT 8. ALTIMETER 29.97. LANDING RUNWAY 26 RIGHT, DEPARTING RUNWAY 26 LEFT. ADVISE ON INITIAL CONTACT YOU HAVE INFORMATION GOLF."
3) Set ALTIMETER, set DG, and check FUEL
"Now, before we enter into La Verne Brackett Field's airport traffic area, which is a five statute mile radius when the tower is in operation, let Tower know that you're coming in and you have ATIS information GOLF. La Verne Tower frequency is 118.2."
4) Tune COM to "118.2" (La Verne Tower)
You:
"LA VERNE TOWER, THIS IS CESSNA 13MIKE, ABOUT SIX MILES SOUTH OF THE FIELD, INBOUND FOR LANDING WITH GOLF."
La Verne Tower:
"13MIKE, OVERFLY THE FIELD AT 2500 FEET AND TURN RIGHT DOWNWIND FOR LANDING ON RUNWAY 26 RIGHT. REPORT WHEN OVERHEAD THE FIELD."
You:
"13MIKE, REPORT WHEN OVERHEAD THE FIELD."
** 5)Record the NAV 2 DME DIST when NAV 1 CDI needle centers _____ (25 pts)
6) At "2500" feet reduce power to about "1600" [1900] RPM
Approach:
"Hey, look there! See La Verne's parallel runways in front of you? You've been right on track and can now have some fun with this approach and landing!
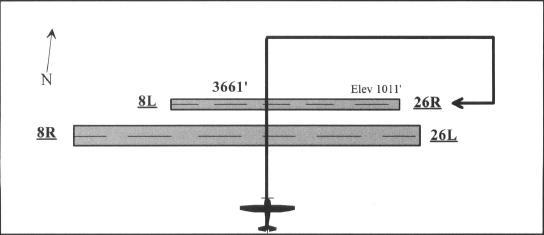
Figure 1.2. 90 degree entry to overfly runway 26 Right.
1) Fly over the runways at "2500" feet and turn RIGHT to enter a RIGHT DOWNWIND for runway 26R (right)
"This looks good! Give yourself enough distance from the runway before you start your turn to the downwind. You can judge when you've got enough distance by looking out your right rear quarter window. Go on and tell Tower that you're overhead the field."
** "By the way, what would your downwind course be when parallel to runway 26R?" ______ (10 pts)
You:
"LA VERNE TOWER, 13MIKE IS OVERHEAD AT THIS TIME."
La Verne Tower:
"13MIKE, YOU MAY DESCEND TO TRAFFIC PATTERN ALTITUDE. YOU'RE CLEARED FOR LANDING ON RUNWAY 26 RIGHT."
You:
"LA VERNE TOWER, 13MIKE IS CLEARED TO LAND."
** "Hey! What is that traffic pattern altitude anyway?" _________ (15 pts)
** 2) When established on the DOWNWIND leg of the approach, record the heading displayed on your DG __________ (20 pts)
3) Select GEAR "DOWN"
"You should be able to see the runway out your right window. If you cannot see the runway, you may be too close. "
"If you're too close, what action could you take to get into proper position of this right downwind? Why don't you simply jog to the left for a 30 degree offset, and after 10 seconds, come on back to your downwind heading. "
4) CARB HEAT "ON"
5) Reduce throttle to about "1400" [1700] RPM (this is the beginning of your approach descent)
6) When you have slowed to 90 knots set FLAPS to first notch (10 degrees)
7) Try and maintain a 400 ft per minute descent on your Vertical Speed Indicator (VSI)
"Keep in mind that in the landing phase, always adjust height with power, and airspeed with pitch. It'll make approach and landings so much simpler for you. "
8) When the end of the runway is at your 5 o'clock position, turn RIGHT "90" degrees to establish your BASE leg of the approach. (heading of 170 degrees)
"See how that runway looks off to your right now? You're heading back toward the runway very nicely. Get ready to turn on final soon!rdquo;
9) Set FLAPS to second notch (20 degrees)
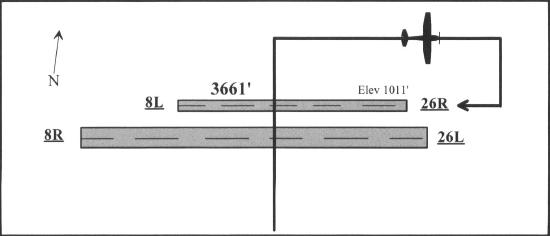
Figure 1.3. Downwind turning Right Base for runway 26 Right.
10) Press "P" to pause the simulation
** 11) Record your:
AIRSPEED _____________________________(25 pts)
RPM _____________________________(25 pts)
VSI _____________________________(20 pts)
ALTITUDE _____________________________(20 pts)
HEADING _____________________________(15 pts)
CARB HEAT _____________________________(10 pts)
12) Press "P" to continue the simulation
13) When runway 26 R (right) is at your 2 o'clock position, start a "90" degree RIGHT turn to establish your FINAL leg of the approach.
"Just keep in mind that if you're not lined up with runway 26 R (right), then make slight heading adjustments to compensate for winds, overshoots, or undershoots. At all costs, keep those corrections small!"
14) When established on the FINAL leg, set FLAPS to third notch (30 degrees)
15) Airspeed should be 70 knots
"Again, let me remind you that you always adjust height with power, and airspeed with pitch. It sure makes life easier on final approach, that's for sure!"
16) When the ALTIMETER displays "1300" feet, press "P" to pause the simulation
** 17) Record your:
AIRSPEED _____________________________(25 pts)
VSI _____________________________(25 pts)
HEADING _____________________________(20 pts)
RPM _____________________________(25 pts)
FLAPS _____________________________(15 pts)
18) Press "P" to continue the simulation
19) When you are 10 to 20 feet off the runway, reduce power to about "1000" RPM, and slowly start to pitch the nose of the aircraft up to reduce the speed of your descent and establish a touchdown attitude
"WATCH YOUR AIRSPEED! Be careful not to stall the aircraft. Do not let your airspeed drop below 60 knots, or else you'll fall out of the sky. We're not ready for that maneuver yet!"
20) When you are five feet off the runway, hold the nose of the aircraft up and allow the airspeed to SLOWLY bleed off. Your aircraft will settle onto the runway while you follow the centerline.
"Don't be impatient! Let the aircraft settle onto the runway slowly. There's lots of runway in front of you, so there's no hurry."
21) After touchdown reduce power to 600 RPM
22) Apply the brakes, turn left, and taxi off the active runway
23) When aircraft has stopped, set CARB HEAT to "OFF"
24) Set FLAPS to "0"
"Nice job! The flight is not over, until the engine stops where we want it to stop! So let's switch to Ground Control on 125.0 and get our taxi clearance. Let's wait to close your flight plan when you get inside the terminal, and then give Flight Service Station a call on the telephone."
25) Tune COM to "125.0" (Ground)
You:
"LA VERNE GROUND, CESSNA 13MIKE IS DOWN AND CLEAR OF RUNWAY 26 RIGHT FOR TAXI TO THE TERMINAL."
La Verne Ground:
"13MIKE, CLEARED TO TAXI TO THE TERMINAL."
** 26) Record the TIME __________(5 pts)
TOTAL POINTS POSSIBLE FOR THIS FLIGHT IS 495
Table of Contents
Previous Section: Flight Scenario One: Preflight
Next Section: Flight Scenario Two: La Verne to Santa Monica