Jet Fighter School II
More Training for Computer Fighter Pilots
by Richard G. Sheffield
Chapter 8
Tips and Hints for Playing Stealth Mission by SubLOGIC
Stealth Mission is the latest release from the founder of the flight simulation movement, SubLOGIC. There are a number of mission scenarios and a wide variety of difficulty levels. Interesting control tower and spot plane views are offered and should be familiar to Flight Simulator and Jet fans. This is a good and complex game and as such, is somewhat confusing at times. I hope the following tips will allow you to enjoy the game more and increase your scores.
Aerobatics
The X-29 is an outstanding aerobatics aircraft that features forward-swept wings. It can perform outside loops (be careful of negative G forces) and turns and handles very well. Like Jet, this game lets you use the scenery disks that are also produced by SubLOGIC. With these disks you can perform your air show over hundreds of different airports all over the world. The folks at SubLOGIC tell me that with a new disk about to be released, you will even be able to defect and fly your super secret F-19 fighter to Moscow. You will have to locate it yourself, however: The airport is on the disk, but no electronic navigational aids are provided.
Note Maximum Weight Before Loading
Before you start to load the aircraft with ordnance, note the maximum weight the aircraft can carry. This may effect your selection of weapons.
Maximum Takeoff Weights are as follows:
Aircraft   Maximum Takeoff Weight   Can Carry as Ordnance
F-19       33070 Ibs                11020 lbs
X-29       17800 lbs                4000 lbs
F-14       74349 lbs                34245 lbs
Although the game is named after the F-19 Stealth Fighter, due to its outstanding maximum speed, range, and payload capability, the F-14 will likely be your choice of aircraft for many missions
Air-to-Air Weapons Default
When you first start up, air-to-air weapons will be preselected. As a result, ground targets won't appear on the Raw Scope. To avoid flying into trouble, you should cycle the weapons control over to an air-to-ground weapon. If you do this, vectors to all ground targets will show up on the screen, letting you plan your attack.
Target Hits
Some targets may not be destroyed by a single bomb hit, depending on the ordnance. But this is not necessarily bad if the target is not a primary target. If you are attacking a missile frigate or SAM site you only need to put the radar out of action; a single hit will normally do that. You will also get credit for a hit on the screen.
The Wonderful Shift-G
Straight and level flight is something that any pilot should be able to accomplish without much thought, but many flight games make it very difficult to do this. The programmers of Stealth Mission have eliminated this hassle with the Shift-G command. If you hold down the Shift key and press the G key, your plane will automatically stabilize on a level flight. Why waste time giving the joystick bumps in one direction, then in the other for five minutes, trying to achieve level flight when you can accomplish the same thing with a single keypress. This command frees you from some of the tedious flying adjustments and lets you concentrate on the more complicated areas of the game. Learn to use it.
Plan Your Attack
As you approach enemy territory you can usually tell a great deal about the enemy deployment from the radar. Usually it's a bad idea to barrel straight into a target area. Plan your attack to minimize your exposure to SAM sites. This can be done by attacking across the enemy front rather than into it. If you head straight in you may come under fire from one target while you're attacking another, and if you turn to avoid that attack you may be detected by yet another SAM site. If you attack across the front, you can generally line up the first set of targets and take them out one at a time. Also, you'll always know which way to turn to get away from the threat area.
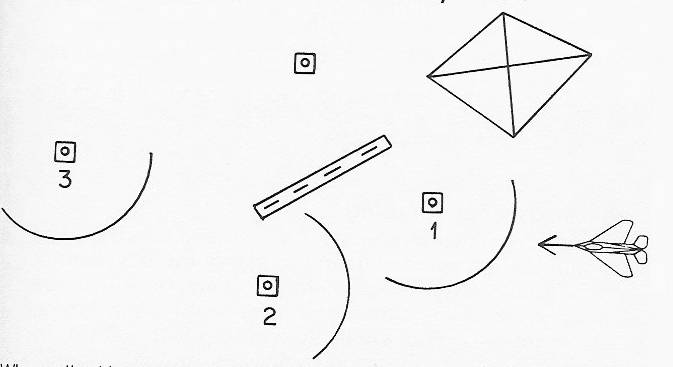
Figure 8-1. Attacking Across the Enemy's Front
When attacking across the front, you can take out targets 1, 2, and 3 in order and always know you have a safe area to your left.
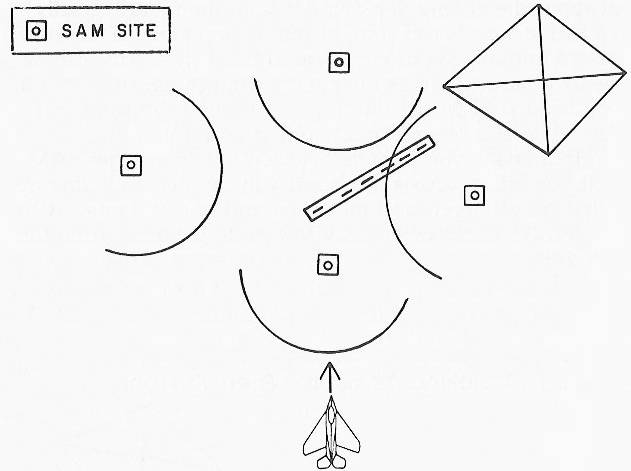
Figure 8-1. Attacking Across the Enemy's Front, continued
If you attack straight into the target area, you are heading into the teeth of enemy defenses. You may come under fire from several directions at once and have limited escape routes.
Break Away After Bombing
The main idea when attacking a ground target is to drop your bombs before you come into range of the target's defenses. It will take several seconds for the bomb or missile to reach its target. If you continue to fly straight toward the target after dropping, you will likely wind up with a SAM on your tail as a result. One good tactic is to drop your bomb and then make a quick 360-degree turn. By the time you come back around to the target you should know if it was a hit or a miss.
Hit or Miss?
Sometimes it seems as if it takes forever for a missile to reach its target. Before you assume that it's a miss, use the missile's eye view command. If you get an image, the missile has not reached the target. It still might be a hit.
Another Miss!
Speaking of missed bombs, you may wonder why so many low-altitude drops come up short. When you lock on a target, the effect of gravity will often cause bombs dropped in level flight to fall short. The manual says to aim a little beyond the target to compensate, but that's hard to judge. The best way is to drop your bombs in a shallow dive. If you are approaching the target at low altitude, pop up briefly to gain enough altitude to safely dive on the target.
Target Locked
The best way to insure a target hit is to get a good lock on the target before you drop. Your accuracy will vary greatly depending upon the magnification level you're using. 8 x magnification level will give the best results when aiming for lock up; using 16 x causes too large a jump on the screen when you move the joystick. A target may look perfectly lined up when on 1 x magnification, but switching to 8 x will often reveal that the aim is far from true.
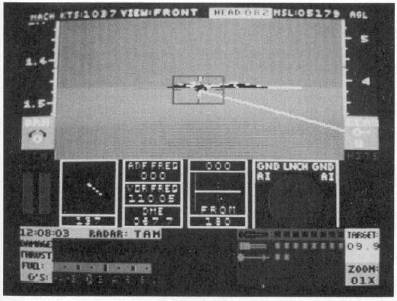
Figure 8-2. At 1x Magnification the Target Appears to Be Lined Up
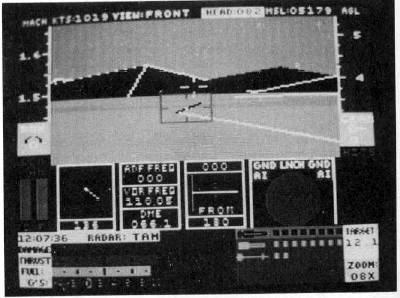
Figure 8-3. 8x Magnification Reveals That Your Missile Will Hit Mountain, Not Bridge
Locking Problems
The current version of the game has one small problem: If you move the joystick in any manner after you lock onto a target, your weapon will be launched. The folks at SubLOGIC say they are aware of the problem and it should be corrected in future versions. Until then you can avoid the problem by using the keyboard for course corrections after locking or waiting until you are ready to launch to lock on the target. By using the keyboard, you can lock onto several targets while you're a safe distance away and then launch as you get closer, thus attacking several targets at once.
Crosshair Color Change
In mountainous areas you will have a tough time aiming with the crosshair sight since both the sight and the mountains are black. One option is to use the 0 key to switch the scenery to wire-frame mode, but the designers went to a lot of trouble to provide solid graphics so it would be a shame to defeat them. The other option is to use the U key to change the color of the crosshairs. You will be offered a series of color options; choose the one that gives you the best contrast.
First Mission
Your first mission will be full of new things to learn, so start with something less dangerous, like the Mountain Conflict--Easy. This mission provides a number of features that will help you learn quickly to fight in the Stealth Mission environment.
First, there are a number of excellent terrain features that can be used to navigate, such as roads, rivers, and mountains. Learning to pay attention to the terrain and navigate using its features will become increasingly important as the difficulty level rises.
The second interesting feature of Mountain Conflict--Easy is the location of the first two primary targets. The two bridges are the first things encountered as you head into enemy territory, and they are lightly defended. This will give you the opportunity to try out your weapons systems and perfect your target aiming-and-locking skills.
The SAM sites will only fire on you if you approach within a certain area. This area increases as you increase in difficulty. To avoid being shot, you should fire your weapons from as far away as possible, then turn away from the target.
Flares and Chaff
Unlike their real-life counterparts, the aircraft in Stealth Mission aren't equipped with radar warning receivers or infrared tracking receivers. This equipment would tell you that you've been locked onto by enemy weapons and what type of missile is coming at you. In this game you never know if a SAM is radar-guided or heat-seeking. Consequently, you don't know which countermeasures to employ.
Fortunately, the game designers have supplied you with a large number of both types of countermeasures, so when fired on by a SAM, it's best to use both types just to be sure. Don't deploy them just once. Flares and chaff only last a couple of seconds, while a SAM may chase you for a minute or more. Keep dropping flares and chaff, and keep jinking the aircraft until the missile threat is gone. Use the radar jammer also.
Think Twice Before Dropping That Last Bomb
When you have air-to-ground weapon selected, the raw scope will provide information regarding the location of ground targets. Once you drop your last air-to-ground weapon, you'll no longer be able to get that information. If a number of SAM sites are between you and the base, you'll want to know where they are in order to avoid them on your way out. If you have only one target and one bomb left, by all means drop the bomb. If a large number of targets remain, and you are going to make a second trip anyway, save the last bomb for the last target on the way out.
Be Careful Around the Mountains
In computer games, depth perception is severely limited. You lack good visual clues to tell you how high an object is. When flying close to mountains, keep this in mind. It's very difficult to tell when you're higher than the peak of a mountain. Give yourself plenty of extra clearance or go around the mountains.
Magnified Views
Using the magnified view option when targeting and navigating can be very helpful, but remember that you're seeing a magnified image with a limited field of view. If you forget your view is magnified, you may think you're beyond a mountain when, in fact, you are not. You're at an increased risk of running into something. When not targeting or trying to find your way around, use the 1 x or 2 x view.
Take Care at Low Speeds
When landing or flying at low speeds, remember that any maneuver you make will cause an additional loss of airspeed. This could cause a fatal stall during landing.
Remote Control Flying
Using the control tower view, you can fly the aircraft of your choice as if it were a remote control plane. Flying this way is difficult because you will lack an artificial horizon indicator. When the plane is far away you'll have trouble seeing its attitude. Remember to use the Shift-G function to level out the wings. Use to ADF to fly the plane back toward the tower.
Low Fuel Hint
If you're low on fuel or have a damaged tank, you'll want to maximize your fuel economy when flying to the base or tanker. One way to reduce your fuel consumption is to reduce your weight, but the game does not offer a jettison-weapons feature. To get rid of your load it will be necessary to locate and lock onto a target, then drop all your weapons on it. Air-to-air missiles will probably have to be carried along unless you are attacked.
Fighting Speed
When dogfighting you want to be able to turn as quickly as possible. The speed at which most fighters turn the best is around 500 knots. Try to maintain this speed during dog-fights. You may need to throttle back at first, adding throttle as you bleed off speed maneuvering.
Using VOR as a Landing Aid
The manual gives a fair description of VOR and what it is. The manual doesn't explain the value of the VOR, or how to use it, however. You don't really need it to find the base since the ADF will do that for you. You can use it, however, to help line your aircraft up for landing. To do this you will need to know the direction in which the runway is laid out. The best way to find this is to note your heading when you take off straight down the runway. You can then use the VOR to fly straight back down that radial when you want to land. By doing so you will be perfectly lined up on the runway.
The easiest way to explain the procedure is by example. Check your manual and make sure you know where the VOR omni-bearing indicator is located. Then go to the Mountain Conflict mission and get ready to take off.
You should be lined up on a heading of 000.
- Your OBI needle should be in the center of the instrument and the OFF indicator should be on.
- Take off and maintain your heading of 000. Fly up to 2000 feet. The OBI should now indicate FROM 180.
- Continue to fly north until your DME shows 50.0. You are now 50 miles north of the base. (You can use the afterburners to speed things up.)
- Now make a 180-degree turn to the left. Make your heading 180 degrees. You are now heading south towards the base. Set the OBI to TO 000.
- Your OBI needle should now be slightly to the left of center. Cut your power to half and fly towards the needle until the needle is in the center of the area. Make small maneuvers and wait for the needle to move. The OBI reacts slowly so give it a chance to start moving.
- The needle will probably move toward the center and keep on going to the right. You flew over the 000 radial, but you aren't on it yet.
- Keep adjusting your heading until the needle is in the middle of the area. When the ADF is pointing straight up and you are on a heading of 180 degrees, you're flying straight down the 000 radial in line with the runway.
- To get all these things to line up you'll need to anticipate your turns. If your turn to the left has the needle moving to the center, turn back to the right just before it gets there to avoid an overshoot.
- Don't worry if you have trouble the first time. Do it until you get the feel of it. It will become second nature shortly.
- Fly on over the runway at 2000 feet. You may have to make some last-minute adjustments to get directly over the strip. At this point it's easier to use the magnified view option to line up in the runway than it is to chase the needle.
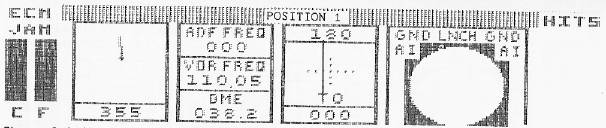
Figure 8-4. Heading into Home
You have turned toward the base, and are heading in the right direction. The OBI needle shows that a line extending from the end of the runway is to your left. Bank to the left. When the needle gets close to the center, turn back to the right until your heading is 180.
Figure 8-5. Overshooting the Line
New pilots often overshoot the line and the needle moves past center to the right of center, as it is in this figure. You are close to the right heading, but minor adjustments must still be made.
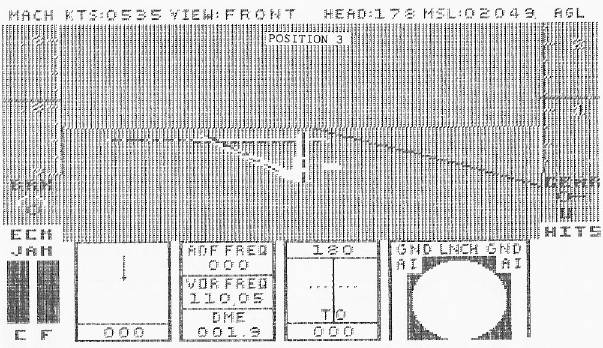
Figure 8-6. Back on Track
Now you're on the right track. The needle is centered and the ADF is pointing straight up. As the runway comes into view, you can make any minor course corrections as necessary.
Touch and Go
The runways on which you must land seem awfully narrow; putting the aircraft down straight on one takes skill and practice. Military pilots practice by doing touch-and-gos. To do a touch-and-go, come in for a normal landing and when your wheels touch the ground, apply full power and take off again. This is often repeated a number of times by flying a race track pattern where you touch down, take off, and go around. The following procedure will help you master the touch-and-go; use the Mountain Conflict again.
- Line up for a landing using the VOR set for TO 000 degrees as we did before.
- Gradually reduce power, speed, and altitude until you're about 50 feet up and at 300 knots airspeed.
- Use the magnified view options to line up the runway. Once over the runway, lower your gear, reduce power to zero, and touch down.
- Immediately after touchdown, apply full power and take off again.
- Make 180 degree turn to the left. Note your bank angle because you'll want to bank again at the same angle later. The best way to do this is to either bank at 90 degrees (totally sideways, making it difficult to level out at the right heading), or bank so the horizon goes from corner to corner on your screen.
- Your heading should now be 000 degrees. Continue on this heading until you are 15 miles from the base. You can reduce this distance as your skill improves.
- When you're 15 miles from the base, make another 180 degree turn (the same angle as the first) and make your heading 180.
- Now start your descent and line up on the runway as you did before.
- Land, and repeat the procedure.
Once you can perform a series of touch-and-go landings without crashing or landing too far from the runway, landings should never be a problem again.
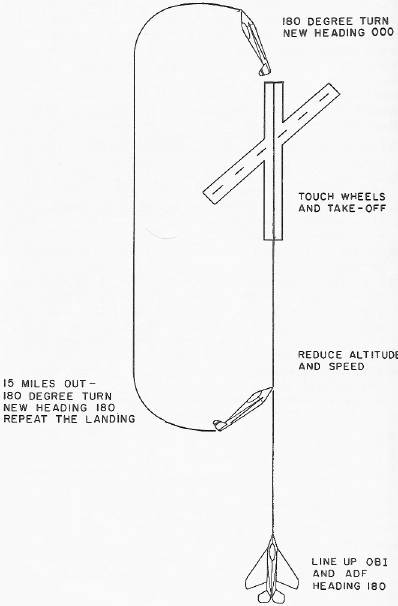
Figure 8-7. Touch and Go Circuit
No Manual Tanking
Although it seems like a good idea, the engineers at Sub-LOGIC tell me it's impossible to hook up to the tanker manually. The SubLOGIC tanker is fast: The fuel transfer process takes place at mach 1.1!
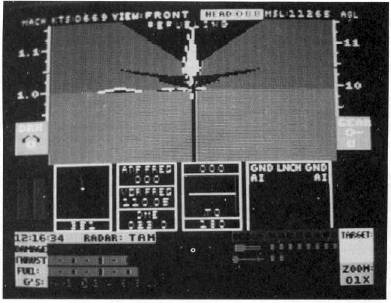
Figure 8-8. Tanking at Mach 1.1
Scoring
Your final score is based solely on the number of targets destroyed in the current scenario. Skill level, hits taken, aircraft chosen, using automatic landing and tanking, and so on, have no effect on your score. There is no penalty for bailing out or crashing and there are no extra points given for successfully returning to the base.
Skill Levels
The skill level chosen will have an effect on three things: the maximum descent rate at which you can touch down without crashing; the number of hits you can take before being destroyed; and the distance at which you can be detected by enemy radar.
The only difference between regular, intermediate, and advanced missions is the number of targets and the type of targets. Weapons ranges, target vulnerability, and so on, are not affected.
Air-to-Air
The number of air-to-air combat encounters is purposely kept low in this game to allow you to concentrate on the strategy aspect of the game. They didn't intend to produce a fast action game. You may even begin to wonder why you bother to carry all of these air-to-air weapons.
In those rare cases where you run into enemy aircraft, you have a distinct advantage. Your AIM-7 Sparrows and AIM-9 Sidewinders have ranges of 40 and 10 miles respectively, while the enemy Atoll missiles can only reach out 5 miles.
A Bomb Is a Bomb
Views on this subject will vary from player to player. Some players insist on recreating the situations as realistically as possible while others try for high scores, using everything the game will allow. Those who value realism are offered a number of different air-to-ground weapons, each with its intended purposes. If realism is important to you, you should use Harpoons only on ships, cluster bombs only on runways, and so forth.
Those who are interested in using what the game provides to its maximum benefit should consider using Harpoon missiles on most ground targets. The Harpoon has the longest range and therefore the best standoff capability, which makes it the safest weapon to use. It is also extremely effective on all ground targets on land or sea. Maverick missiles would be a good second choice; they also have a good range.
Table of Contents | Previous Section | Next Section