Runway USA
A pilot's guide to destination cities in Flight Simulator
by Charles Gulick
Sunday Flyer
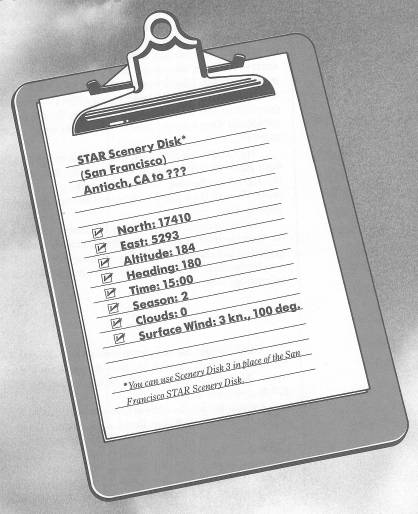
Before this book ends, I can't resist the temptation to come back here to the San Francisco Bay area and this first STAR Scenery Disk. This disk, together with the Japan Scenery Disk, points the way, I'm sure, to the future for Flight Simulator. In this detailed rendition of San Francisco we have the most realistic environment in all the simulator world—buildings, mountains, lakes, waterways, bridges, even fog (though I find it more useful to regard fog as snow, as you already know). The basic Scenery Disks—brilliantly executed as they are—pale by comparison, though they're not without some splendid scenes, many of which we've seen together.
My thought this afternoon is to fly without any specific flight plan—to take off and fly around just for fun, taking in the sights and heading wherever something looks interesting. We can chalk up the experience as “familiarization” with the area.
So the business end of Runway 9 at Antioch Airport is out there in front of you. It's Sunday afternoon, you're all gassed up and checked out, and the weather is perfect. Get out your sectional chart and open it on your flight desk, and let's get up in the air.
Climb straight out and plan to level off at 1500 feet. As you reach 1000 feet, turn left and head due north toward the water. When you're over the water turn left again and head 270 degrees, due west.
On your left are the cities of Concord and Pleasant Hill, and south of them are Walnut Creek and Lafayette. To your left is Grizzly Island, and you're flying over, in turn, Honker Bay, Grizzly Bay, and Suisun Bay. The two islands ahead are Ryder and, south of that, Roe. The big body of water in the distance is San Pablo Bay, which is at the northern end of San Francisco Bay. The highway on your left is John Muir Parkway, and the runway over there is Runway 7/25 at Livermore Municipal Airport.
Where the water turns left, follow it, flying toward the first of two bridges (just highways traversing the water) you'll cross before you get to San Pablo Bay. The water is quite narrow along here. The first bridge is named Benicia Martinez. Well over to your left, this side of John Muir Parkway and the metropolitan area, you'll be able to spot Buchanan Field's interlocking runways. You can also pick them up on radar.
Turn right to follow the water toward the second bridge, called Carquinez, which continues southwest and then south as Interstate 80. Once you're beyond Carquinez Bridge you'll be headed out over San Pablo Bay. On the last strip of land to your right is a U.S. Coast Guard station.
An airport will show up ahead of you as you get out over the bay—Hamilton Air Force Base. The base is inactive now and can be used by private aircraft. We won't use it this afternoon, but let's fly on over and take a look at it anyhow. San Pablo Bay is only about 12 miles wide here.
As you come up on the west shore of the bay, turn left to a heading of 170 degrees. There will be a disk access as you do, and once you level off you'll see Mt. Tamalpais on the right side of your windshield and the bare beginnings of San Francisco on the left. Where the land juts out in front of you is the city of San Rafael, and just beyond the jut is the Richmond-San Rafael Bridge.
Very soon, you'll see a little burst of color almost straight ahead. Do you recognize it? If not, you soon will. Bank and turn slightly if necessary to get the object straight ahead, just off your nose.
If you take a 45-degree view to your left at the moment, you'll see where the Richmond-San Rafael Bridge touches down in the metropolitan area formed by Richmond, San Pablo, and El Cerrito.
A little further on, using the same 45-degree view, you'll see a rough rectangle called Angel Island State Park.
By now it will surely be obvious that you're flying toward the Golden Gate Bridge. As you get nearer, you'll see a nice flat strip of land to the right of the bridge. And what does a nice flat strip of land say to a Sunday flyer? Particularly when it's right next to a major scenic attraction? So why not?
Look at that nice flat strip of land on radar. It sure looks like a long runway, doesn't it? And the wind is in the right direction for a landing to the east.
Here's how I suggest we do this (you may want to save your present parameters before you start, in case anything goes amiss):
The water the Golden Gate Bridge crosses is called, reasonably enough, Golden Gate. Fly out over Golden Gate, until radar shows that you are about opposite the midsection of the bridge. Then turn right to a heading of 250 degrees. You are now downwind in a right-hand pattern for the “runway,” which we'll assume bears 70 degrees. As you turn, transition to slowflight and start losing some altitude.
When you're heading 250 degrees, take a 90-degree view to your right. There sits the runway, big as life. When you're opposite land's end, turn right and fly the base leg, heading 340 degrees. Take and hold a 45-degree view as you would in any normal landing. Make your final approach on a heading of 70 degrees, using full flaps.
Once you've come safely to a stop, taxi up as close to the bridge as you like; but check radar to avoid hitting the structure or, worse yet, hitting the water. Take front and right-side views and see it all. (Note that the “ground” here is very deceptive. It looks as though there's grass rather than water under the bridge. But it's water, and it's wet.)
When you're finished viewing the bridge, here are some parameters for your takeoff. (You can also use these to rejoin “us” if you couldn't accomplish a landing after a few tries. It's tougher than it looks, and that mountain, like all of the mountains we've encountered in the simulator, can be treacherous.)
Go into the Editor and set North to 17437, East to 5050, and heading to 70 degrees. (Note your altitude, just for reference.) This sets you up for a nice takeoff over the north end of the Golden Gate Bridge, and you can use the parameters for your own private Golden Gate Airport. If you look behind you, you'll see that you have plenty of room for a takeoff on “Runway 25,” too, should the wind be off the Pacific Ocean.
Make your regular takeoff (and don't miss the absolutely spectacular 45-degree, then 90-degree views of the bridge as soon as you are climbing).
Ahead of you, slightly to your right, is Alcatraz Island. Turn as needed to fly straight over it. The island beyond Alcatraz is Treasure Island, where the San Francisco–Oakland Bay Bridge touches down en route to the east shore of the bay. When you can't see Alcatraz Island any more, turn right to a heading of 105 degrees. You'll be pointed across the center of the San Francisco–Oakland Bay Bridge, with Fisherman's Wharf below and to your right. Level off when you get to 1500 feet.
Now use all your right-side views to watch San Francisco's business district go by, followed by rear views of the bay, Alcatraz Island, Fisherman's Wharf, and the Golden Gate Bridge.
Out front, Nimitz Field is in the left foreground, with Oakland International Airport straight ahead. The spot that seems to be floating in the water to the right of the Oakland airport is actually a runway, 11/29. In fact, it's the major strip at Oakland. The other three comprise “North Field.”
So let's do a touch-and-go on Oakland's Runway 11. It's a long runway. We're practically on a long final for it, and the wind's from 100 degrees. Seems like everything is logical.
Transition to slowflight, apply 10 degrees of flaps, and get straight and level. Again you may want to save the current parameters so that you can catch up to the text if—heaven forbid—anything goes wrong with your touch-and-go procedure.
Your composure will probably be interrupted by a signal from the Outer Marker of Oakland's ILS. But pay it no heed.
After the disk access, you'll see how Oakland's main strip is connected to North Field by a peninsula. Do what you have to do to get lined up for Runway 11, and start your letdown. The elevation of the airport is just seven feet—barely the height of a basketball player.
As you descend, think about your touch-and-go procedure, which we developed in the first chapter of this book: As soon as you're in the landing roll, eliminate your carburetor heat (assuming you put it on for your landing). Then trim your elevators to achieve something close to normal takeoff trim, get your flaps up, add full power, and go ahead with a normal takeoff. Remember three things before you add power: carb heat off, elevator to takeoff trim, and flaps to zero. Don't rush anything. If you land reasonably close to the near end of the runway, you'll have ample room and time for all your control manipulations.
You'll get some more marker beacon signals, both on your final approach and as you get airborne again.
Climb straight on out to 2000 feet this time. You'll see the parallel strips at Hayward Air Terminal to the left of your course. Then you'll be coming up on California State Highway 92, which crosses San Francisco Bay as the San Mateo-Hayward Bridge.
You'll probably get still another Outer Marker signal from Oakland International Airport's ILS, and while it squawks at you, turn right and follow the bridge, pointing toward where it cuts left and makes landfall in San Mateo. (I wish I knew how to shut off those signals, short of cutting off the sound altogether; when you're not flying an ILS approach, who needs them?)
Notice that there are what seem to be piers under the far section of bridge, while the near sections are just a standard white line. Then, as you get nearer, the piers become independent of the bridge; the upshot is, I don't know what they are.
As the shoreline disappears under your nose, turn left to a heading of 105 degrees.
Another Outer Marker signal—this one from San Francisco International Airport—is behind us.
After the disk access, you'll have a great head-on view of Dumbarton Bridge, the southernmost of the San Francisco Bay bridges, and of the unique Hetch Hetchy Aqueduct just below it. Off to the right, less than two miles south of the bridge, you'll be able to spot Palo Alto Airport on the west shore.
But let's have some fun with the bridge and aqueduct. Give a couple of notches of down elevator and get into a dive. Don't change power setting. Just use elevator to keep your VSI reading somewhere between 1000 and 1500 FPM down. You'll pick up some airspeed, of course, but nothing dangerous. The airplane will try to get into climb configuration rather than pick up big amounts of airspeed. Take a look off to one side and note that your aircraft's attitude in relation to the horizon isn't all that dramatic.
Watch your altimeter regularly, and when it reads 300 feet apply up elevator to level off, flying over the bridge and Hetch Hetchy Aqueduct at an altitude somewhere between 200 and 300 feet.
Then push your throttle to the wall and set up a climb at about 1500 FPM, pinning the VSI needle at the high end. Notice you won't need giant amounts of elevator to do this. When you're close to 1500 feet of altitude, reduce power to normal cruise and adjust elevator to operational neutral, for straight-and-level flight.
Now turn to a heading of about 122 degrees and tune San Jose VOR on 114.1. You'll hear the indefatigable Outer Marker signal from San Jose International Airport while you're doing this.
So, sure enough, we're headed for the “home” airport whose acquaintance we made earlier in this book. Looks familiar and “comfortable,” doesn't it, suspended there between the mountains? Who knows, maybe a friend is there, watching for us, knowing we'd come back eventually.
And have we traveled! Texas, Oklahoma, Arizona, New Mexico, California, Oregon, Montana, Idaho, Colorado, Utah, South Dakota, Kansas, Missouri, and Nebraska. From the Gulf of Mexico to the Gulf of California, to the blue Pacific, and north, to the edges of Canada. All behind this trusty engine and supported by these beautiful wings, by this beautiful airframe of the imagination.
What will tomorrow bring to Flight Simulator? I anxiously await the eastern set of Scenery Disks, and more STAR Scenery Disks, and the third-generation simulator for the third-generation computers. My Amiga is ready and waiting, and I am holding my breath to see what its speed and color and resolution prowess will do with and for my airplane. And, if rumor is right, there may be a second airplane in that future package—a jet that is really a jet, that takes patience to understand and skill to fly.
I believe the Flight Simulators will and should—they must—go on and on, getting better and better with each new release. In my opinion there has never been anything to match them, certainly nothing within reach of the ordinary microcomputerist.
I feel privileged to have been able to enjoy with you the breadth and beauty of the western Scenery Disks, the San Francisco STAR Scenery Disk, and, particularly, Flight Simulator itself—just a humble, innocent-looking disk, but for us it has a 35-foot wingspan.
As long as new versions, and new extensions of present versions, come on the scene, and I'm here to fly them, I intend to experience and to write about them. Then, as always, I look forward to the pleasure of your company.
Table of Contents | Previous Chapter | Next Chapter