Runway USA
A pilot's guide to destination cities in Flight Simulator
by Charles Gulick
Instrumental Interlude
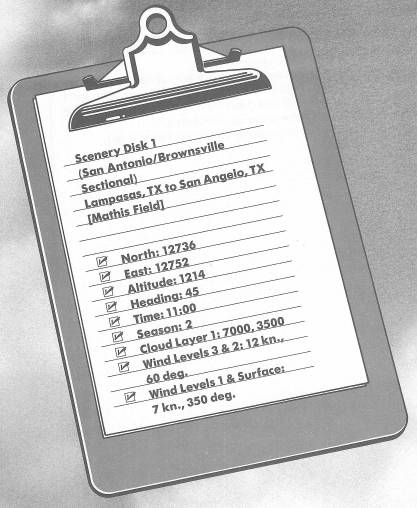
Well, we have some weather, don't we? Guess what? I ordered this up special for you so that you wouldn't get too sluggish. Flying in nothing but sunshine can give you bad habits.
We have some slightly tricky winds aloft, too. But the good news is that we have San Angelo VOR right at our destination. If you trust your OBI needle and keep your nose on it, we'll be in San Angelo in time for lunch. I'll even buy.
Tune your NAV to San Angelo OMNI (check your sectional) and see if you can pick up a heading.
You say we're out of range of the station? Well then, we have to use our chart. It shows us where we are in relation to San Angelo, and where north is.
The best thing to do is to get up there and fly in the general direction until we're in range of the station. I'll leave it to you to decide what heading you'll take up, but our cruising altitude will be 8500 feet. That will put us nicely above the clouds.
Runway 34's ahead and to your left. Take her off.
Climb straight out to at least 2000 feet.
After you've dumped your flaps, work with power and trim as usual to climb 500 FPM. Get it on the button, at least by the time we get to 2000 feet.
Make a standard rate (two-minute) left turn to your heading. Everything precise. Everything under control. You should be on your course long before we ever get into the weather.
It's so much easier if things aren't piled up, isn't it? Out of your turn…on your heading…nice standard climb with everything smooth…tuned for the VOR when it wants to turn on…isn't it fine?
And once you get into the gray stuff, everything's just as easy—no sweat. If you're in control, you've nothing to do but wait for the blue. It's just a poem.
You'll be on top at 7000 feet. While you're climbing is a good time to practice your instrument scan, the way you learned it in Co-Pilot. Remember how the instruments confirm one another. They also confirm that you're in control, whether or not you can see anything of the outside world. Except for the missing scenery, you'll soon feel as satisfied and confident in weather as out of it. If the airspeed looks right and the artificial horizon looks right and the altimeter looks right, then the turn coordinator, heading indicator, and rate-of-climb indicator will look right. And vice versa. In all directions.
If you were making an instrument approach, the OBI and its glide slope references would be added to the primary instruments you'd scan—in fact, they would become the primary instruments. But all other instruments will confirm what you see on the glide slope, and it will confirm them.
Back to what we're doing now: Your DME will get active when you're about 60 to 70 miles out. Then you can crank your OBI around to find out what radial you're on. As soon as the OBI needle is centered, see how close your estimate was when you eyeballed your heading west.
Keep the needle centered, mile by mile. Don't let it go astray more than a degree or two before you make a correction. And don't expect the heading on your directional gyro necessarily to agree. The OBI needle is your primary directional instrument when you're flying a VOR course. If, in the present case, it's centered, then you're headed straight for Mathis Airport, in San Angelo.
While you have some time en route, let's have some fun:
You've probably noticed that with the wind at your back, and at this higher-than-usual altitude, your airspeed is pretty good. Let's do a check on ground speed.
If you happen to have a stopwatch handy, perfect. If not, use the sweep-second hand on your watch. You also need a pen or pencil. Starting anytime, jot down your DME reading, and at the same time start timing for one minute. At the end of the minute, jot down the new DME reading.
Subtract the second DME reading from the first. The difference is your approximate ground speed in nautical-miles-per-minute. Multiply that by 60 and you have your approximate ground speed in nautical-miles-per-hour.
Both figures are useful, but the per-minute value is the most useful when you're working with short distances. With it, you can figure your ETA (Estimated Time of Arrival). Divide the distance to go by the speed per minute. Add the result to the current time, and you have your ETA. Note that this result, however, assumes no change in ground speed from here to the threshold of the runway, which is unrealistic. The formula is more exact when figuring elapsed time between OMNI stations or other points of reference.
The speed-per-minute figure is also useful for figuring when to start your letdown. Supposing a ground speed of 2.3 NM per minute, or 138 NM per hour (thanks to our tailwind), and the correct descent rate, 500 feet per minute, your aircraft will cover 4.6 nautical miles while it descends 1000 feet. If, as in the present case, you're at 8500 feet and the ceiling of the cloud cover below you is at 3500 feet, you have 5000 feet of altitude to lose before you see the ground again. And because, theoretically at least, you'll cover 4.6 NM for each thousand feet of altitude you lose, you'll need 4.6 × 5 or 23 nautical miles to get from where you are to where you want to be, out of the overcast and in visual reference to the ground again.
So go ahead and plan your letdown for San Angelo, remembering that you'll need time and distance to get into approach configuration for your landing. When you break out of the overcast, it'll be more comforting to see Mathis Field out there ahead of you than to wonder where it went.
Just before you start to descend, see how closely you can estimate what time it'll be when you get out of the clouds, and what the DME will read at that point.
Don't be surprised if you're off a few miles or minutes. An error of 1/10 nautical-mile-per-minute in your calculation with the stopwatch or sweep-second hand adds up to an error of six miles over the course of an hour. And, precise as you try to be, you really won't maintain constant airspeed or ground speed, particularly in climbing or descending flight. Add the difference in actual over-the-ground speed when you're climbing or descending, ground lost while you're correcting to keep the OBI needle centered, instrument error and other vagaries, and you'll see that all of our formulas are just aids, not solutions.
The key thing is to allow plenty of margin for error. In short, start early.
As a very general rule of thumb, I use formulas requiring no major in-flight calculations, based on an average speed of 120 knots (a convenience figure, but not too far off), which when rounded off indicates I'll fly two nautical miles while I lose or gain a thousand feet. And at a vertical speed of 500 feet per minute it'll take me about two clock minutes to lose or gain that thousand feet. The same data tells me that for every nautical mile my DME says I have to go, I'll consume a half-minute of flying time.
Thus I can look at my DME anytime I'm tuned to a VOR, divide what it says by two, and have my approximate flying time in minutes to that VOR. I can also decide how much altitude I need to lose (or gain) in thousands of feet, multiply by four, and the result is the approximate nautical mileage I'll use up making the altitude change. I can then start my descent (or climb) when the DME reads that many miles.
But again, I must start early. Like ten miles or five minutes early. So when I get out of overcasts I can see airports out the windshield, ahead of me, not right under my wing, or worse yet, somewhere in the past tense.
The surface wind being from the north quadrant, our landing at Mathis Field will be on Runway 36. The ground elevation is 1916 feet.
My earlier offer to buy lunch is contingent on whether, after your landing, I still feel like eating lunch.
Table of Contents | Previous Chapter | Next Chapter