Runway USA
A pilot's guide to destination cities in Flight Simulator
by Charles Gulick
The Farside Gambit
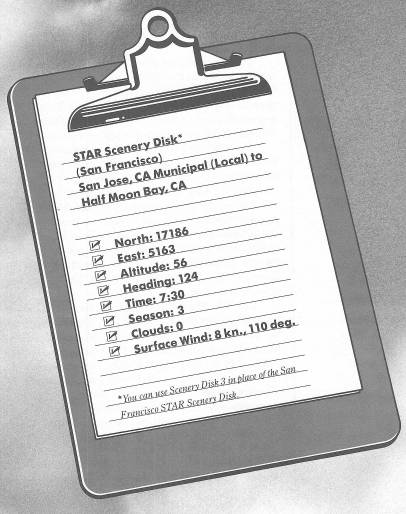
After you exit the Editor, make sure your heading is within a degree or so of 124. Then press the Pause key.
If you are using the STAR Disk, what you're about to do and see, in this and the following flights, dramatizes just how far Bruce Artwick's concept of flight simulation has come since its origination in 1979. If you are using Scenery Disk 3 in place of the STAR Disk, the following information on the evolution of flight simulation may still be of interest to you.
The first time I flew a SubLOGIC simulator was in 1980; it loaded from a tape cassette, and was called the T80-FS1. It was designed for the black-and-white TRS-80 Model I and, later, the Model III, and required only 16K of memory. It had a 10-mile-square grid, one paper-thin mountain range, one east/west home runway, and a couple of “enemy” runways and factories as total scenery. I soon learned that if I took off on Runway 27 and flew straight to and beyond the west end of the grid, I'd find myself on a straight-in approach to the same Runway 27 I'd left a few minutes before. That made landing practice very easy.
In 1983, FS2 came on the market, and I flew the Commodore 64 version, CM-FS2, first. I'm still flying it, but the fact that an MS-DOS version was also available, through Microsoft, led me to buy an IBM-compatible computer, purely to fly the most sophisticated configuration possible. I was stunned by the color, the beauty, and the scope of these second-generation simulators: 80 airports in four major geographical areas, navigation and communication aids, a full panel of instruments, real time and real distances, weather, wind—truly a world full of wonder.
Now you're looking at the latest development in the second generation of Flight Simulator: the first STAR Scenery Disk. Out your windshield is part of the new phenomena—more buildings right here in San Jose than in virtually all the “regular” flight simulators put together. There are mountains visible on all sides, and over the horizon there are even more mountains, lakes, waterways, great bridges, city parks, and more!
In between T80-FS1 and this STAR Scenery Disk there are, of course, the Scenery Disks themselves (the western group of which is the primary subject of this book).
What kind of imagination does it take to even think of simulating the whole United States on twelve little 5¼ disks, priced at $19.95 each? And then, beyond just thinking of it, going ahead and doing it?
By no means have we seen the end. The third generation of Flight Simulator is coming. The present San Francisco STAR disk gives us a little preview of what that new simulator will be like, because the San Francisco Bay area is the “home” area for Flight Simulator III. But with the power, speed, and resolution of third-generation computers such as the Macintosh, the Atari ST series, and the Amiga, the whole world of simulator flying will be upgraded.
You'll see what limitations our present computers impose on highly detailed scenery as we fly here in the Bay area. Your airplane will be slower to respond, so you'll have to compensate. The simulator is busier than ever, trying to show you all there is out there to see. The scenery jerks a bit more, but all that will pass when the new computers take over. Meanwhile, think of yourself as something of a pioneer in this remarkably pictorial world of the STARs.
I'm recommending that we fly this present flight with a different concept than we've flown in our previous flights: the concept of a “home” airport.
One breach of realism that occurs in simulator flying, and is based not on a fault but on a virtue of the simulators, is the plethora of choices. With so many hundreds of airports to fly to and from, and so many geographical areas, we tend never to get really familiar with any single area. This is counter to actual flight experience. Almost invariably, students learn to fly at one “home” airport and practice takeoffs and landings from there. Then they fly cross-country to nearby airports, land and get their log books signed saying the flight was made, and take off again and fly back to the home airport. The students become intimately familiar with their base of operations, the landmarks that surround it, the highways and bodies of water that point to it. Also, there is a certain emotional satisfaction in going somewhere…and then going home. There's a relaxation of tension after a long (or, in an airplane, even a short) trip, as we at last head back to the familiar and, in our minds, the friendly and secure home base.
I have explored the airports in the San Francisco area at some length, and I recommend San Jose for your consideration as an ideal home airport. Further, I suggest your present position on San Jose Municipal as an ideal “tiedown,” the place your airplane will always be when you're ready to fly, and where you'll always park it when you come home. By the time we finish the flights in this and the next several chapters, you'll know this airport and its environs like the back of your hand, and how to get to it from anywhere you fly in the San Francisco area. That's the whole idea of using a home airport.
If you prefer another home location, I urge you to explore and create just that. But for the present, bear with me and you'll come to see why I chose San Jose.
Press the Pause key again, and let's get flying.
The prevailing wind here is from the east quadrant. From where you're parked, you have easy access to all three runways. They exactly parallel one another, although two are numbered 12-30 and one—the short one, for daytime light-plane operation—is numbered 11–29. You're parked just to the right of 12R, which is the longest and widest, and the one from which we'll make our first departure.
Ready your aircraft, taxi into position, and take off.
The highway you'll cross at the end of the runway is State Highway 17, here called the Nimitz Freeway.
Climb out on the runway heading (also known as the upwind heading). Plan to level off at 2000 feet.
Take a look behind you as you go, and you'll see the complete layout of San Jose Municipal Airport, with San Francisco Bay in the background.
Out front again, the highway beyond the metropolitan area buildings is Interstate 280, which over to your left bends almost immediately north and merges with Interstate 680. The whole stretch is known as the Sinclair Freeway. The mountain to your left is Mt. Hamilton, and is part of the Diablo Range. The famous Lick Observatory, where the second-largest refracting telescope in the world has been operating for well over a century, sits on a 4213-foot peak there. The University of California has directed the observatory since 1888.
The weaving highway stretching ahead of you, almost to the horizon, is U.S. 101. The highway traces the Pacific coastline all the way to Los Angeles, where it splits to merge with Interstate 210 and then Interstate 10.
Directly out the right side window you can see two mountains, the Sierra Morena and then Loma Prieta, and even a glimpse of the Pacific Ocean. The highway cutting between the mountains is State Highway 17.
The redwood patch you'll fly directly over is the Santa Clara County Fairgrounds. When you can no longer see the fairgrounds out front, and there's nothing there but U.S. 101 and a little strip of water, turn right to a heading of about 170 degrees, or whatever will point you a little to the left of the eastern base of Loma Prieta. The mountain should end about halfway across your screen. Don't get too close or you'll fly into it. It's as broad as it is tall. You can watch the peak approach out the right front window, but when you get close, take a forward view, or the simulator will think you're about to hit it (which, if the side were the front view, you would). Correct as needed to keep the point of the base of the mountain at about center screen.
After the disk access, look right, left, and behind you. What happened to Loma Prieta?
Well, that'll teach you to toy around on the leading edge of things. But it's my fault, since I brought you here, so it's up to me to get you back to civilization.
Fly straight ahead while you count off or clock off a minimum of a full 30 seconds, then turn right until the tip of a metropolitan area appears on the right side of your screen. Your heading will be in the vicinity of 270 degrees.
Very shortly there'll be another disk access, Sierra Morena will appear where the edge of a metropolitan area was, and Highway 17 will slice across the terrain.
Don't take any side views yet! If you can see any of Loma Prieta in your front view, bank to the left and get away from it. Take my word for it, this is an extremely treacherous and unforgiving mountain.
Take a look on radar, and you'll see you did indeed get to the other side of Loma Prieta.
Turn right to a heading of 310 degrees, tune San Francisco VOR on 115.8, and set the OBS to the 310 radial.
You should find that the needle settles on or close to center, but, if not, keep the 310 setting and fly to center the OBI needle on that radial.
You can take looks out the right side and rear windows now and see the mountain you flew around. The simulator temporarily got lost, but you never did because you knew the mountain was there all the time, right?
Keep a regular check on your altitude. (You should be doing that as a matter of course, anyway.) There actually seem to be “mountain effects” in the skies around here, and perhaps there are.
Out the right front and side windows now you'll see San Jose from another angle. Try to spot the fairgrounds way over there, this side of Mt. Hamilton, and north of them the buildings of downtown San Jose.
I hope you begin to see the importance of familiarity with the area you're flying. From here, using just your eyes and what you already know, you could certainly fly in the general direction of San Jose Municipal Airport, couldn't you? If not, you'll soon be able to, from anywhere in the San Francisco Bay area.
It takes only a few landmarks to give you your relative bearings, but you have to know what and where those landmarks are. One reason STAR disks such as this one will be so great is that they give you the landmarks you need. In a regular Scenery Disk, you might see the metropolitan area, but without mountains, buildings, and county fairgrounds you'd be hard-pressed to know for sure if it was San Jose, let alone pinpoint a course to the airport.
Watch the massive Sierra Morena Mountain pass by on your left.
When your DME reads 20 nautical miles from San Francisco, subtract just 10 degrees from your heading and fly a 300-degree course toward the Pacific.
The highway stretching ahead of you is Interstate 280, and the other—on the San Francisco Bay side—is U.S. 101, which, as you know, leads to San Jose. Take some radar views to get an idea of your position in relation to Sierra Morena, Loma Prieta, San Francisco Bay, and Oakland.
Out the right side, see if you can pick out Palo Alto Airport and/or Dumbarton Bridge, which is just north of it. About five miles north of the bridge is San Carlos Airport, which should show up if you take a 45-degree view out the right side of the aircraft.
As you approach the Pacific, there'll be a disk access. Immediately take a view out the right front window and you'll see our destination airport, Half Moon Bay. Turn left to 255 degrees and you'll be on a downwind leg entry heading for Runway 12, on a left-hand pattern.
So far, so good. However I'm always suspicious of the geography on the fringe of these simulator sectional charts. Particularly where a liquid is involved, as, in this case, the Pacific Ocean. It remains to be seen whether we can fly our customary pattern and approach Runway 12 from the ocean side, which, of course, is the only possible way to approach it. However, the only way to find out is to do it.
The downwind number is, of course, 300 degrees, and our base leg will be 210 degrees, as I'm sure you've already figured. Continue to follow me as closely as you can. The following explanation is to give you a general idea of what I'm doing in the prototype.
I've put my carburetor heat on, and am transitioning into slowflight while descending at about 750 FPM. Elevation at Half Moon Bay is 67 feet, so I'm figuring a pattern altitude of about 1000 feet.
I'm getting level at 1000 feet, at pattern airspeed, and am now turning downwind, heading 300 degrees. I've got a 90-degree left view of the runway, and I'm a little closer than I'd like to be, but still I can see the strip. Opposite the threshold of Runway 12 I'm putting on 10 degrees of flaps.
As the runway leaves my view, I'm banking about 35 degrees left and also turning to the base leg, heading 210 degrees. Altitude as I'm turning is about 800 feet.
When the end of the runway (still using left side view) is just about to disappear offscreen, I'm switching to a 45-degree left view and there it is again, almost immediately, because I was in quite close on downwind. I'm banking and turning final.
I steepen my bank because I can see from the runway angle that I'm going beyond my optimum position. That's confirmed when I switch to an out-front view, so I continue my turn to improve my position.
My airspeed is good, and while I'm turning I put on all my flaps so I can steepen my descent. I steepen it with a couple of strokes of down elevator, and reduce my power with a couple of strokes, too.
The runway at Half Moon Bay is straight ahead, and my VSI reads 1000 FPM.
It's time to flatten my descent, using two quick notches of up elevator. My altitude is 100 feet—I quickly apply two more notches of up elevator. Now feeling her back…back…back, and finally, touchdown!
I never even saw the Pacific Ocean. You shouldn't have, either, because you should have been (as I'm sure you were) watching by turns your instruments and the threshold of Runway 12.
I wonder whether, if we'd been watching out front, the simulator would have done a mountain number on us again.
Table of Contents | Previous Chapter | Next Chapter