Flying Flight Simulator
Sky-High Adventure with the Macintosh, Amiga, & Atari ST
by Charles Gulick
Chapter 2
CALL A TAXI
If you're continuing from the previous page, you're still on the ramp at Greater Kankakee Airport, ready to start your engine and taxi. If not, boot your simulator and load the situation disk to which you saved RAMP IKK 22 /C in the last chapter. To load the situation disk, click on SITUATION in the menu bar, then click on LOAD RAM FROM DISK, and follow the screen instructions. When the load is completed, click on RECALL from the same menu (or in Amiga/Atari just press the R key), and then click in the box opposite the situation you want to recall—in this case RAMP IKK 22 /C.
Some aspects of situations are not saved. One of them is engine status. Thus, if you just booted, your engine will be running even though you shut it down when you saved RAMP IKK 22 /C. In that case, shut it down for a moment now. (The numeral 1 key is the magneto switch for shutdown.)
Each time you climb in the airplane there's a simple panel preflight checklist to go through:
True the DG: DG is short for directional gyro, the instrument second from the left on the bottom row of your panel. On the lower left edge of this instrument is a knob marked D. Place the mouse arrow over the knob and, watching the numbers in the instrument windows, click the mouse button once. The numbers change. The number in the top window now agrees with the magnetic compass heading, as you'll see if you check your compass (in the top row of instruments on the right side of your panel). This is what is meant by “trueing the DG.” The magnetic compass always gives the true magnetic heading of your aircraft, but when you turn in flight, it takes a while to settle down. The directional gyro, which needs no settling time, cannot reference the earth's magnetic field as does the magnetic compass. Because the DG references only its own internal gyroscope, you have to tell it frequently which way the aircraft is pointing, to compensate for instrument drift. Clicking on the D knob trues the DG to the magnetic compass heading. If you'll notice, your DG has already drifted a degree or so; you'll have to true it frequently in flight, particularly when you want to hold a precise heading. In ordinary flying, you can use the magnetic compass exclusively if you like, when you are assured that it has settled down, that is, as soon as it's no longer wavering between headings.
In flying, a “heading” is the magnetic compass direction in which the aircraft is pointed, in relation to an imaginary 360-degree compass rose with the aircraft positioned at the center of that rose. A heading is not necessarily the exact direction in which the aircraft is flying, because wind conditions may be (and often are) such that to move the airplane in a straight line in relation to the ground you have to “crab,” or fly somewhat sideways. The crabbing will result automatically as you correct your heading to fly toward a specific point on the horizon or to “track” (fly directly along) a VOR (Very high-frequency Omnidirectional Range) radial to a VOR station. You'll soon learn about that navigation boon.
True the Altimeter: The altimeter, which you've already met, also needs to be trued. Click on its knob (marked A) in the same way as you clicked on the D for the directional gyro. Trueing the altimeter calibrates it to the current barometric pressure. We'll true it about every half hour on an extended flight.
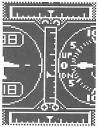
Check Op Neutral: This involves simply adjusting elevator trim to the position described earlier. In Amiga/Atari op neutral has the indicator directly opposite 0 on the VSI (only for visual reference; the VSI is in no way connected to elevator trim). Confirm op neutral by one press of down elevator (8 key). If the trim indicator drops a notch, you were at op neutral before the press, so press up elevator (2 key) once, reestablishing the desired trim. In the Mac, the indicator should be one notch above the mark which is opposite “DN” on the VSI (see detail). In this case, a notch is a “pop” of the indicator up or down to a new position.
As you fly and frequently save situations, you'll find you're saving them with op neutral trim already in place. But always check it anyway.
Carb Heat Off: The status of carburetor heat (the indicator is on the right side of your panel, in the bottom row, just left of the gear indicator) is very important. Before you begin a flight, carb heat should be off. This setting is not saved when you save a situation. If you put it on (as you will) to make a landing and then recall another flight situation, on the ground or in the air, the carb heat will still be on, and the resultant lower engine speed will materially affect your aircraft's performance. Before taxiing out for takeoff, be sure carb heat is turned off. On the other hand, you will save some flight situations in the air—a slowflight situation, for example—where you deliberately will have carb heat on. If you recall a situation of that kind, the carb heat may be on or off, depending on its setting in your previous flight. So, you'll need to know, before flying a new situation, which setting is appropriate. In any slowflight, airport approach, or landing situation, have the carb heat on. In cruise situations, it should be off. When you recall a situation and the plane does not perform as you'd expect, you'll likely find that the carb heat setting is the reason; so, correct it.
Zoom 1.00: Your zoom indicator is on the far right of your instrument panel, halfway down. Zoom should always be set to 1.00 when you're doing anything critical such as taking off, making a landing approach, performing special maneuvers, or stunting. Zoom 1.00 gives you the truest picture of what's happening.
Lights Off: This just reminds you to turn off your panel lights if it's daytime. We don't want the bulbs to burn unnecessarily. The lights indicator is at the bottom right of your panel, and, logically enough, the L key toggles your panel lights.
That's your preflight checklist. If you haven't already run through it, do it now so that you're ready to roll. Here's a recap of the list:
- True DG
- True altimeter
- Check op neutral
- Carb heat OFF
- Zoom 1.00
- Lights OFF
Start your engine (four presses of the 2 key).
When I refer to “notches” of throttle in what follows, I mean presses of the “increase” or “decrease” throttle keys (the 9 and 3 keys, respectively). Three notches is three presses. In the Mac you use the mouse, of course, but you can see and count the notches just as if you were pressing keys. Similarly, “put on” or “back off,” when referring to notches of throttle, means increase or decrease, respectively, so many notches. “Open” your throttle also means increase it so many notches. “Add some power” means, of course, increase your throttle setting to suit the situation, just as “take off some power” or “reduce power” means decrease it as required. “Cut” your throttle means back it off to zero.
With your right hand in the basic control yoke position or poised on the mouse, and with the first two fingers of your left hand on the rudder pedals (to steer the nosewheel), put on three notches of throttle to get the aircraft moving.
Practice steering left and right with the nosewheel as you taxi, to get the feel of it. On Amiga and Atari, remember that you straighten your nosewheel with the 5 key, the center key on the basic yoke.
Take the ramp that is a little to your right, and then turn right onto the main taxiway to parallel the runway. Back off your power a notch to slow down before the turn.
If you get fouled up, recall the RAMP IKK 22 /C situation (in Amiga/Atari, press A to get the RECALL list) and start out again, until you get it right.
As you taxi along the main stretch, parallel to Runway 4/22, try out your brakes. They'll stop you momentarily. Use more or less power to taxi at whatever speed feels comfortable to you. Practice steering with your nosewheel some more. Take a control tower view of yourself (C key) if you like, and then return to the spot plane view (S key).
Don't take the first left, or the second, which is Runway 16/34. Taxi all the way to the end, and then turn left and stop short of the next left, which accesses Runway 22. Cut your throttle and use your brakes.
Don't hesitate to practice the foregoing operation—taxiing from the ramp to the holding position for Runway 22—until you get reasonably good at it. The ability to taxi well is almost as important as the ability to fly well. It will give you great satisfaction to be able to handle the aircraft skillfully on the ground. And the rewards in terms of realism are considerable. Kankakee is one of the simulator's best airports for taxiing, and you may want to regard it as your “home” airport for the Chicago chart area.
As you practice, try using the out-front view (the T key) as well as the spot plane (S) view. Switch back and forth between them. Use whatever view gives you the best control, or use them in combination. The objective is to get a “feel” for how much nosewheel (rudder) pedal to use for a desired result and when to start your turns at a given groundspeed. You'll find that slowing down for sharp turns will correct matters if you're consistently overshooting.
When you feel satisfied that you're in a good position, stopped short of the final turn onto Runway 22, save the situation to RAM. (Press the T key so that you have the out-front cockpit view when you save.) Also save to disk if you plan to quit the simulation for now. Name the situation HLDNG IKK 22/C. There isn't room to spell out “HOLDING,” but the title describes the situation exactly. In aviation terminology you're “holding short of Runway 22.” IKK, again, is the airport code for Greater Kankakee.
Having saved this situation, you'll be in excellent position to practice takeoff preparation and the takeoff itself, without the need for taxiing out from your “tiedown” position on the IKK ramp.
Table of Contents | Previous Chapter | Next Chapter