Flying Flight Simulator
Sky-High Adventure with the Macintosh, Amiga, & Atari ST
by Charles Gulick
Chapter 3
TAKE IT OFF AND FLY IT
Because you did your preflight check before you started taxiing, your takeoff preparation for this flight consists merely of two operations: setting takeoff trim and putting on 10 degrees of flaps. Both operations are standard for all normal takeoffs.
In the Mac, set takeoff trim by slowly dragging the mouse back until the elevator trim indicator pops to the first mark above 0 VSI (see detail).
In Amiga/Atari (from op neutral), set takeoff trim with five quick presses followed by four slow presses of up elevator. In the Appendix B Flight Checklist, I use “qu,” “qd,” “su,” and “sd” to refer to quick and slow up and down presses of elevator. While we're flying. I refer to “quick ups,” “slow ups,” and so forth to mean the same thing. Phrases such as “quick presses” or “presses in quick succession” mean presses at less than half-second intervals. They don't have to be extremely rapid, but they should be as quick as is comfortable for you. Count them mentally as you apply them, and apply them as deliberately as you can count them (without slurring over them).
Trim for takeoff now if you haven't already. In Amiga/Atari, notice that your trim indicator has moved one long mark plus a short mark above operation neutral. (A “short mark” is only a pixel, and you probably can't see it unless you're using an RGB or other high-resolution monitor.) Take-off trim is important because it gets you airborne at a lower airspeed and, thus, sooner than if you take off without it.
Extend your flaps to the 10-degree position. The flaps give you some extra lift, which also helps you get airborne sooner.
And you're ready for takeoff!
Now, follow the procedure I describe as well as you can, and remember that you can recall your immediate situation and try again, or pause the simulation, as often as you like. Don't expect perfection. You'll be busy for the first minute or so, trying to remember which key is which and watching several instruments almost simultaneously. But, believe me, with a bit of practice you'll soon take off like a pro—every time.
With your right hand in the basic yoke position or poised on the mouse and with your left hand in position to operate the rudder pedals, open your throttle three notches and move ahead.
Turn onto the runway and steer to line up with the far end of it. Don't be in a rush; you have plenty of time. Don't worry about staying exactly on the centerline. Point for the far end of the strip, and then add about five notches of power. Steer with the rudder pedals as you pick up speed.
When you're satisfied that you are straight in relation to the runway, open your throttle all the way. Continue to steer with the rudder as needed.
As you pick up speed, keep glancing at your airspeed indicator. When the needle is between 60 and 80—pointing straight to the right—if flying the Mac, apply rotation pressure with a slight backward movement of the mouse, not enough to move the indicator; if flying Amiga/Atari, use two quick presses of up elevator.
When the runway begins to drop away and you know you're airborne, retract your gear (U key) and cancel the rotation pressure with two quick elevator downs or with a slight forward movement of the mouse. The trim should still read the same as it did for takeoff.
Wait a second or two, and then zero your flaps.
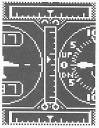
Watch the tachometer (rpm indication) on the right of your panel, and gradually back off your throttle until you have a reading, if flying Amiga/Atari, of 2100 rpm. If flying the Mac, decrease power until the throttle position indicator is even with the bottom of the frequency numbers in the NAV 1 radio compartment (see detail). (You'll be indicating about 1750 rpm, but that will change when you level off.)

Now, check your VSI. You want a vertical speed of 500 fpm. You get that by trimming down—not quickly, but with steady, slow, regular presses of the 8 key or, if you're using the mouse, with small increments of forward pressure.
As you trim, the needle moves down toward the 5 mark on the VSI. If it goes below the 5, you're trimming a bit too eagerly. Match your down-trimming to the VSI. When the needle moves above the 500 mark again, apply another notch of downtrim.
Judge your trimming to control the needle, answering its movements, but don't glue your eyes to the VSI. You've many notches to trim.
Check your altimeter, which is directly above the VSI. You want a cruise altitude of 2300 feet.
Continue to trim. Now, begin to check the elevator trim indicator. The objective is to trim to operational neutral while maintaining a 500-fpm climb rate. When you reach cruising altitude, 2300 feet, you'll reduce power to level off.

If your climb rate drops below 500 fpm and hangs there, don't trim up. Add a couple of notches of power, and you'll see the needle move up again. Continue to trim to hold the climb rate on or near 500 fpm.
You know how to confirm operational neutral, and you follow the same principle here. In the Mac, you want that point where the indicator pops down to join the top of the mark opposite “DN,” two marks below 0 VSI (see detail). In Amiga/Atari, if the needle is opposite 0 VSI, you need to downtrim until the needle drops below 0. Then you know where you are. Trim up one notch and stop trimming.

You'll be at 2300 feet when the altimeter's short needle is on the 2 and its long needle is on the 3. When you reach that altitude, whether you're at op neutral or not, reduce your power to a reading of 1950 rpm if flying Amiga/Atari. If flying the Mac, decrease power until the throttle position indicator is even with the bottom of the “N” in the NAV 2 compartment (see detail). (Such visual throttle position indications are more useful than rpms in the Mac because engine speed varies considerably with the aircraft's altitude.) In all versions, engine speed may fluctuate a bit until the aircraft is balanced, but it should settle at 1950 rpm in Amiga/Atari and 2000 rpm in the Mac.
When you're at or near an altitude of 2300 feet and your throttle is at 1950 rpm (Amiga/Atari) or 2000 rpm (Mac), your objective is to control the airplane so that it will fly straight and level. “Straight and level” is that configuration in which the aircraft is neither banked nor turning, the elevator is correctly trimmed (in the present case, to operational neutral), and the throttle is at a power setting that yields a zero reading on your VSI. If you are straight and level with op neutral elevator trim, your aircraft will fly at its optimum cruising airspeed; in the Cessna this is about 134 knots, with the airspeed needle approximately intersecting the “0” of the 140-knot mark.
When you are trimmed to op neutral, your throttle becomes your altitude control. Add a few notches of power if you are under your desired 2300-foot cruise altitude. If you are above it, reduce power a bit, and the aircraft will descend. When you're right on your desired altitude or within 20 feet of it (one mark on the altimeter), adjust power as required to stay there.
No single throttle setting invariably results in level flight. When I told you where to set your throttle earlier, I gave you an approximate setting, or, actually, a preliminary setting. As you fly, you may find that straight and level requires a power increase or decrease. That's all right. If you're not climbing or descending significantly, the throttle setting is the correct cruise setting for your altitude and your heading, in this particular season and weather, in this particular part of the world, and on this specific day. At a higher altitude, you'd need higher power. At lower altitudes, you'd be straight and level with a lower power setting. Tomorrow, you may need more or less power even if you duplicate this exact flight pattern. Instead of exact throttle-setting references, you fly with an exact elevator trim reference—op neutral. Then you use power to get the result you want. Whether you're flying straight and level, climbing, or descending, your throttle is your altitude control.
Now you're going to do a 180 and head back to IKK. “Doing a 180” means turning the aircraft 180 degrees and heading in the opposite direction.
Your magnetic compass probably reads within a few degrees of 218 now if you were fairly well lined up with the Kankakee runway on takeoff. Whatever it reads, you're going to turn left to a heading of “zero three eight” degrees. In ordinary English, that's 38 degrees, of course. Pilots use the long form when stating headings—to be exact and to be sure we're understood, for instance, when we communicate with a tower. So get used to saying “zero three eight” or “two four five” when you read 038 or 245 in this book.
You remember about aileron pressures and neutralizing to bank and turn the airplane from our earlier discussion.
One technique I haven't covered in regard to turns: Apply a notch or two of back pressure on the elevator as you turn (one or two slow key presses or a slight backward movement on the mouse, not enough to show on the elevator gauge). This prevents loss of altitude that would otherwise result. Use whatever pressure is required to hold your altitude; the steeper you turn, the more pressure you need.
Start a left turn now, with a little back pressure and some left aileron. Then, neutralize when the horizon splits your screen diagonally.
As you turn, the bank will tend to become shallow, because the plane wants to right itself. Respond by adding a little aileron pressure, which forces the wings to stay banked to the degree you want. Then neutralize.
Keep an eye on your magnetic compass. Remember that you're looking for a heading of 038 degrees.
This is a very shallow bank and thus a slow turn. Later, you'll learn to bank more steeply. For now, you're honing your precision. You have (I hope!) the aircraft completely under control, making it do exactly what you want in the manner you want. That's precision flying, and it's time to applaud yourself on your progress.
When the magnetic compass reads 050, apply right aileron pressure to roll out of the turn. Neutralize when the horizon is straight.
Now, let off the back pressure you used to hold your altitude in the turn. In this case we are talking about pressure, not trim. In an actual aircraft, you would have applied a little back pressure to the yoke as you turned and then relaxed it when you rolled out. So you're duplicating what really occurs. With regard to trim, you will return to op neutral if you take off as much pressure as you applied at the start of the turn.
Your compass probably reads below 038 degrees now, which is fine. I want to show you how to use rudder—and rudder only—to make minor heading changes in flight. If you were using auto-coordination, you'd have to bank the airplane to add or subtract even a degree or so to your heading. With rudder control independent of aileron, you simply yaw the nose around a bit. Rudder alone does the job beautifully.
Use a little rudder now to put the nose on the number you want, 038 degrees. When the compass shows that you're on that heading, neutralize. (If you're flying keypad yoke on the Amiga/Atari, neutralize with the 5 key; if you're flying the Macintosh, apply as many notches of opposite rudder as you used to institute the heading adjustment.)
Isn't that neat? And think how useful rudder will be when you're on a landing approach: You won't need to bank to have fine control over your direction.
You are now headed back toward Greater Kankakee Airport. I'll show you how to point your aircraft exactly to that “home” airport and how to find out exactly how far away you are moment by moment.
Pause temporarily (P key) for a few instructions. I don't want you getting to IKK too quickly.
To the right of the center of your instrument panel (in the Mac, at the center of the panel) are two almost identical instruments, one above the other. Each has a knob labeled V on its lower left edge. These are your Omni-Bearing Indicators, or OBIs. Their only difference is that the top one, OBI 1, has a glideslope feature, used when making an ILS (Instrument Landing System) approach. OBI 1 is associated with your NAV 1 radio, and OBI 2 with your NAV 2 radio.
The NAV radios are equipped to tune in and identify VOR stations. These stations assist pilots from one end of the country to the other. VOR stations transmit magnetic course signals, known as “radials,” in every direction—360 such signals in all. These radials emanate for many miles, like the spokes of a giant wheel. And they converge, of course, like the spokes of a wheel, at the hub: the VOR station from which they are radiating.
When you tune your NAV 1 or NAV 2 radio to a VOR station, you can use the OBI associated with that NAV to identify which radials of the particular VOR station you are currently on or crossing.
You'll do that now.
First, tune NAV 1 to the VOR station that (fortunately at our stage of instruction) is situated on our home airport, Greater Kankakee. It's called the Kankakee VOR. To tune it, you have to know its frequency, which you can find in the appropriate box on your chart. I'll give you the frequency this time so that you can concentrate on what you're doing. It's 111.60.
Tune the NAV radios the same way you tuned the COM radio when you checked on the weather at IKK. Use the mouse on the first or third digits for the numbers left of the decimal point and on the first or second digits for the fractional frequencies to the right of the decimal point.
Tune NAV 1 to the Kankakee VOR frequency.
You probably noted some action in the OBI 1 instrument. You'll now use the OBS (for Omni-Bearing Selector, the knob labeled V on the OBI) to find out on what radial to the Kankakee VOR station you are currently flying.
The number in the top window of the OBI (you're using OBI 1, remember) indicates magnetic courses to the VOR station. There are, as I mentioned, 360 of them, reading 000 through 359. By clicking on the left edge of the V on the knob, you access lower numbers; by clicking on the right edge, higher numbers. Your objective is to center the vertical needle with a TO reading on the OBI dial. In the Mac version, the OBS reads out only the even radials, so if you can't center the needle exactly you'll know the correct radial is the odd-numbered one in between.
To familiarize yourself with the OBS, click on either side of the V and run through the entire cycle. If you hold down the mouse button for a few seconds, the numbers go by quickly. The needle will never disappear, but it will “pin” to one side or the other and then start back toward center. The reading will cycle through TO, OFF, FROM, and OFF and then back to TO again. While it's reading TO and starting to move toward the center, release the button and then click slowly to bring the indicator needle to the exact center of the instrument. When it's centered, the top window reads out the radial you are on at the moment. The bottom window reads out the reciprocal, or 180-degree opposite, radial.
Note your compass heading. Does your magnetic heading agree with the radial you're on? Almost invariably, it won't. What you want to do now is get on—and stay on—the radial indicated in the top window of the OBI. You'll do that by turning to the compass heading that agrees with the radial readout. That radial will take you straight to IKK. Say, for example, your present magnetic heading, as read on your compass, is 038. And the radial readout from Kankakee VOR, with the OBI needle centered, is 033. Immediately after you unpause, you'll start a turn to a heading of 033, to “fly the radial.”
If you're only a few degrees off, as in the example above, use your rudder to yaw the nose around. If you're far off, use a regular aileron turn to get on the heading you want. Either way, don't use the numbers in my example; use the numbers on your instrument panel. You're flying the airplane, not me.
One more bit of advice: When considering the quickest way to get on the new heading you want, you'll usually turn right to get to a higher number, left to get to a lower number. If you're heading 038, as in the example above, you'll turn (or yaw, if you use the rudder) left to 033.
Unpause now, and get on the indicated radial to IKK.
When you're on it, pause the simulation and save your situation to RAM. Use the title VOR TO IKK 22/C. This is an economic way of saying that the situation has you “on a VOR radial inbound to IKK for a landing on Runway 22.”
If you're continuing, go to the next chapter. If not, save RAM to disk as before. We'll come back to precisely this point in the next chapter, whenever you're ready.
Table of Contents | Previous Chapter | Next Chapter