Flying Flight Simulator
Sky-High Adventure with the Macintosh, Amiga, & Atari ST
by Charles Gulick
Chapter 4
ON THE MONEY
I mentioned earlier that some parameters are not saved when you save a situation to RAM or save RAM to disk. The fact that your engine is shut off isn't saved—nor is your carb heat setting. In addition, the program doesn't remember to which frequencies you set your NAVs or your COM radio or which radial you cranked in on your OBI.
Thus, when you recall a situation such as the present one, where you are en route to a destination, you have to check—before you start flying—that carb heat is on or off, as applicable. You must also retune your radios and select your OBI course again.
If you've just booted, recall the situation titled VOR TO IKK 22/C, and then retune your COM radio to the Kankakee tower frequency, 123.00. While the tower message is on screen, note that the wind direction and velocity were, happily, part of the save.
Next, retune NAV 1 to 111.60, and then adjust the selector knob (V) on OBI 1 to center the needle. I have no way of knowing which radial appears in your OBI window now that the needle is centered. It is likely to be somewhere in the low 30s. Normally, you'd go ahead and fly whatever radial is indicated. But for this instruction, adjust the selector knob for a reading of 033 in the upper display of the OBI.
If you weren't already on 033, the needle moves away from center to the left or right.
Finally, check that carb heat is off.
Ideally, you should now be in the same configuration that you were in at the end of the last chapter, but this isn't always the case. The simulator often does strange things with altitude when you recall a situation. When I saved my own VOR TO IKK 22/C last night, my altitude was about 2280 feet. When I rebooted this morning, my altitude was 1500 feet. The moral is: Check your altitude as well as other critical parameters when you recall an in-flight situation, and correct any simulator errors that you discover. Otherwise, the aircraft will not perform as you expect. In fact, you can often trace oddities of performance to such conditions as carb heat or altitude. When carb heat is on—as it is in slow-flight and on landing approaches—engine rpm is significantly lower than when the heat is off. So, for example, if you make a landing (carb heat on) and then switch to a previously saved in-flight situation where you were straight and level at about 3500 feet and at cruising airspeed, you'll find yourself in an inappropriate descent, and the whole flight will go awry. The cure for such a situation is to pause, recall the situation, turn off the carb heat, and then start flying again.
To correct simulator altitude errors, you have to open the NAV window. Follow along now, whether or not your altitude is about where it should be (2300 feet), so that you'll learn how to correct these errors when you need to.
Click on NAV in the menu bar, and then highlight and click on POSITION SET…to open the window of the same name. Now, click on the box next to ALT under AIRCRAFT, type 2300.0000, and press RETURN. While you're in this window, check ALT under TOWER. You may recall setting this to 660.0000 before you were on the ramp at IKK. This morning my reading is 42.8736, so the tower must have crumbled and fallen in a heap overnight. If your tower ALT is wrong, reset it to 660.0000, and then press RETURN. If the ALT figures now look okay, close the window.
Before you unpause and start flying VOR TO IKK, read through this short discussion:
In the present situation, you are flying on R033 (or radial 033) toward the VOR station at Greater Kankakee Airport. You are going to do what we call “fly the needle.” Flying the needle means keeping the OBI needle centered on, in this case, your OBI 1. The center of the instrument, where the little circle is, represents your Cessna 182. The needle represents R033, because you selected that radial. You can read out the radial you selected on the window at the top of the OBI. It reads 033. Flying the needle also means, specifically, turning toward the needle when it is off center. If the needle drifts to the right of center, turn or yaw (use the rudder to rotate the aircraft's nose) to the right and fly until the needle moves to center again. Conversely, if the needle drifts to the left, turn or yaw left to center it. The needle itself does not move—that is, the radial represented by the needle doesn't move. You fly toward the radial, get to its center, and then correct again to fly straight along it, as if along a wheel spoke toward the hub.
Unpause now and start flying the needle.
When the needle stays at center, naturally, you merely fly—no turning or yawing needed. (Using rudder to yaw the aircraft is the best way to make minor heading corrections. Once you're on R033, rudder should be all you need to stay on it.)
Don't fix your eyes on the OBI needle. Don't fix your eyes on anything as you fly. Instead, scan your primary instruments on the left side of your panel.
Your airspeed indicator will read about 133 KIAS (the needle covering the 0 of the 140 marking), which is the best all-around cruising speed for your present altitude.
In the Amiga version, the artificial horizon to the right of the altimeter tells you very little unless its craziness has been corrected by the time you read this. The indicator is missing not only markings, but the whole point of an artificial horizon, which is to provide a synthetic horizon that exactly depicts your aircraft's attitude in relation to the real horizon.
Your altimeter should read about 2300. If not, correct it by changing your power setting.
The VSI, directly below the altimeter, should show a zero rate of climb unless you're in the process of correcting altitude.
True the directional gyro, which is left of the VSI, so that it agrees with your compass reading.
The turn-and-bank indicator, left of the DG, will show no bank unless you're using aileron to correct your heading.
Check the OBI again to track radial 033. How are you doing?
You should scan the instruments in the order described above. Begin with the airspeed indicator, work right to the altimeter, drop down to the VSI, and then work left to the turn coordinator.
Scan the world outside the aircraft too. You'll be watching for IKK to show up somewhere out there. How far out there? The answer to that is on your instrument panel too. Find the DME (or Distance Measuring Equipment) reading on the right side of your panel. When you're tuned to a VOR station, as you are now tuned to Kankakee VOR, the DME tells you how far you are from that station in nautical miles (nm). Isn't that handy?
If all's well, you'll see (except on the monochrome Mac) blue on the landscape ahead. That's the Kankakee River.
When your DME shows that you are 8 nm from Kankakee, pause the simulation. If you're already closer in than that, pause anyway.
IKK should be approximately straight ahead of you and visible on your screen. It's to the right of the highway, Interstate 57, and on this side of the river.
I'll show you a little trick for spotting runways at a distance, while they're still not too well defined on the screen. Set the zoom factor to 2.00. It's like using binoculars. Now, you can see that the black shape on the horizon couldn't be anything but an airport. You can even make out the taxiways between the strips (runways).
Reset the zoom factor to 1.00.
As soon as you have your destination airport in sight, make the transition from cruise configuration to slowflight configuration. You want to slow down the aircraft—in the Cessna from 133 knots to about 100 knots. At slower airspeed you—and the folks in the tower—can better cope with traffic conditions, and you'll have more time to think and get into position for landing.
First, apply carburetor heat. Normally you'd be flying when you do it, but go ahead and do it now. Remember, the carb heat toggle switch is the I key. The I stands for ice. You apply heat to the carburetor to prevent it from forming ice when you reduce power. Carburetor icing, believe it or not, is more likely on a nice warm summer day than on a cold, dry day in midwinter.
Unpause and resume the flight now, and I'll talk you through the rest of the procedure.
With carb heat on, your engine rpm will drop, and you'll hear the difference in engine sound.

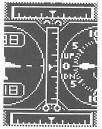
If you're flying the Mac, back off your throttle until the throttle position indicator is opposite the center of the NAV 2 compartment, between the bottom of the “N” in “NAV” and the tops of the frequency numbers (see detail). In Amiga/Atari, set the throttle so that the indicator is approximately opposite the bottom of the frequency numbers in the NAV 2 compartment. I can't give you an rpm value for these positions because engine speed takes a while to settle down, and you have other work to do right now.
Now, start trimming up to counteract the aircraft's descent. It starts to descend, naturally, as a result of the carb heat and the lower throttle setting.
Throughout the transition to slowflight, try to reach and maintain a zero reading on your VSI. Trim up regularly but slowly to match the movements of the VSI needle.
As you trim up, the airspeed drops. In the Cessna, you want a slowflight airspeed of about 100 knots. (In the Lear, airspeeds in all configurations are different from Cessna speeds.)
Now, here's the neat part. You have a slowflight neutral trim for operations at slowflight speeds, just as you have an op neutral trim for operations at cruise speeds.
You no doubt remember that with op neutral trim in Amiga/Atari the indicator is directly opposite 0 VSI, and in the Mac the indicator adjoins the top of the line opposite the VSI “DN” indication. You reach slowflight neutral trim in Amiga/Atari when the indicator is at the first mark above op neutral and in the Mac when the indicator is one notch below 0 VSI (see detail). (You will see a hairline between the needle and the 0 VSI mark; they won't be joined.) In the Mac, to pinpoint the setting exactly, you must make micro adjustments of back pressure to keep your vertical speed at 0 and your airspeed at 100 to 105 knots. In all versions, when you're at slowflight neutral, adjust power as necessary to maintain 0 VSI at approximately 100 KIAS.
You'll fly on beyond the airport for the present, so don't worry about passing over it.
You probably lost or gained some altitude while you were making the transition to slowflight. That's perfectly normal until you've had considerable practice. Now, I want you to get to an altitude of 2000 feet and, when you get there, to fly straight and level at your slowflight airspeed.
Leave your elevator trim where it is. Remember that your throttle is your altitude control. Use throttle—and throttle only—to climb or descend, whichever is necessary, to an altitude of 2000 feet. When climbing or descending, try to maintain a VSI rate of about 500 feet per minute. Careful throttle control will let you keep this rate and also resume level flight when you get to the target altitude. When you are at 2000 feet, maintain your altitude and present heading until your DME reads 10 nm from Kankakee. Then pause the simulation and come back to this text.
Did you notice that, whether you were climbing or descending, your airspeed stayed virtually the same—100 knots? That's one of the beauties of slowflight trim, as it is of op neutral trim. You can climb, fly straight and level, or descend—all at a constant airspeed.
Normally you wouldn't fly so far beyond an airport where you intended to land, but I had you do it to buy some time. The time we have now will let me “talk you down” to, I hope, your first precision landing.
When you unpause, you're going to turn approximately 180 degrees to the right, much as you did earlier. But this time you'll use a standard 20-degree bank.
Look at your turn-and-bank indicator now, on the bottom left of the panel. Note the L and R, for Left and Right, and the marks above the letters. In a turn, when the aircraft icon's wings are banked so that one wing touches the mark indicating L or R, you are in a 20-degree bank. In the turn you're about to do, the right wing of the aircraft icon will barely touch the mark. You'll hold it there, as before, using right aileron and neutralizing as required. With this bank, you'll be doing a “standard-rate two-minute turn.” This means, at least theoretically, that you will turn 360 degrees in two minutes. Thus, you'll complete your approximate 180 in about one minute.
The key point to remember is that I want you to roll out on a compass heading of 218 degrees.
Unpause now, use a bit of back pressure to help maintain your altitude, and start your 180-degree turn to the right, applying a small amount of right aileron. Neutralize when you've established a 20-degree bank. If necessary, use additional aileron to hold that bank.
Watch your DG. When it reads 200 degrees, start rolling out of the turn with a little opposite (left) aileron pressure. When you are level with the horizon, neutralize your ailerons. Take off the back pressure you applied before the turn, and then correct as needed to get a compass reading of exactly 218 degrees.
When you are heading 218 degrees, pause the simulation for a moment.
So that we are on the same wavelength, I want you to set some parameters. Obviously, I can't know how well you executed your standard-rate turn or exactly where in Illinois you may be at the moment. But now that you're heading in the right direction, I can put you exactly where I want you.
Click on NAV in the menu bar and select POSITION SET. Put the aircraft at NORTH 16898.257, EAST 16636.1980, and ALT 2000.0000; then, close the window.
Press Q and save this situation to RAM as INBND IKK 22/C, meaning “inbound for IKK, Runway 22, in Cessna.” If you're going to quit, save RAM to disk also, but I hope you don't quit now. Much excitement is ahead.
Unpause and take over.
You're nicely lined up for a long final approach to IKK's Runway 22 from about ten miles out. Hold the heading of 218 degrees. You are, of course, in slowflight. Presently the airport will take shape on your screen. You can zoom in for a closer look, but don't use the zoom view as an accurate guide to runway alignment. Stay on your present heading until you're close enough to see the runway more clearly. Then, you can decide on the best approach.
(If you recalled this situation after a boot or after flying another situation, pause and tune NAV 1 to 111.6 if it isn't already on that frequency. This will give you a DME reading of your distance from the airport.)
When your DME reads 8 nm, gradually back off your power so that you descend at the rate of about 300 fpm. The rate may vary a bit as you descend, but that's okay. Your airspeed will remain constant at about 100 KIAS.
“Pattern altitude”—the altitude at which propeller-driven aircraft such as your Cessna are expected to enter the immediate environment of an airport—is nominally 800 to 1000 feet AGL. Because the field elevation at IKK is 625 feet, pattern altitude should read between 1425 and 1625 feet on the altimeter. We'll regard it as 1600 feet.
However, you're “on final,” which means that you're directly inbound to the active runway, intending to land. So, you'll need to be at the altitude that best lines you up for the runway threshold (the near end of the runway) as you enter the pattern. That altitude depends on how you execute the approach.
When your DME reads 2 nm (as you cross the Kankakee River), increase your throttle setting four or five notches and drop your landing gear (U key).
After a second or two, put on 10 degrees of flaps.
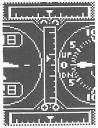
If you're flying the Amiga or the Atari, as the VSI swings down, apply two quick notches of elevator uptrim. Again, as the VSI swings down, apply two more quick notches of uptrim. A third time, as the VSI starts down, apply two quick notches of uptrim—for a series of three in all. If you're flying the Macintosh, slowly drag the mouse backward until the elevator trim indicator reaches the first mark above 0 VSI and then pops up one more notch (see detail).
Immediately pause the simulation for a moment.
The elevator position you established is the third and last of the “neutral” trims. We'll call it “approach neutral.”
Note the position of the trim indicator. Approach neutral trim is the highest trim position and results in the lowest airspeed you've encountered so far. When you start flying again, try to maintain your optimum approach airspeed, which is 70 KIAS. If power changes won't do the job, don't hesitate to change your approach neutral trim a bit. Airspeed is now the critical factor, and your elevator is your primary airspeed control.
When you unpause the simulation, you're going to add the rest of your flaps, so I'll describe how that's done.
You currently have your flaps extended 10 degrees. The three additional flap positions, as you already know, are 20, 30, and 40 degrees. Because additional flaps increase lift temporarily, compensate for that lift by applying forward elevator pressure before each additional flap extension. (This is virtually the only time you'll actually simulate forward pressure on the yoke.) Precede each additional 10 degrees of flaps with, in the Mac, a slight forward movement of the mouse or, in Amiga/Atari, two quick notches of forward pressure (8 key). Remember that the key for extending flaps is the ] (right bracket) key. So, to add the rest of your flaps, follow this routine: Apply forward pressure and immediately extend flaps to 20 degrees. Repeat the step but extend flaps to 30 degrees. Repeat once more with flaps extended to 40 degrees. What you're actually doing is trimming back to slowflight neutral, or close to it. But again, the key is to maintain an airspeed of approximately 70 KIAS, so adjust trim and/or power accordingly.
While you're still paused, click on VIEW, and then highlight and click on SET SPOT PLANE. When that window opens, click on the box off your right wing, and then set SPOT ALTITUDE to 0, using the arrows opposite that parameter. Close the window.
Before you unpause, save your present situation with the title FINAL IKK 22/C. This reminds you that you are in the late stages of your final approach to IKK's Runway 22.
All that remains is to apply full flaps as described above, improve your alignment with the runway (using rudder only, no aileron), and land the airplane. I'll talk you through the later stages.
I had you save this situation, immediately prior to extending full flaps, so that you can practice both the flaps procedure and the landing as often as you like. Landing is the most challenging undertaking in the simulator, and no two landings are alike. But the present situation will give you a feel for it and help you to sharpen your skills.
Unpause when you're familiar with the flap procedure, and go ahead with it.
Your rate of descent will go to above 1000 fpm.
Begin to improve your alignment, using rudder only. The runway is the rightmost of the two black lines you see in front of you.
As the runway threshold becomes three-dimensional, it will start to drift downward from the center of your windshield. When this happens, reduce power as required to keep it apparently motionless below the windshield's approximate center. The threshold should not be moving, but enlarging, as you approach it.
When your altimeter reads about 700 feet (75 feet AGL), flatten your approach a bit with two quick notches of back pressure (or, on the Macintosh, a slight mouse movement).
Continue to gradually but deliberately reduce power.
Use rudder as necessary to improve your alignment.
As you cross the threshold, or a few feet above touchdown, apply two more quick notches of back pressure. Then continue to apply steady back pressure one notch at a time. (Move the mouse very slowly and slightly back.) Try to keep the airplane flying a foot or so above the runway as long as possible.
If you bounce when the tires hit, wait for the aircraft to settle again, and try a tiny bit of back pressure.
If you get a stall warning, apply a notch or two of forward pressure.
As soon as you are on the ground to stay, cut your throttle and allow the aircraft to slow down.
At the first taxiway, turn off the runway to make room for pilots who may be taking off or landing behind you.
I urge you to practice your FINAL IKK 22 approach a number of times. Strive to make each transition in the approach and landing as smooth as possible. If you consistently undershoot the threshold, start to reduce power a bit later the next time. If you're well beyond the runway when you touch down, start reducing power earlier or do it faster.
And when you make a good landing, play it back with INSTANT REPLAY. To do so, don't pause once you've definitely landed and are slowing down. Click on SITUATION in the menu bar, and then highlight and click on INSTANT REPLAY. The simulation will pause by itself. Next, click on the box opposite SECONDS OF REPLAY TO SHOW, type the maximum seconds, and press RETURN.
While your approach and landing are being replayed, take the spot plane view. The side view you set up when you saved the situation is the best for judging how you did. Note the attitude of the aircraft in the early stages of descent, and watch for the point at which you flattened your approach. Most important of all, watch to see how well you flared. (The “flare” is the pitching up of the nose right before touchdown so that the aircraft lands on its main wheels, with the nosewheel not impacting the runway.) When the plane is immediately above the runway, you should see it level and then pitch slightly nose high, and “hang” above the pavement briefly, virtually stalling when it finally settles on the runway.
You can replay the landing as many times as you like if the previous replay is paused. Try taking the control tower (C) view on one replay, using the zoom view to watch yourself at various ranges.
Remember that if you recall this situation later your altitude may be incorrect at the outset, because of the simulator altitude discrepancies I discussed earlier. So, it's a good idea to record in a “situation notebook” critical factors such as approach altitude or to note them on your situation disk label so that you can restore the correct values. Otherwise, you'll be trying to improve your procedures under a flawed set of circumstances.
My own altitude at the outset of FINAL IKK 22 /C, incidentally, was 1500 feet; your altitude can be quite different. Your distance from the threshold, depending on how quickly you paused after dropping your gear and the first 10 degrees of flaps, could be considerably different from mine. You'll need to land many times, at IKK and other airports, before you'll be really skilled at it. The specific distances and altitudes described for this approach were merely to give you a general idea of the procedure—the best I could do from where I'm sitting. In actual practice, you will need to handle every landing somewhat differently. You'll be correcting moment to moment for your immediate situation. You'll depart from “standard” procedure often to suit situations. Practice, and only practice, will make you proficient at landing. And, no amount of practice will ever make any landing routine. That's part of the fun and the challenge.
Table of Contents | Previous Chapter | Next Chapter